

Embedding beautiful models is always a fascinating method for promotion and welcomed by the website developers. Modelo provides the easiest method to help you embed your Sketchup, Rhino, Revit, 3ds Max, and other models into your websites. In order to fulfill different kinds of embedding situations, there are many Modelo embedding options.

Let’s look at each of the elements in the image above individually:
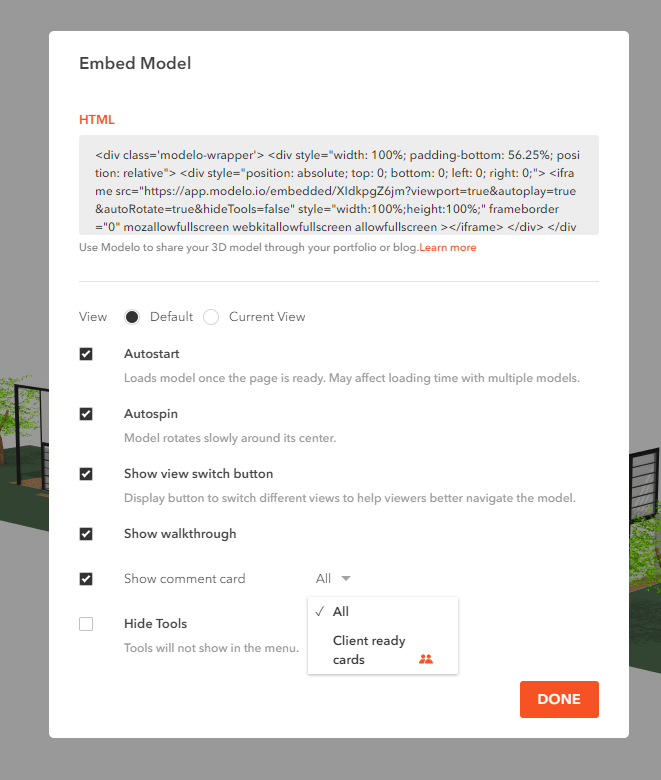
- Embed code: This is the text you will copy and paste into your blog or website’s HTML. Click the text once to select it, copy it, then paste it into your site. (We’ve included some helpful links to iframe how-to for some of the most popular blogging sites below)
- Size: This sets the size of the embedded model. The default is 640 x 360 – experiment with this to find the best fit for your purposes and the format of your website’s content. Pro-tip: you can adjust the width to 100% in order to have an adaptive window.
- View: Default / Current View allows you to set the angle or perspective of the model when it loads on your site. Selecting Default will display the model in your embedded viewer as you see it when you first open it in Modelo. If you have a particular angle you want the model to be displayed at when it loads, cancel the Embed, rotate the model to your preferred position, and then select Embed and toggle to “Current View”
- Autostart: Automatically loads the model on your site so that a user can immediately begin it. Keeping Autostart turned off will display a preview of your model with a Play button superimposed on top. If you are planning to embed a number of models on a single page, you should consider keeping Autostart turned off, otherwise, the load times could slow down significantly.
- Autospin: The embedded model rotates slowly around the center when the model starts to display. If you drag to view the model, the autospin will pause a few seconds. Then it will continue when the users stop operating.
- Show view switch button: In the top right corner, a small cube is displayed. Hovering over this cube pops out three different perspective views that allow your visitors to quickly change angles of view between: Top/Bottom, Front/Back, Left/Right and Default.
- Show comment card: 3D comment card is another powerful feature of Modelo, you could use them to organize and showcase different design options, layer configurations, camera angles, as well as annotating in 3D.
- Show walkthrough: You could easily create a walkthrough in Modelo interface, so when your website’s visitors see the model, they could simply click the play button to experience your 3D space like they are in it. The walkthrough option will only show when the ” Show comment card ” is clicked.
- Hide Tools: When clicked this option, the toolbox will not show in the embedded models. Pro tips: if you don’t want customers to see the dimensions and the model inside. You prefer to check this box.
After setting these correct embedding options, Modelo will generate embedding iframe code. Then you can copy and paste this code into your blog, portfolio, and any other HTML websites to embed your beautiful models.