Today, we will share several exquisite commercial facility models from Modelo 3D Community. We hope you can find commercial design inspiration from these models and enrich your design works.
If you would like to participate in one of our display series, don’t hesitate to contact me at hi@modelo.io. We will present your works to all Modelo users.
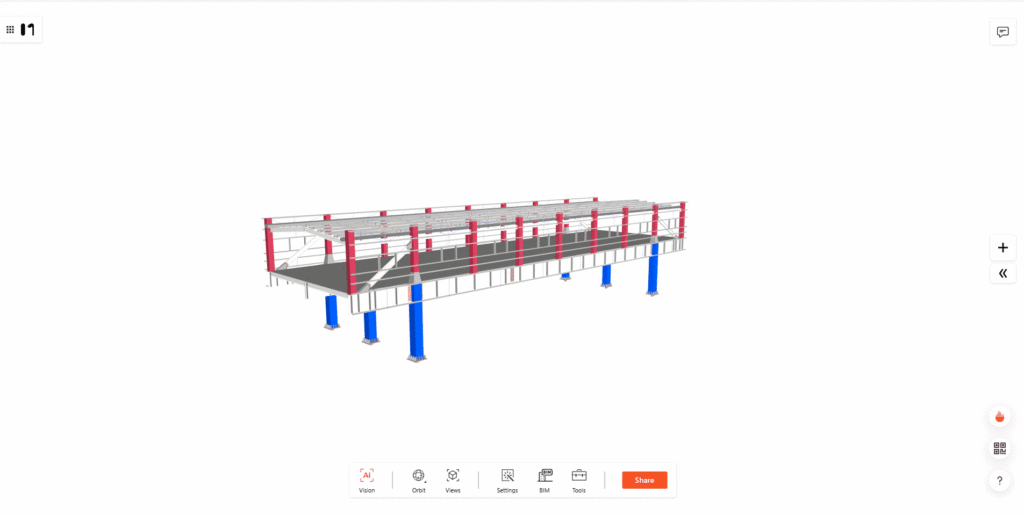
In the bustling realm of steel structural design, where precision and collaboration dance hand in hand, picture this scene: A seasoned steel structural designer immersed in the intricate world of Tekla, meticulously crafting a vision of architectural excellence. His canvas? The robust modeling software, his medium? The very fabric of steel. But what sets this maestro apart is not just his skill but the seamless symphony of efficiency orchestrated by Modelo.
Meet Alex, our virtuoso designer, navigating the complexities of steel design with Tekla. As he puts the finishing touches on his masterpiece, a remarkable steel structure, he realizes the pivotal moment has arrived to share this intricate creation with the world – from BIM to reality. And what better way to do so than with Modelo?
To see Modelo’s collaborative 3D BIM software tool in action, take a moment to check out the overview video below:
With a few swift clicks, Alex effortlessly exports his Tekla masterpiece into the universally understood IFC format. The file, a digital embodiment of his creativity and precision, now takes center stage on Modelo’s collaborative platform. As he uploads the IFC file, the magic unfolds.
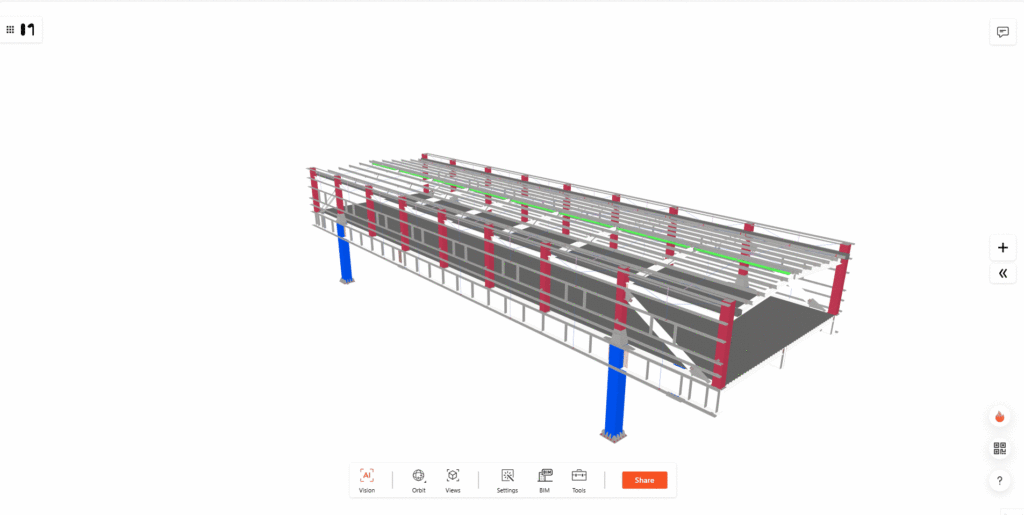
Modelo transforms the traditional viewing experience into an immersive journey through the heart of the steel structure. Alex, now equipped with the power of Modelo, seamlessly navigates through the BIM information, unraveling layers of detail with unprecedented ease. Every beam, every joint, every nuance of his design comes to life, not just on his screen but in the very essence of Modelo’s interactive interface.
However, the true crescendo of efficiency arises when Alex decides to share this living, breathing BIM masterpiece with the unsung heroes of construction – the on-site warriors bringing dreams into reality. With Modelo’s collaborative prowess, he effortlessly extends an invitation to the construction team, granting them access to the intricacies of the project in real-time.
The construction site becomes a theater of collaboration as Modelo breaks down the barriers between the design desk and the field. On-site workers, armed with tablets and smartphones, seamlessly access the shared model, enriched with BIM information. This dynamic exchange not only propels efficiency but transforms the very essence of communication on the construction site.
Modelo supports your complete design-build-manage process by with a robust, collaborative online BIM tool. Modelo automatically imports BIM properties and elements from compatible Revit files. By predictably, productively and profitably connecting workflows, utilizing BIM in Modelo permits team members to more completely navigate models, conduct lightning fast 3D quantity takeoff calculations and analyze sectional material volumes, mark-up the design with their comments, and digitize their construction sites and processes – all in an online tool accessible from any device.
Collaborating on Building Information Modeling projects is made easy in Modelo. The online 3D BIM tool allows users to quickly calculate the volume of materials required, construction costs, or any other number of construction-related calculations. These estimates can then be recorded and shared through Modelo and any construction issues that are foreseen in the design can be marked up directly on the design in the browser and addressed prior to construction beginning.
Are you tired of being overwhelmed by the constant demand for multiple design options from your clients? Do you find yourself wavering between different alternatives, unsure which one will truly capture their vision? Are you spending countless hours constructing models and rendering drawings just to compare different design possibilities?
If these challenges sound all too familiar, then we have excellent news for you. With our advanced AI Vision tool, we have unlocked a world of possibilities for streamlined design comparisons for those who are dealing with those situations.
Join us on this transformative journey as we explore how AI is enhancing efficiency, expanding creative potential, and ultimately enabling design professionals to deliver exceptional results. Get ready to unleash your design genius like never before!
How does the magic work?
With just 3 simple steps, you can effortlessly complete multi-option comparisons using our newly updated AI Vision tool.
Step 1: Experience consistent AI vision that adapts to changing angles.
You can effortlessly navigate and rotate the perspective within the model, empowering you to explore designs from every angle with our AI-powered Tool.
Gain exclusive access to our cutting-edge platform and immerse yourself in a world of limitless possibilities.
Step 2: Experience enhanced AI algorithm for reference images.
Witness the transformative capabilities of our upgraded algorithm as it brings your desired content to life with unprecedented fidelity. Prepare to be amazed by the remarkable accuracy and exceptional quality of the generated images. By leveraging advanced techniques, you can now achieve even better results that closely align with the desired content depicted in the reference image
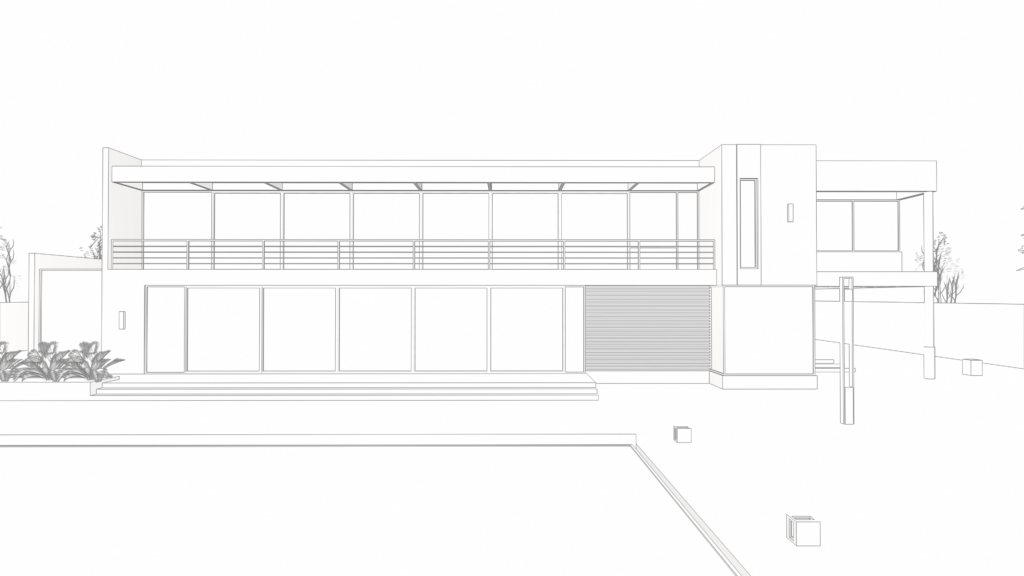
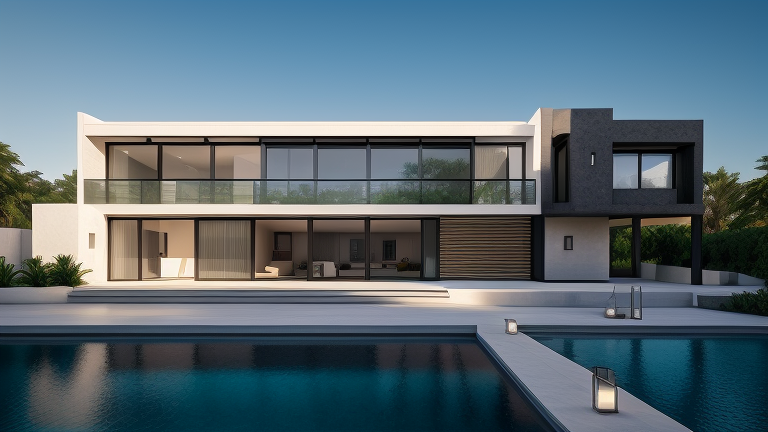
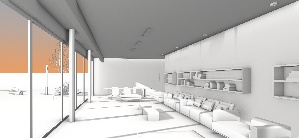
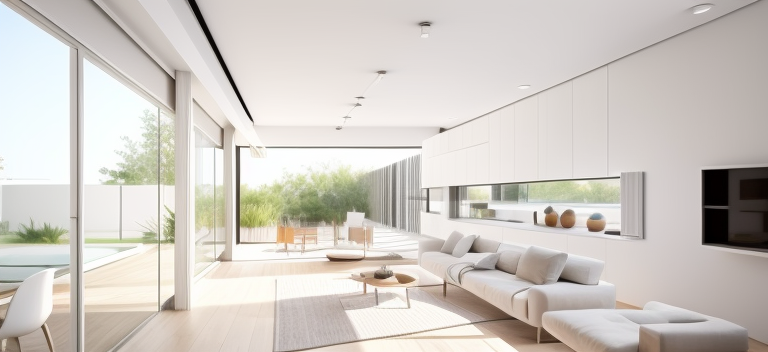
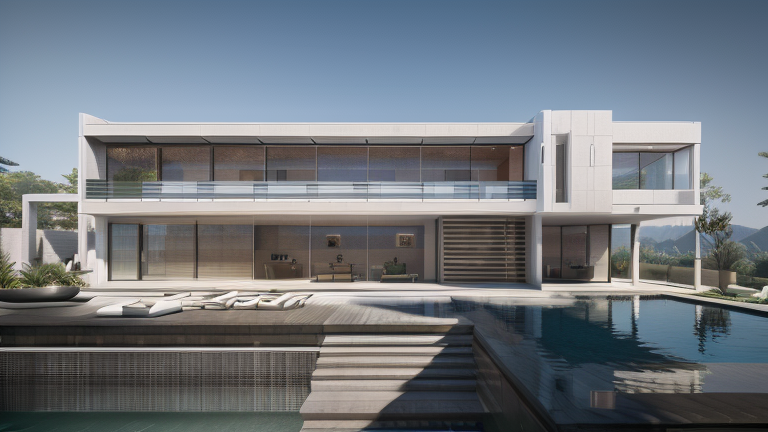
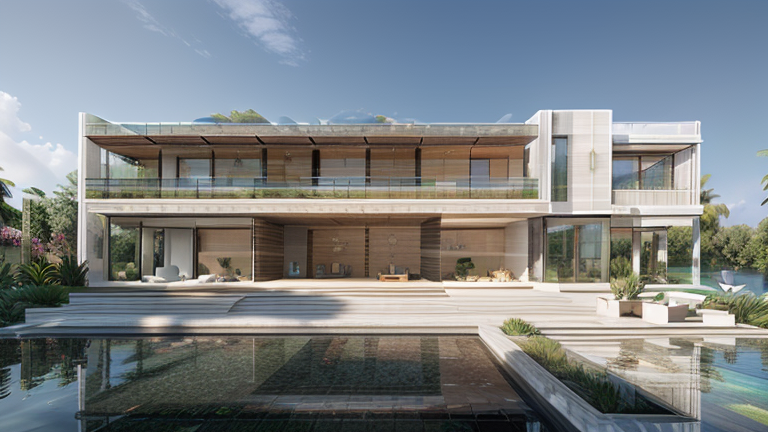
Exterior Example
Original Model
Before AI Enhancement
Reference
After AI Enhancement
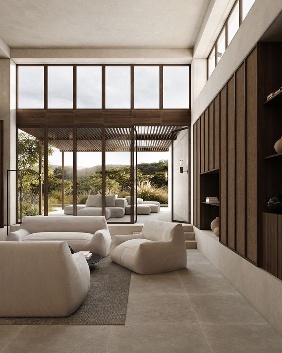
Interior Example
Original Model
Before AI Enhancement
Reference
After AI Enhancement
Step 3: Maximize your prompt input with AI-powered revisions.
Stop using short and dull promtps, excel at it! Don’t stress out about writing the good prompts, we can take care of that.
At the click of a button, our upgraded AI Vision tool springs into action, analyzing your prompt and reference images to generate a remarkable array of design alternatives.
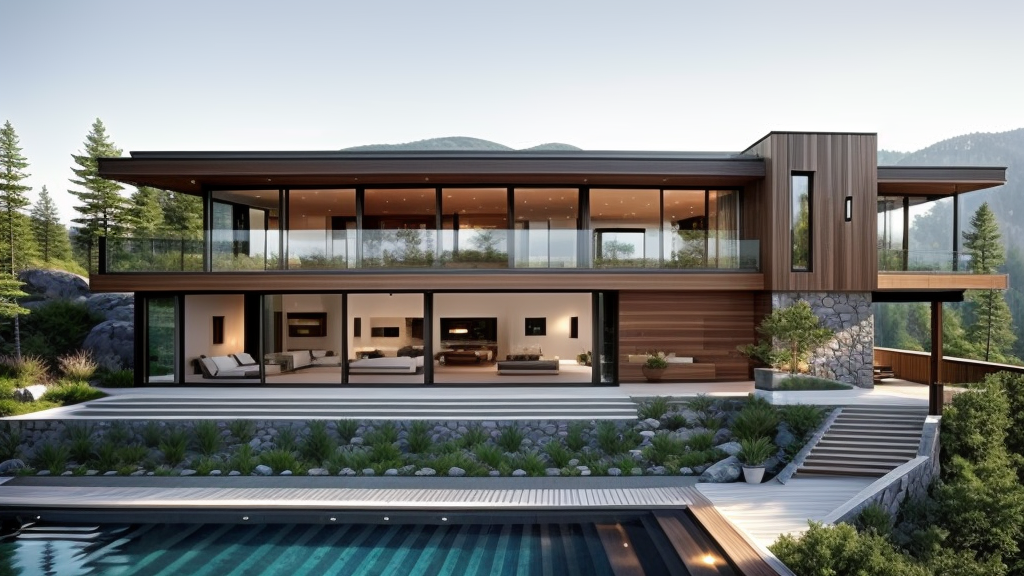
AI-refined Prompt: Eye-level view of a luxurious villa, intricate details captured in hyper-realistic rendering. Modern architecture with glass facade, interior features marble and polished wood. Surrounding landscape includes lush gardens and a sparkling lake, with soft natural lighting creating a warm atmosphere.
Now you can discover the power of effortless comparison after just 3 simple steps and start evaluating your options in no time!
Not only can you fine-tune these designs, but you can also dynamically rotate the model to gain a comprehensive understanding of each option, bringing your ideas to life in more detail.
Embrace our AI Vision tool’s transformative power and unlock a new level of efficiency and effectiveness in your design projects. Explore a variety of design options effortlessly, saving valuable time and reducing communication costs with clients. With the ability to seamlessly compare and select the most promising designs, you can unleash your creativity and achieve remarkable outcomes while maximizing client satisfaction.
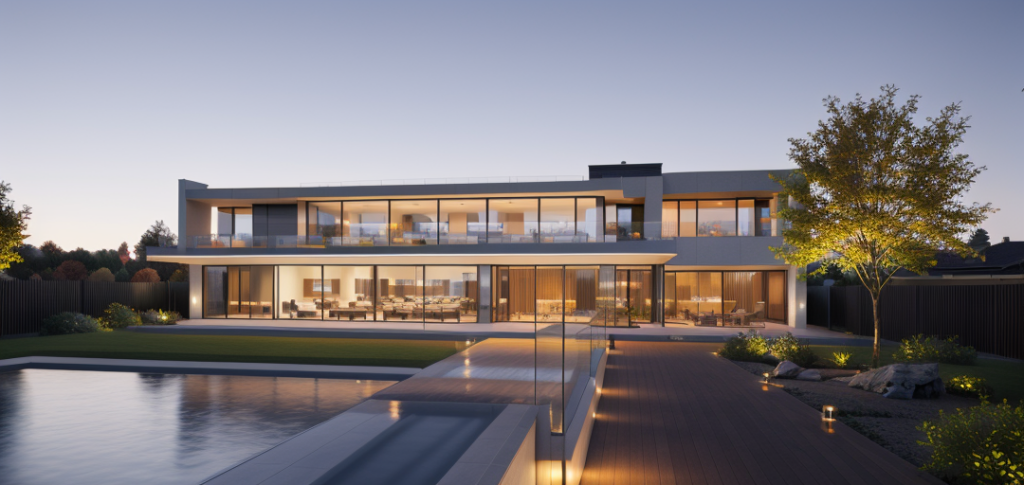
Picture this: You are a few months into a villa design for your client and you guys are ready to finalize the designs with a meeting at a cafe. As you finish up you presentation, you turn towards your client, anticipation in the air, and posed the pivotal question,
“So, what do you think”
She turns to you and says,
”Well, I like it, I think. I don’t really know about the different styles, though. I like where this is going, but I want to see these three style options for my house design. Can I see them tomorrow?”
Your meeting ends, and you go back knowing you have a full week filled with late nights ahead of you to complete these renderings. On one hand, you don’t want to keep your client waiting. On the other, you know that this would take multiple all nighters to get all three options developed.
An Evolution in Design
What if… that process didn’t need to take a whole week? What if… it could have been done right on the same day, saving you hours of time?
This is where Modelo’s new AI Vision Tool comes in. With just a drag and drop of a photo, you can instantly visually show your client what the model could look like in a specific style. Right after that meeting in the cafe, you could meet up with your client again, a few hours later, so she can decide which style she likes most—instantly allowing you to move forward in your design process. Say goodbye to hours of wasted time on creating those concept design visuals.
Modelo’s AI Vision tool leverages algorithms that take input parameters, such as what your model looks like, style reference photos, and text prompts to swiftly generate a multitude of design alternatives based on your specifications.
Tip #1: Choose a Close-up Perspective
Zoom into a close up perspective in your model. Choosing the right perspective view of your model when you try to generate AI images matters. If your model is too small or hard to see, it will not produce the optimal results. If you find that the AI is not recognizing that perspective view of your model well, try shifting your perspective a bit! It might bring about a huge change.
Suboptimal Perspective
Optimal Perspective
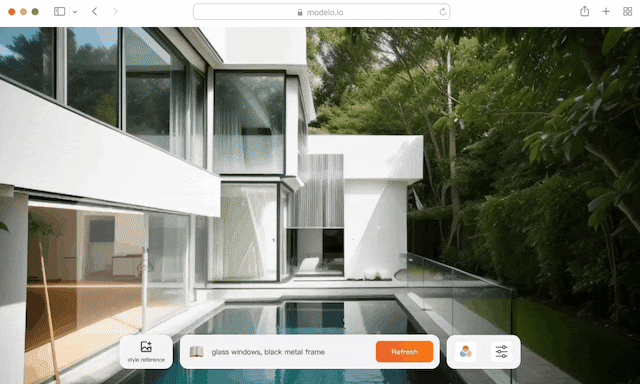
Tip #2: Pick a Good Reference Photo
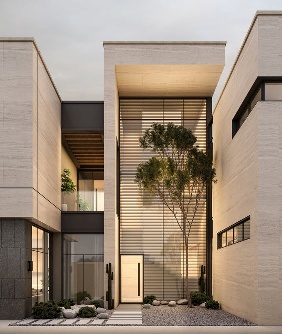
To achieve optimal results, make sure that the overall form of the building in the reference photo closely resembles your model. Curved architecture should match curves; straight lines should match straight lines; villas should match villas; and high-rises should match high-rises.
Reference Image
AI Generated Image
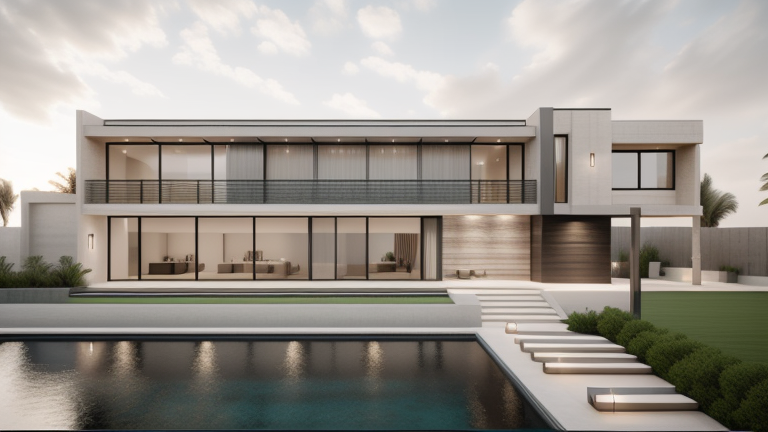
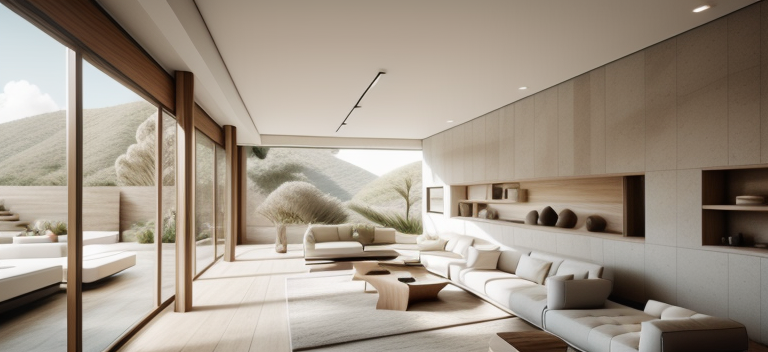
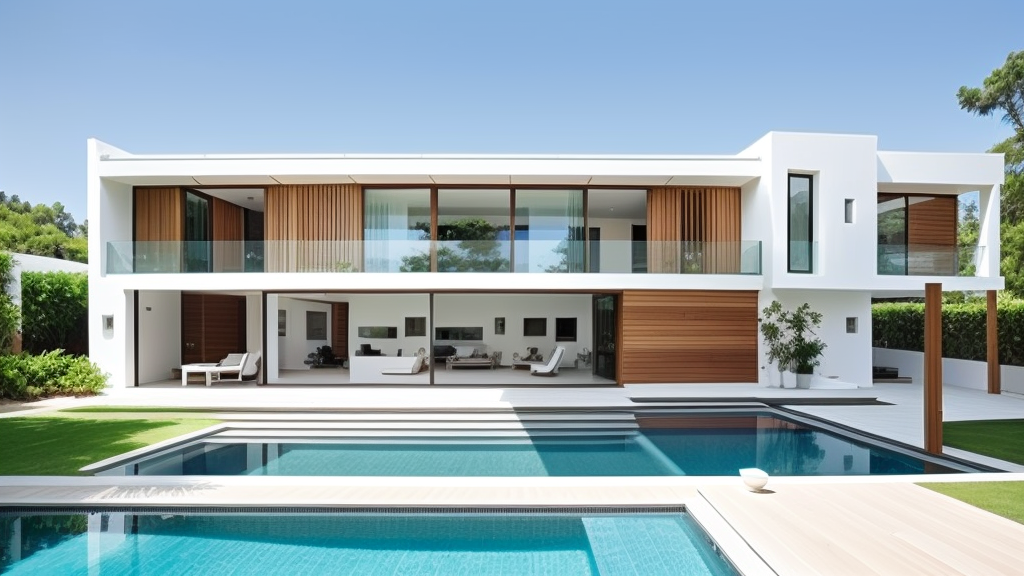
Text Prompt: villa, summer, wooden finishes, Eye-Level View
Tip #3: Utilize Text Prompting
To optimize results and get more specific in what you want, you can also add in text prompts to specify what you want. Being more descriptive and specific is a great way to allow the AI to generate your ideal villa design. Additionally, If you want the facade material to closely resemble the reference drawing, provide relevant information in the prompt to enhance the rendering effect. Notice how the more specific I got in my text prompts, the more detailed and realistic the generated images (compare top and bottom images)
Reference Image
AI Generated Image
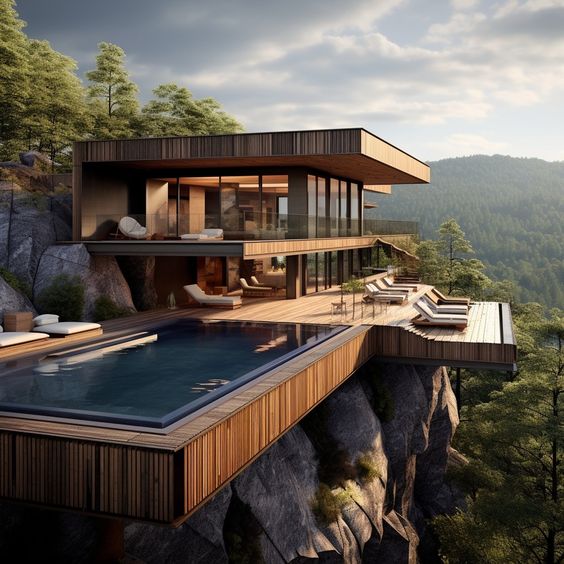
Text Prompt: “The villa, featuring striking wood finishes, should exhibit sleek, contemporary design elements seamlessly integrated with the mountainous landscape. Emphasize the misty ambiance enveloping the surroundings, depicting a tranquil and mystical atmosphere. Showcase large windows offering panoramic views, wooden accents enhancing the villa’s connection to nature, and possibly terraces for outdoor relaxation.”
To help you in prompt generation, we have a prompt library and a prompt generator right in our Visions tool. To help you get started, try out these sample exemplar prompts on your own:
1. A villa set against a vibrant blue sky on a sunlit summer day. The villa should boast clean, white walls exuding a sense of purity and freshness, complemented by elegant wooden finishes that add warmth and character. Showcase the villa's modern architecture with well-defined lines and possibly expansive windows that capture the essence of openness and natural light. Highlight the serene atmosphere of a perfect summer day with the sky radiating a brilliant blue hue.

2. A modern-day villa featuring commanding black walls harmoniously contrasted with elegant wood finishes. The villa should showcase a sleek and minimalist exterior design, characterized by clean lines and geometric shapes. Emphasize large windows or glass panels to infuse natural light and openness. Incorporate strategic wood elements, such as trims, panels, or accents, enhancing the villa's sophistication.

3. Second floor balcony of a stylish villa in Los Angeles, characterized by pristine white walls contrasted with sophisticated gray wood finishes. Capture the essence of modern architecture prevalent in LA, emphasizing sleek lines and contemporary design. The villa should exude an aura of elegance and luxury, with the white exterior walls imparting a sense of sophistication while the gray wood accents add depth and refinement.
Tip #4: Use a Style Template
If achieving the perfect image using our reference photo function proves challenging, consider exploring our selection of style templates such as “Eye Level View” or “Minimalist Style”. These meticulously crafted templates harness optimized models to enhance image generation, ensuring superior composition and lighting for your desired outcome.
Use text prompting to add in specific details of what you want the design to look like when you are using one of our style templates to customize the templates.
Style Template: Minimalist Style
Conclusion
With Modelo AI Visions, instead of responding to your client with “Of course. I can get back to you next week on those concept designs.”, you can now say, “I can get back to you later today. It’ll be quick with Modelo.”
The future of villa design is not just about functionality and aesthetics; it’s about harnessing the power of technology to create spaces that resonate with the desires and visions of your clients. In a world where time is of the essence, AI Visions will become a game-changer in villa design. It’s not like AI will take over all your work. It’s really about saving all that time and energy you had to spend wasting on “potentials” and channeling that for further creativity. So don’t get left out, and join us in Modelo 2.0’s Vision to design not just another building, but the future of what architectural design could look like.
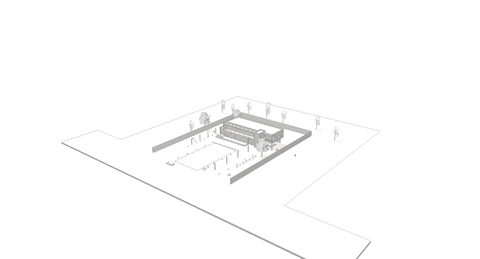
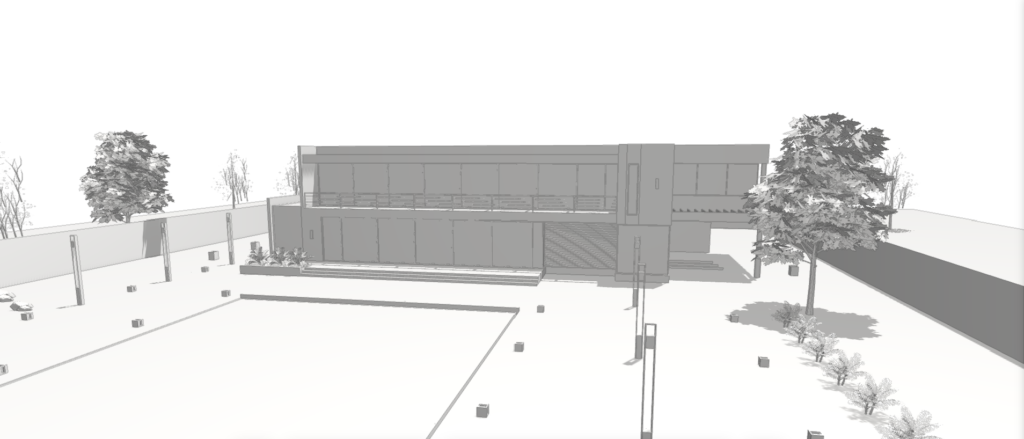
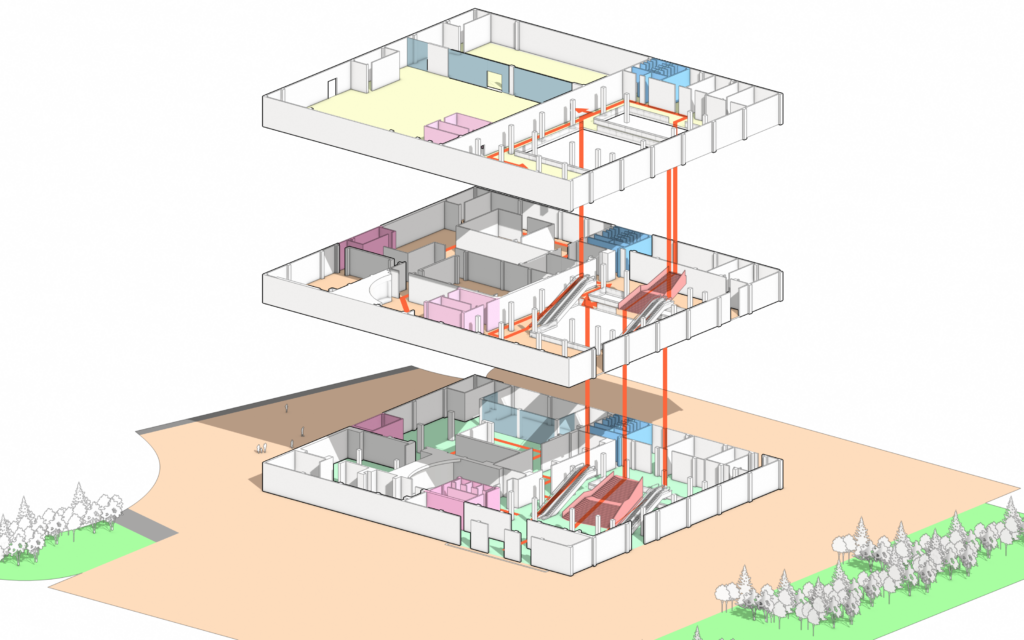
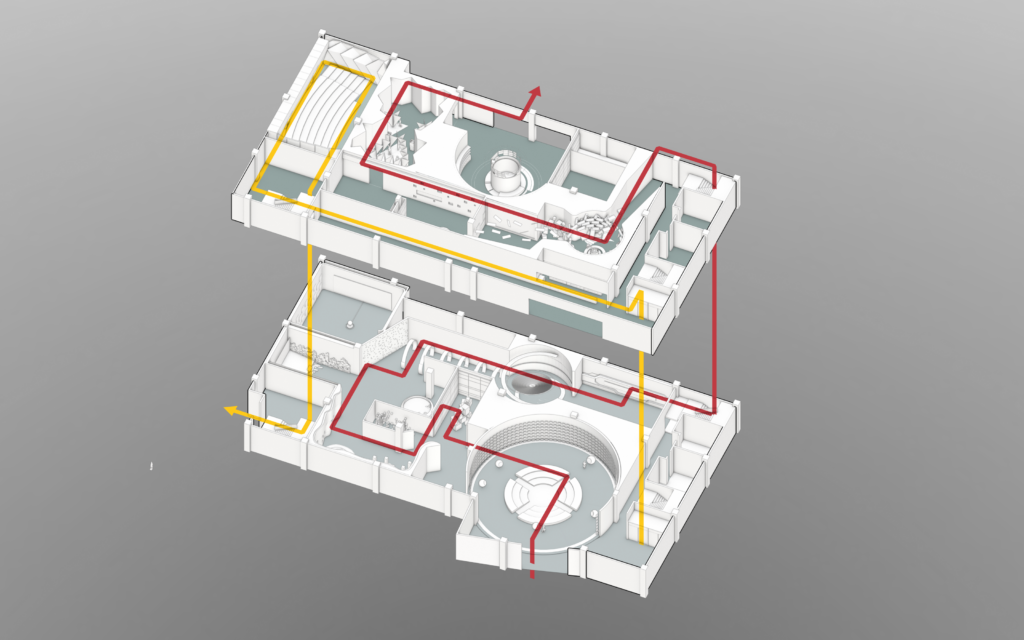
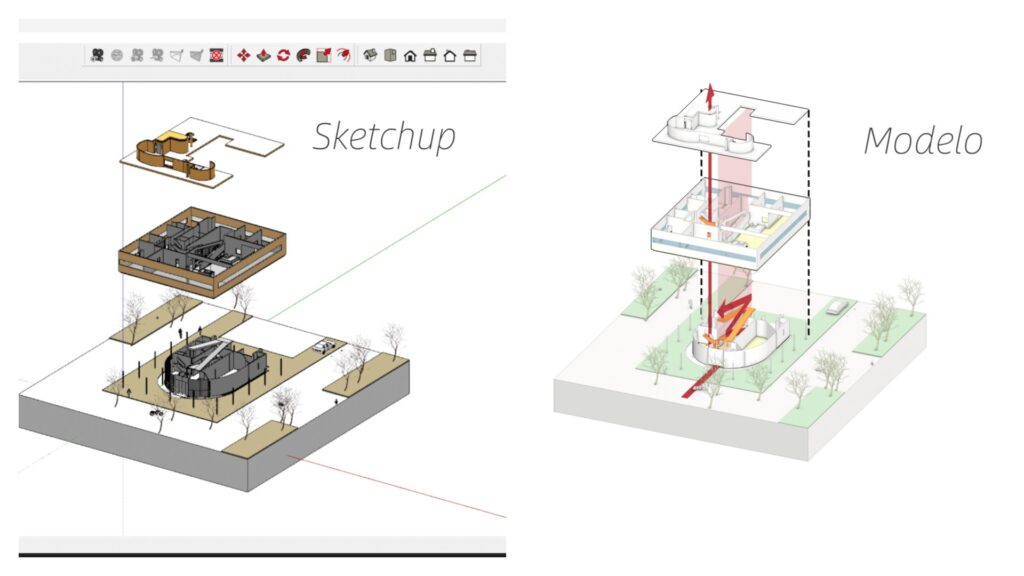
The Modelo’s new “Make diagram” function is designed for architects users to create diagrams quickly and efficiently. Modelo can complete the transformation of the image below in just a few minutes.
Watch this video and create your own architecture diagrams now!
Architectural rendering is the process of creating two-dimensional and three-dimensional images of a proposed architectural design. The goal is to illustrate a lifelike experience of how a space or building will look before it is built, accurately representing design intent. Therefore, they have long depended on drawings to explain their design concepts clearly. So, architectural rendering has always been a vital tool for designers and architects to communicate with clients, contractors, and other stakeholders. In this article, we have collected the following list of the popular 5 rendering software that you can integrate into your design workflow to enhance your architectural design through them. However, we highly recommend that you focus on finding the best one for you.
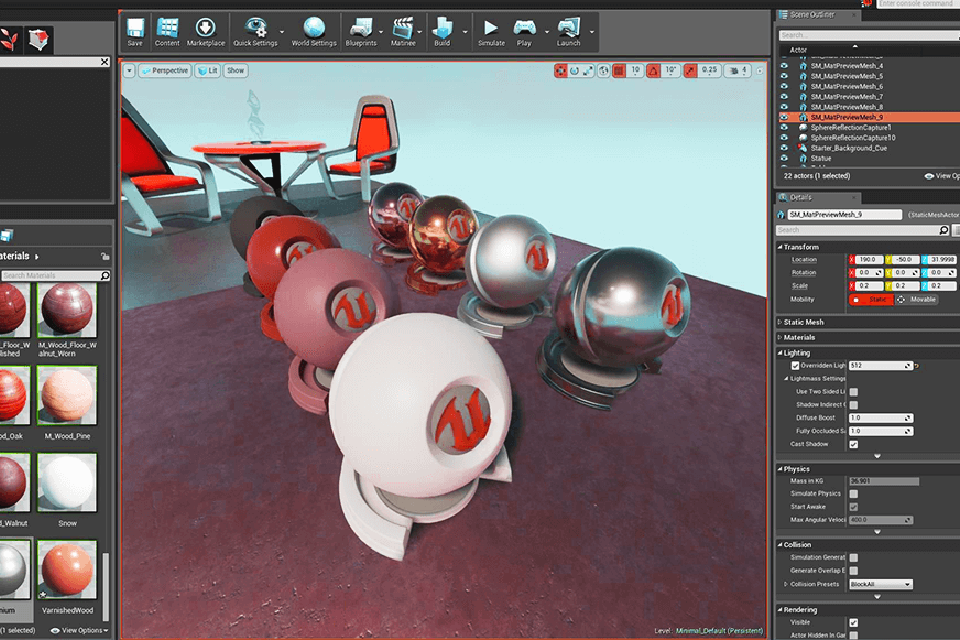
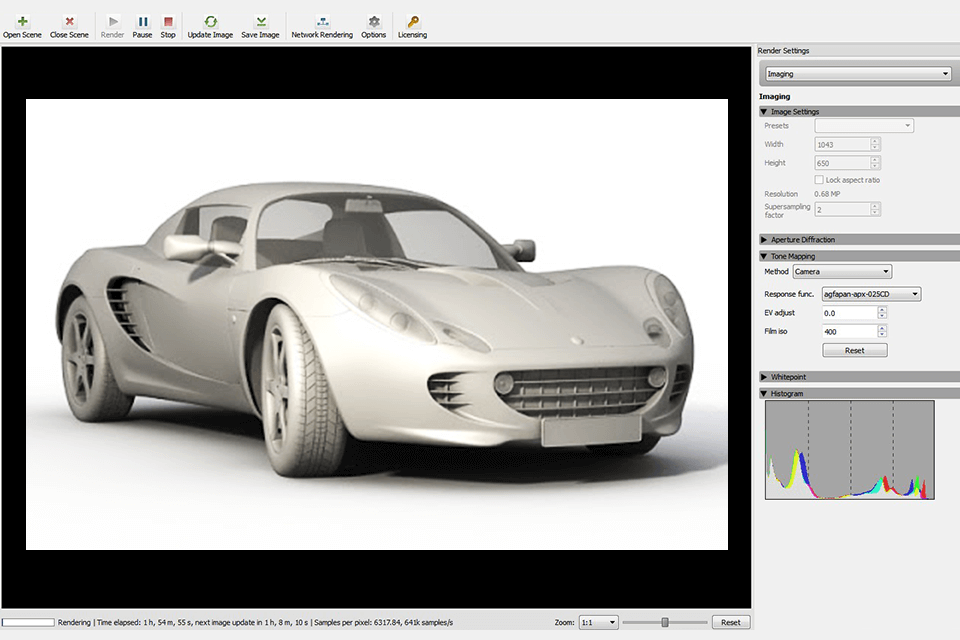
V-Ray is one of the most effective professional 3D rendering solutions used by almost every architect. V-Ray is popular with architects for its ability to perfectly simulate real-world lighting. Although lighting calculations are time-consuming, designers can obtain high-resolution renderings of the most realistic scenes from them.
2. Twinmotion
Twinmotion is the latest real-time rendering software from Epic Games that provides a range of media exports from a single Twinmotion scene in seconds. It is a tool to help visualization professionals in the architecture, construction, urban planning, and landscaping industries better communicate their ideas. Thanks to its powerful engine, users can add realistic environments to scenes by changing seasons and weather, or by putting a project’s geographic location into the settings. The software is compatible with most BIM systems and syncs ARCHICAD and Revit projects with just one click.
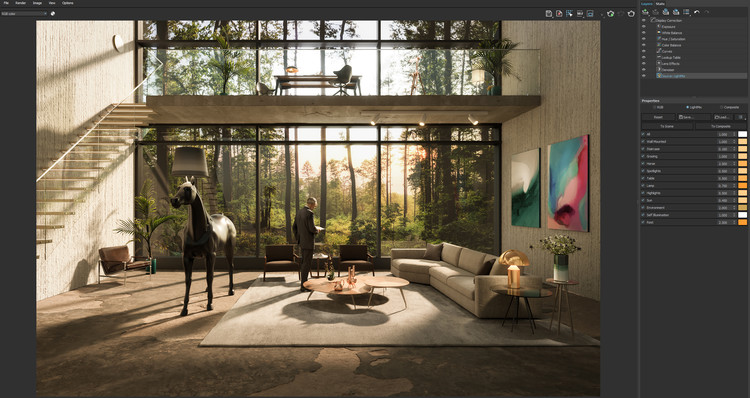
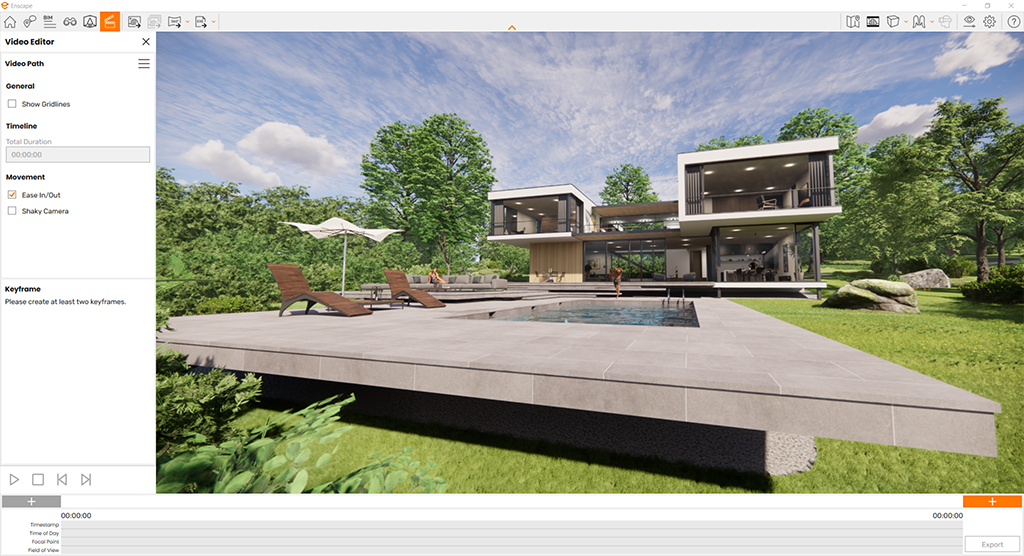
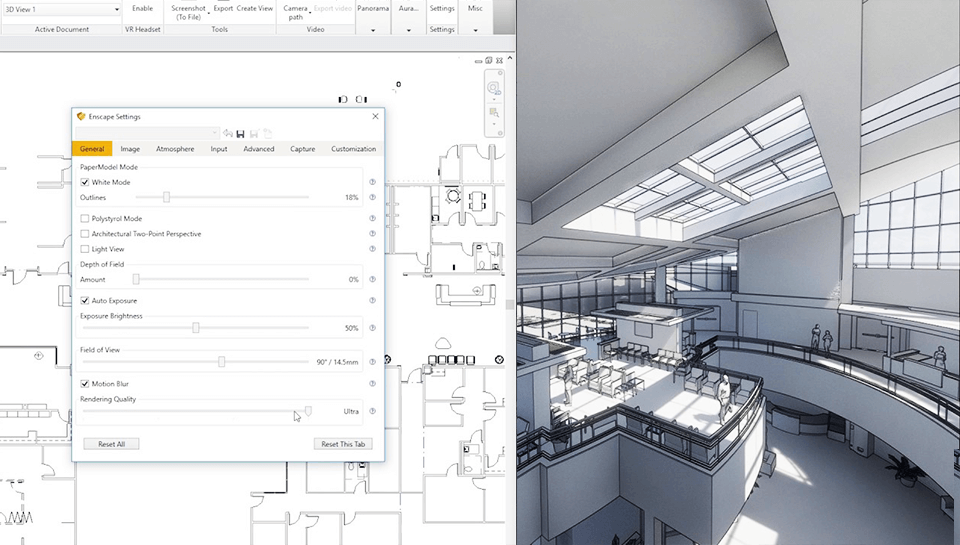
Enscape is a plug-in for Revit, Sketchup, Archicad, and Rhino that provides useful real-time capabilities to showcase projects while making changes. With Enscape, users can create high-quality real-time 3D visualizations, as well as videos, panoramas, and virtual reality simulations. The user creates the entire set of images at once, and modifications made in the plan view are immediately reflected in the visualization. The plugin provides overlay orthographic projections on top of 3D designs such as floor plans or sections, allowing users to better communicate their ideas with clients.
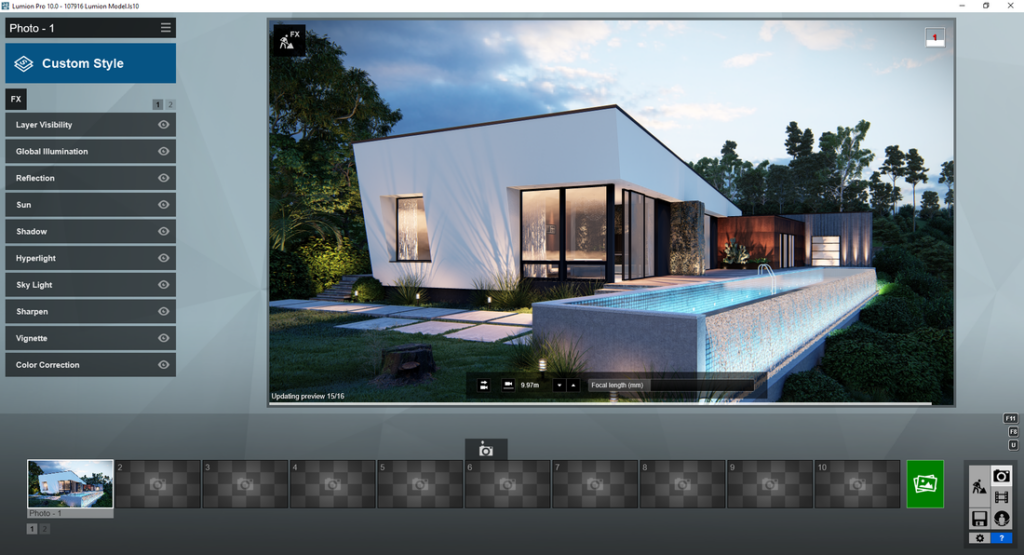
4. Lumion 3D
As a compatible software with most 3D modeling programs, Lumion 3D provides real-time rendering that can quickly turn 3D models into breathtaking photorealistic images and movies. The outcome can include renderings, animations, virtual reality, and virtual tours. Advanced sun and sky settings and dynamic materials to present transparency, among its simple user interface and the low learning curve, make Lumion one of the best rendering programs.
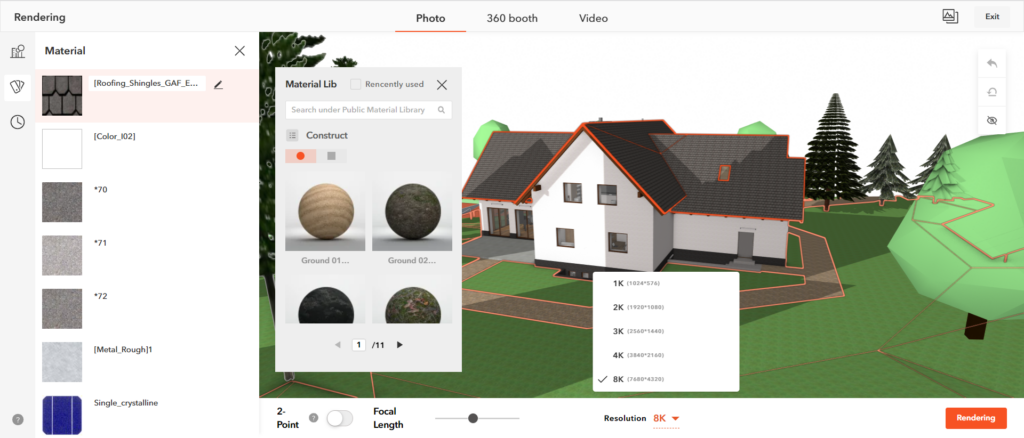
5 Modelo
Modelo has become the most popular online free rendering software recently with the characteristics of massive rendering scenes, rich material library, fast drawing, and easy operation. Modelo supports most mainstream 3d model formats. So no matter what modeling software you’re using, Modelo can render your model with one click and plot in ten minutes. In addition, Modelo has a variety of rendering methods for you to choose from, you can render a single image, or you can try the free 360 booth rendering and video rendering.
There is nothing better to showcase your designs than beautiful renderings. However, it is difficult to find free rendering software. This article will introduce 8 best free rendering software and introduce their features.
Modelo has become the most popular online free rendering software recently with the characteristics of massive rendering scenes, rich material library, fast drawing, and easy operation. Modelo supports most mainstream 3d model formats. So no matter what modeling software you’re using, Modelo can render your model with one click and plot in ten minutes. In addition, Modelo has a variety of rendering methods for you to choose from, you can render a single image, or you can try the free 360 booth rendering and video rendering.
Blender is free and includes modeling, animation, post-processing, and video editing tools with audio, and most importantly, rendering tools. A user-friendly interface is one of the advantages of Blender rendering software. It includes many icons and tools that allow you to render quickly. You can also use available shortcuts to automate some actions. This 3D software features the grease pencil tool for creating 2D animations.
The great advantages of the engine are the ability to quickly view the result directly in the 3D viewport, as well as rendering using GPU. So, it is an excellent choice for beginners. The capabilities of this free 3D software are suitable for creating awesome characters for games and various architectural objects.
Arnold is a program designed to render a wide variety of objects, you can get photorealistic images, impressionistic images, or anything in between. It is one of the best free rendering software that includes a node-based material editor. As a result, Arnold is very clear for users. Another advantage of this software is the ability to create your own nodes. However, Arnold does not have a fully functional texture renderer. They are only available in a limited mode. The controls and user interface are simple and intuitive.
The Indigo Renderer software is a powerful rendering tool for modeling lighting effects, which includes a material editor that allows you to create any kind of material from sand, leather, and wood to car paint and water. This is the best option for you if you are trying to achieve maximum photorealism. This free rendering software can be used not only with a CUDA-capable NVidia graphics card. It is also compatible with the OpenCL standard used by AMD. If you want to make the rendering process faster, it’s possible to organize a powerful system of slave renderers.
Enscape is one of the most famous architectural renderers. This is a paid program that offers a great free trial. You can also find features for designing process support here. Thanks to them, you can monitor all your changes to have an idea of how the final picture will look after rendering. You may use this rendering software free to apply various stylized modes, such as paper, sketch, and polystyrene models. In Enscape you can get the content you need from many programs, such as SketchUp, Rhino, Revit, and ArchiCAD.
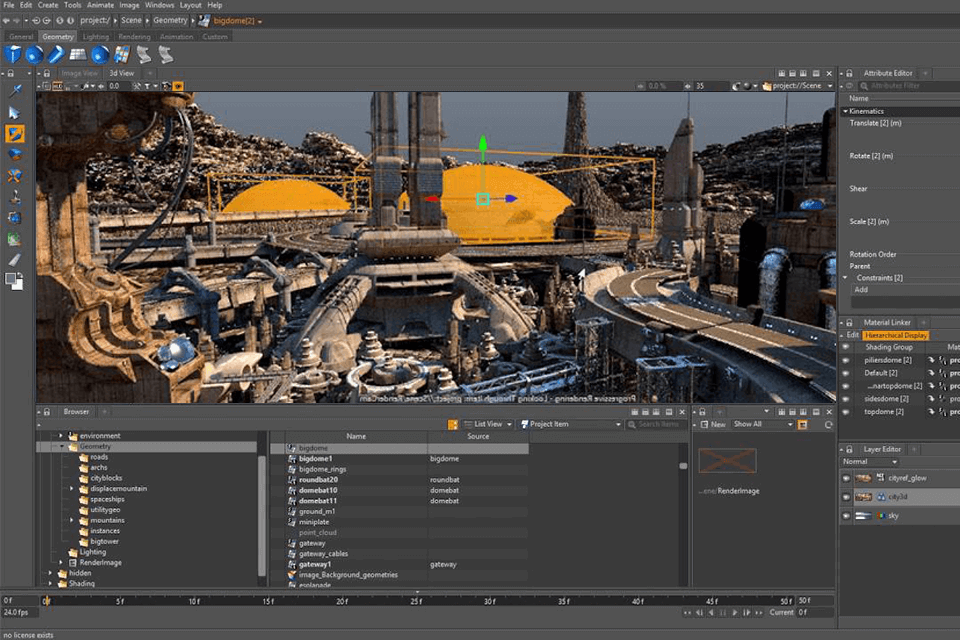
Clarisse is not only fast 3D rendering software. This free 3D software is very popular among the creators of science fiction movies. It works on a layering and node-structure system. Thanks to the layered structure, the previous work of animators and designers remains unaffected during rendering. If you are a beginner in this area, you can figure out how to work in this photo rendering software by reading the detailed tutorial – Personal Learning Edition.
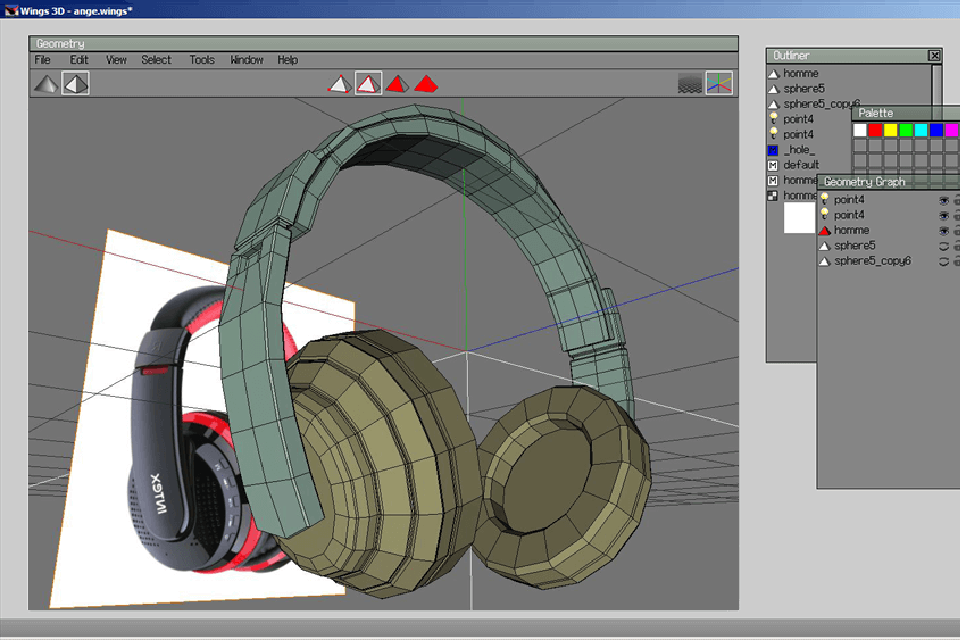
Wings 3D is open-source software for modeling and texturing. Wings 3D has a customizable interface. The program does not support animation, so to create scenes in the dynamics of the figure, you will have to export to other software. This 3D rendering app is not difficult to use. It has many customizable features for working with multi-layered materials, scenes, modifying lighting settings, and effective scene rendering. You can also use various free textures to get breathtaking results.
Conclusion
When choosing the best 3D rendering software, you can frequently face the problem of high or simply unaffordable prices. In the quest to create high-quality and realistic renderings, this can be a significant obstacle. That is why the search for professional but free rendering programs is becoming popular and relevant. So, we have selected for you the top 8 free rendering software that will best meet all your needs.
Modelo enables users to merge multiple 3d Max models online for free. Come and see how you can do that in just two easy steps.
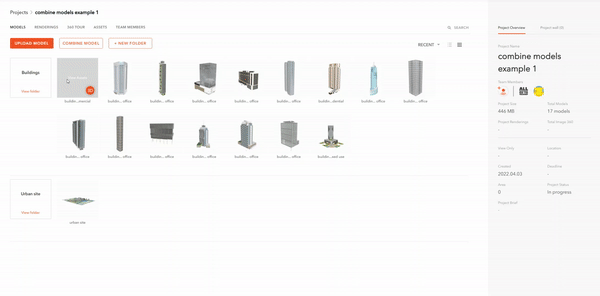
First, you need to upload your 3d Max models to Modelo. Just drag to upload your 3d Max models to Modelo. You can upload several models online at one time.
When you click the ”Combine Model“ option on the project page, you can select the models to be merged and open them on the same page. You can see the list of models on the left side of your window.
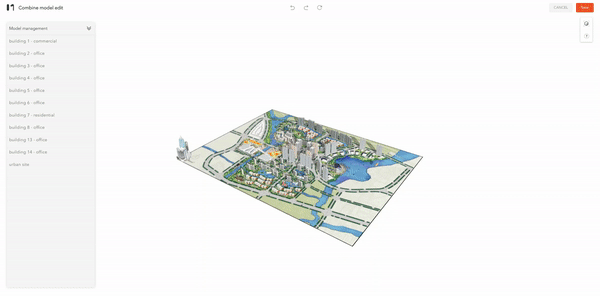
You can select the model through the list on the left and adjust their positions through the axes. Don’t forget to click the save button in the upper right corner after editing.
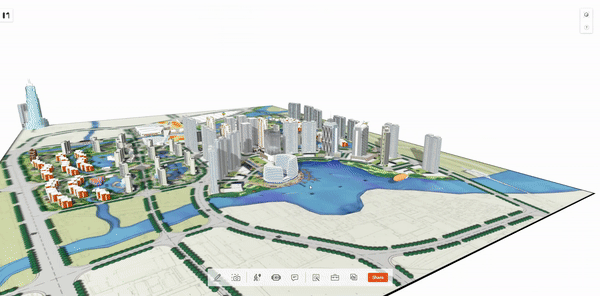
After the merge is completed, you can share the model with one click and complete online communication with others through the Model comment, which improves collaboration efficiency.
When you click the ”Combine Model“ option on the project page, you can select the models to be merged and open them on the same page. You can see the list of models on the left side of your window.
You can select the model through the list on the left and adjust their positions through the axes. Don’t forget to click the save button in the upper right corner after editing.
After the merge is completed, you can share the model with one click and complete online communication with others through the Model comment, which improves collaboration efficiency.
After the merge is completed, you can share the model with one click and complete online communication with others through the Model comment, which improves collaboration efficiency.
Modelo enables users to merge multiple Rhino models online for free. Come and see how you can do that in just two easy steps.
First, you need to upload your Rhino models to Modelo. Just drag to upload your Rhino models to Modelo. You can upload several models online at one time.
When you click the ”Combine Model“ option on the project page, you can select the models to be merged and open them on the same page. You can see the list of models on the left side of your window.
You can select the model through the list on the left and adjust their positions through the axes. Don’t forget to click the save button in the upper right corner after editing.
After the merge is completed, you can share the model with one click and complete online communication with others through the Model comment, which improves collaboration efficiency.
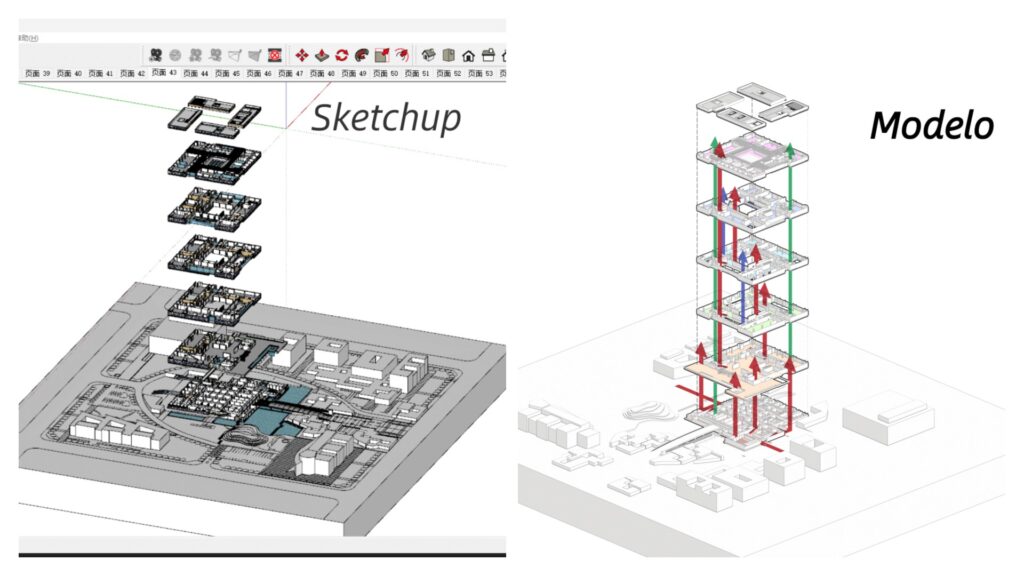
Modelo enables users to merge multiple Sketchup models online for free. Come and see how you can do that in just two easy steps.
First, you need to upload your Sketchup models to Modelo. Just drag to upload your Sketchup models to Modelo. You can upload several models online at one time.
When you click the ”Combine Model“ option on the project page, you can select the models to be merged and open them on the same page. You can see the list of models on the left side of your window.
You can select the model through the list on the left and adjust their positions through the axes. Don’t forget to click the save button in the upper right corner after editing.
After the merge is completed, you can share the model with one click and complete online communication with others through the Model comment, which improves collaboration efficiency.