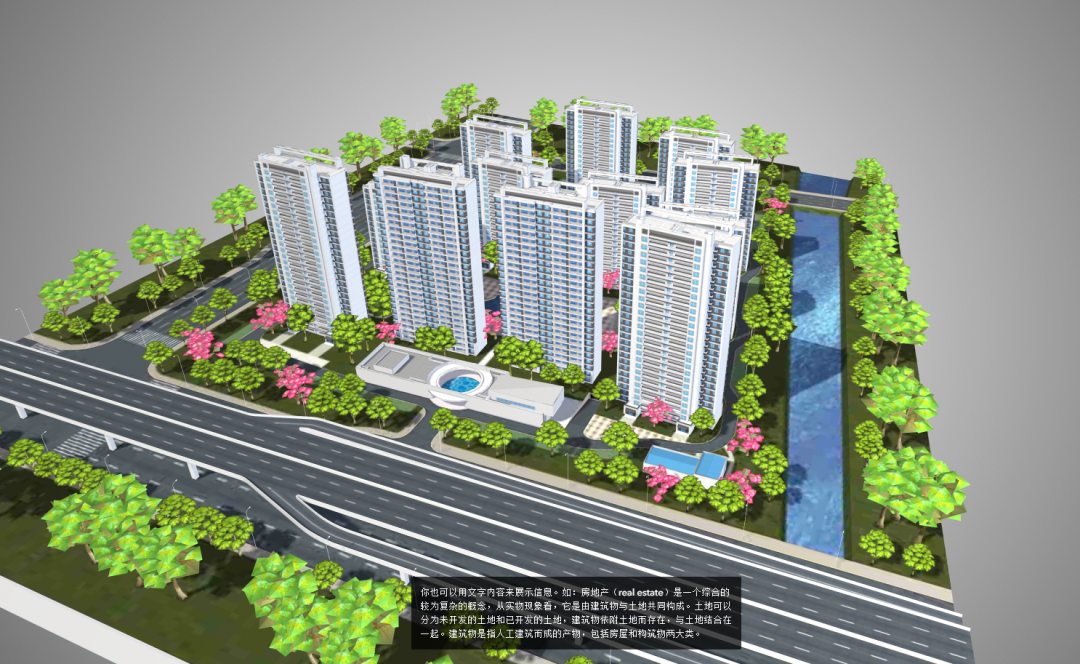
Modelo’s 3D comment feature has been one of the most popular functions since its inception.
People use it to create 3D presentations, drop 3D annotations, embed 3D experience on their homepage and curate spatial fly-through. It links with rendering settings, section cut, walk-through, and assets. In a way, you could say the 3D comment feature is at the center of all.
Today, we are very excited to announce a few updates to it. With the new 3D comment feature release, you could do the following things:
1.You could use an image attachment as a cover page for your presentation.
2.You could add promotional videos and play it with just a touch of the “SPACE” button.
3.Panorama is also supported as an attachment.
4.Last but not the least, you could add phone recorded voice-over to the 3D comment and now your clients could experience your design in 3D and listen to your explanations about the space at the same time.
As Modelo continues to grow and develop, we continue to add more features to our newly released panorama function. In this post, we will focus on generating a “Panorama shareable link,” the same concept as the shareable link of a model, as well as embedding a panorama image on your website.
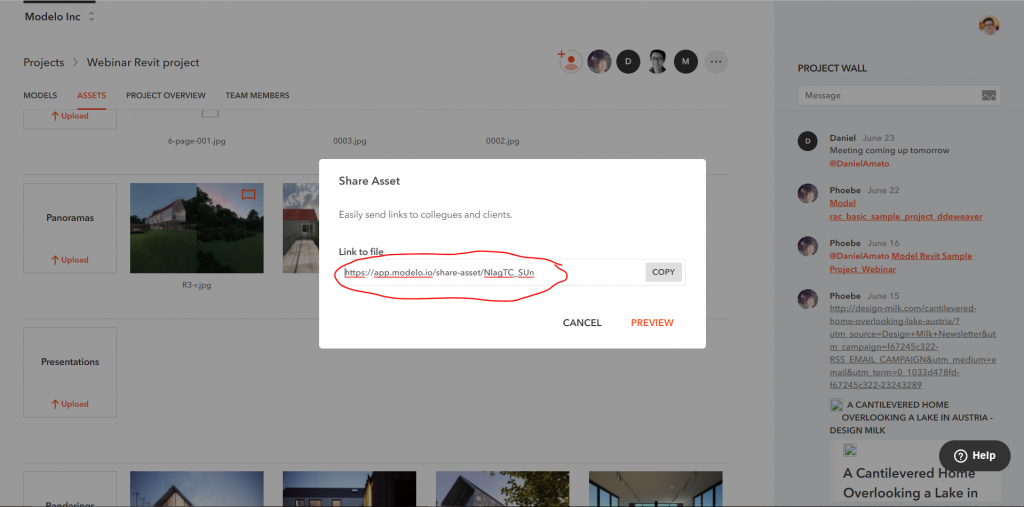
First let’s dive into generating a panorama shareable link. When you feel that your model or panorama image is ready to share, you can easily generate a link, then email or message it to other project collaborators. Learn how to generate panorama shareable links below:
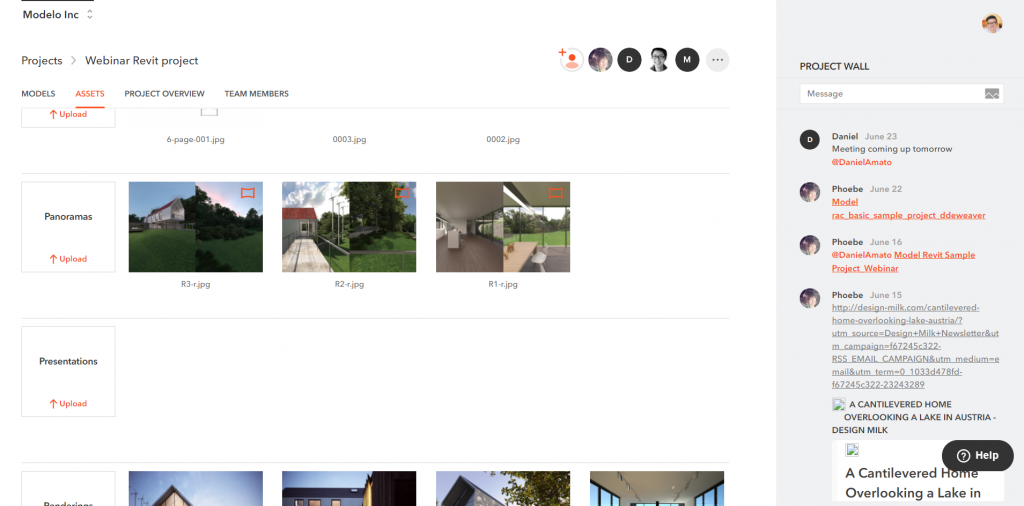
Step 1: Go to your project’s assets folder where you uploaded your panorama images. (unsure how to upload a panorama? Check out this post)
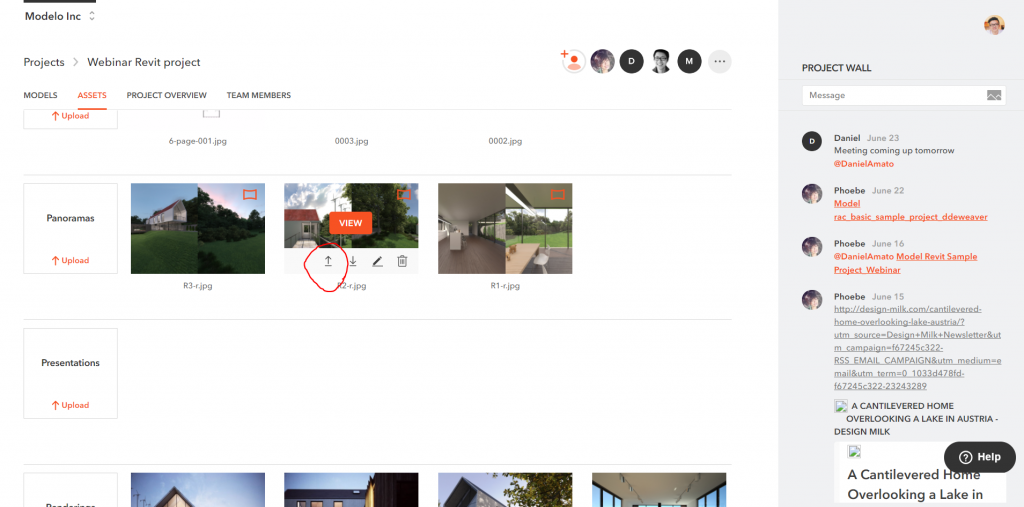
Step 2: Hover your mouse on one of the panorama images and you will see a share button
Step 3: Click on that share button, you will then see the shareable link in the pop up window.
Here is the link of this panorama image. I’ve been asked for a similar embed function for the panorama images. In fact, our team is implementing that into our coming release so stay tuned. As for now, there is an alternative solution. Here is how to do that step-by-step:
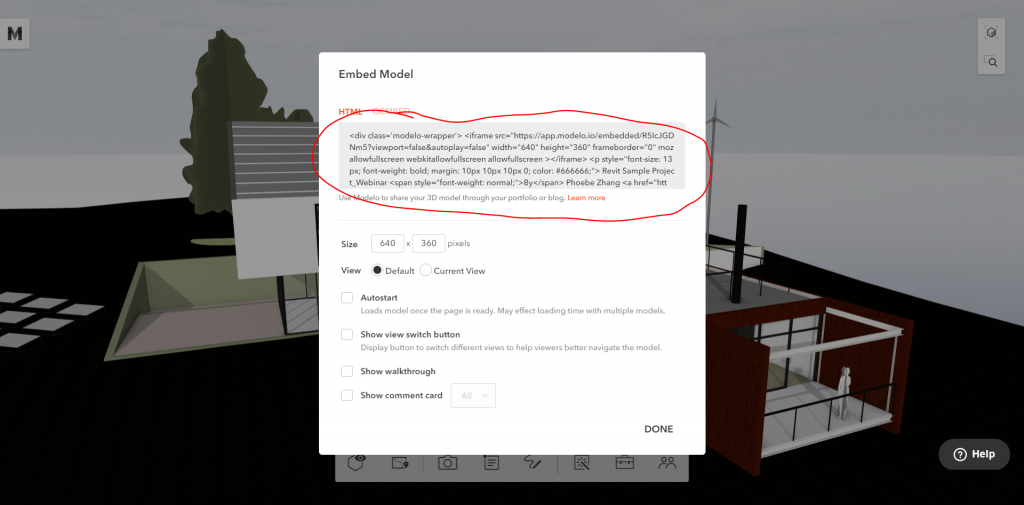
Step 1: Go to a model page, open the embed dialog, and then copy the embed code.
Step 2: Now let’s take a deeper look at this embed code since it consists of several parts. The major concept of iframe is basically putting a mini web browser window within another website. As you can see from the following, the URL after the “iframe src=” is where this link is referring to. Now if we replace this link with the shareable link of our panorama, it will then show the panorama instead of the 3D model. In addition, there are several other parameters you can change, like the width (normally you want to put 100% so that it’s responsive to the device’s dimension), height, model’s name and author.
Step 3: Replace the embed URL to the panorama shareable link and adjust the other parameters. Below is the final look (try clicking and dragging your mouse on the below window), and most importantly have fun!
Rotate panorama and click on orange hotspots for a guided tour Modelo »
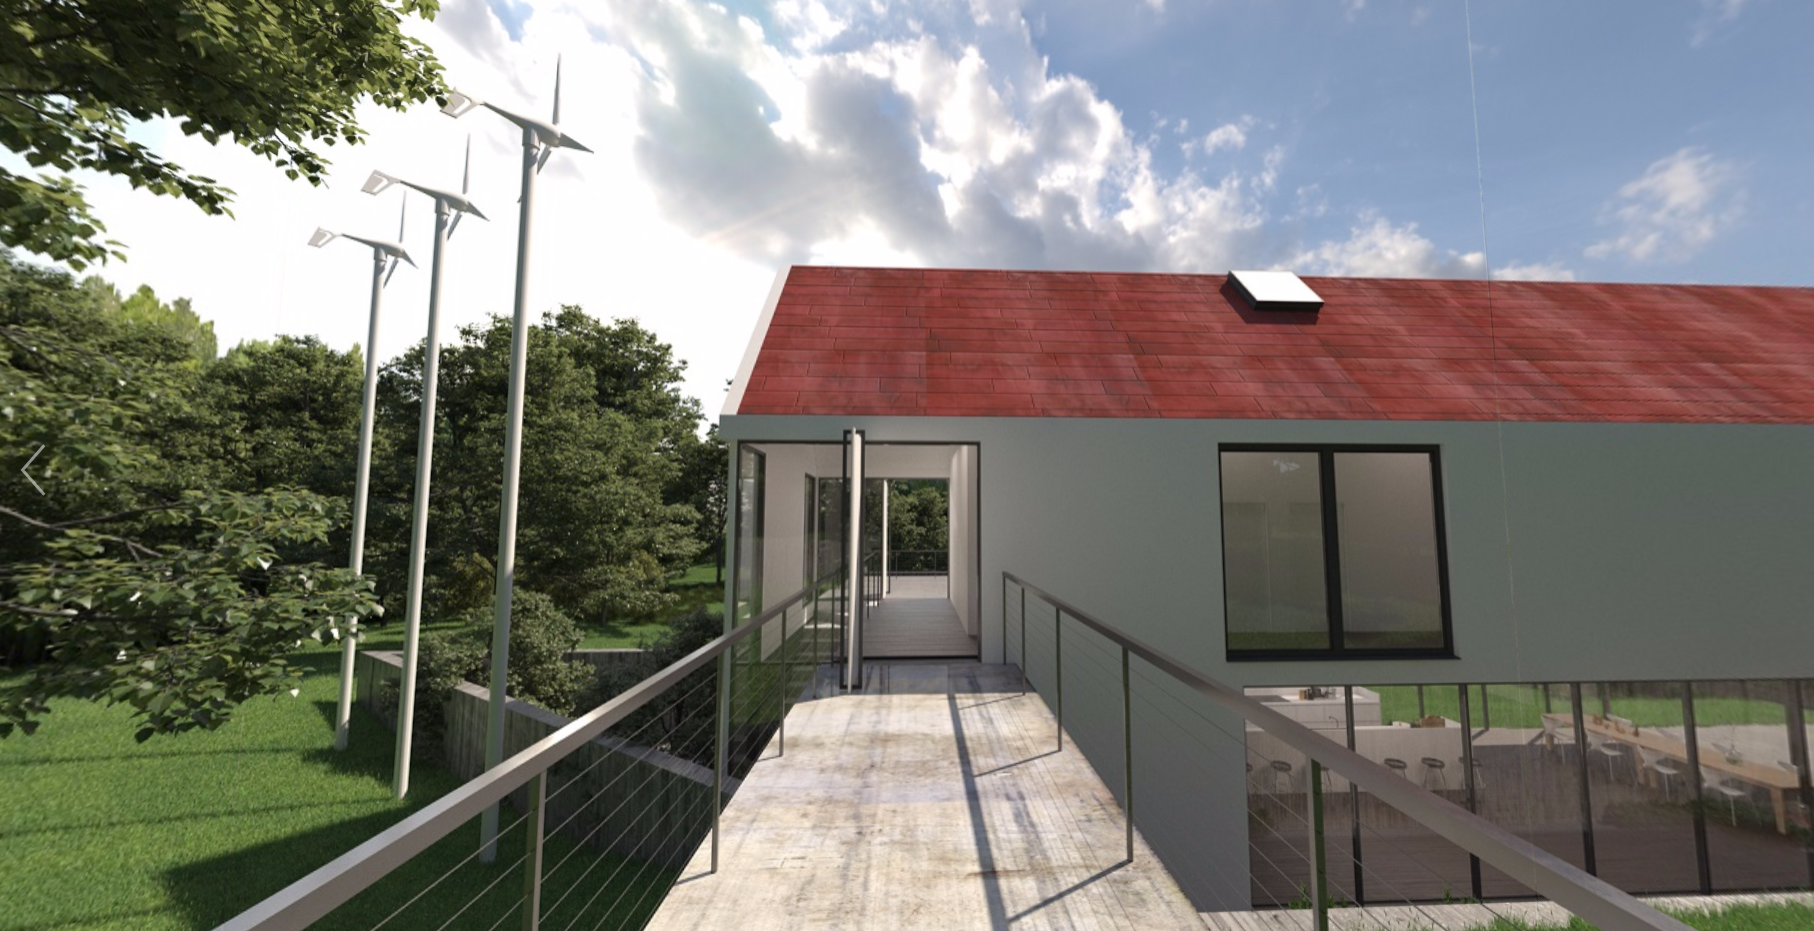
In this post, I will show you how to use our newly released panorama feature to showcase your 3D building design with camera captured 360º panorama images.
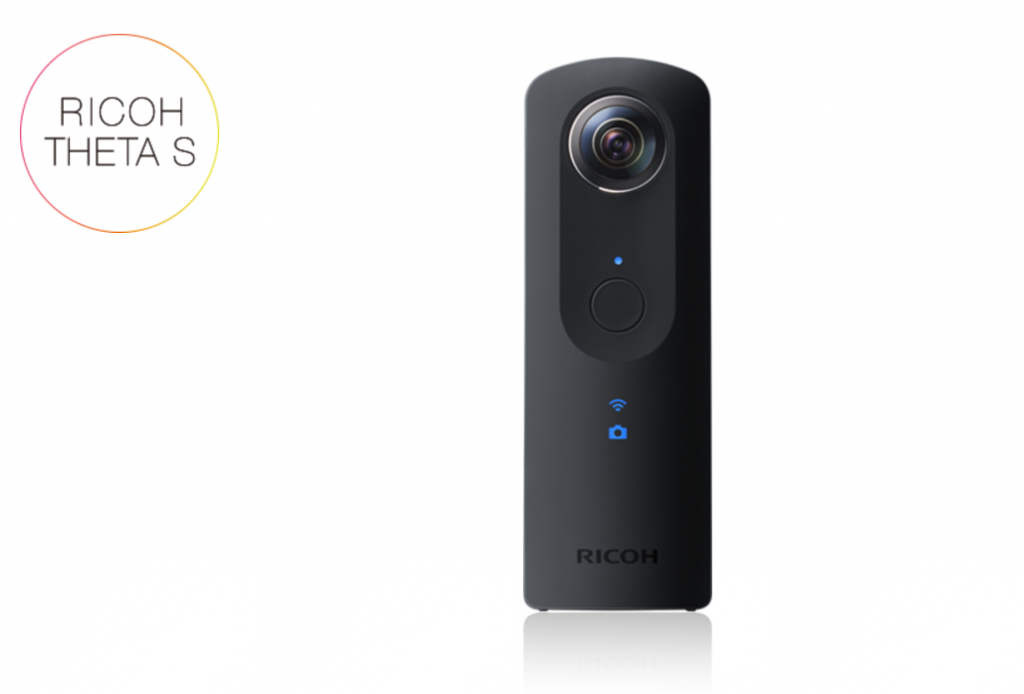
First, to capture 360º panorama images you will need a special camera. These are not the panorama images that you can capture with your smartphone, but spherical ones that can be wrapped into a sphere so you can freely look around. There are many options for equipment in the market, but the one we used is Ricoh Theta S.
It’s very easy to setup and quite intuitive to use. There is even an app with which you can shoot the images and view them directly on your phone in real-time.
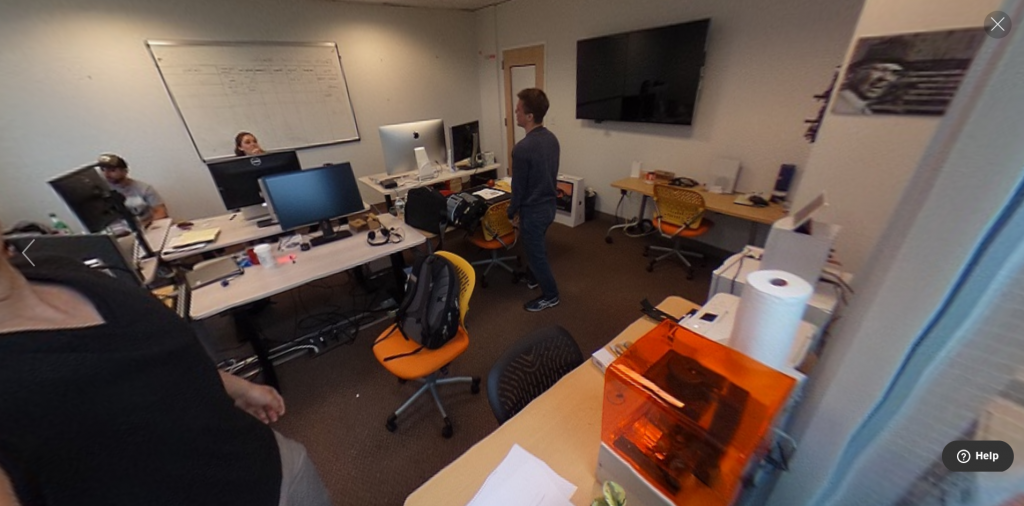
I brought it to our office last Friday for some panorama shooting. I started off with couple images in our office, like this:
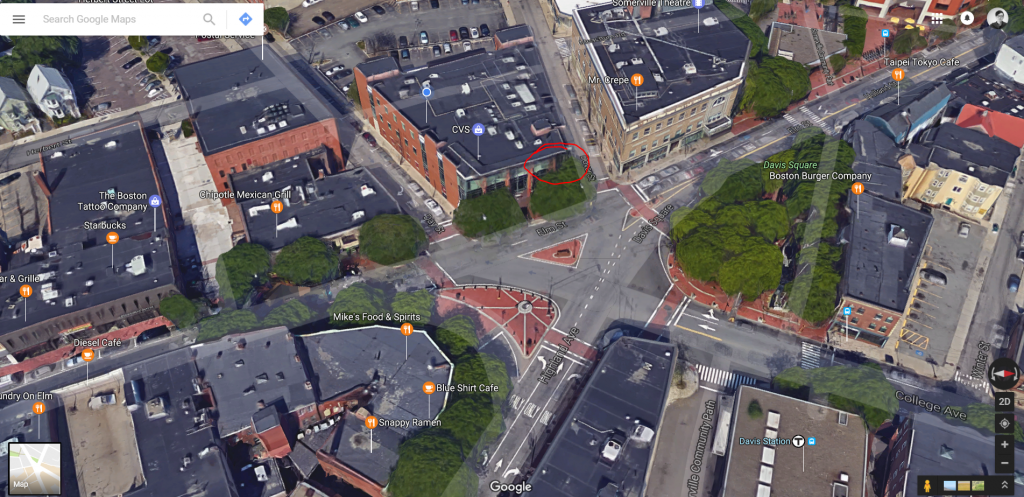
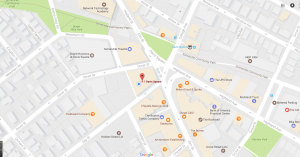
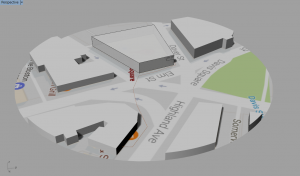
And I soon decided to capture some surroundings. Our office is in Davis Square, Somerville, located on top of Boston Sports Club, as you can see in this image:
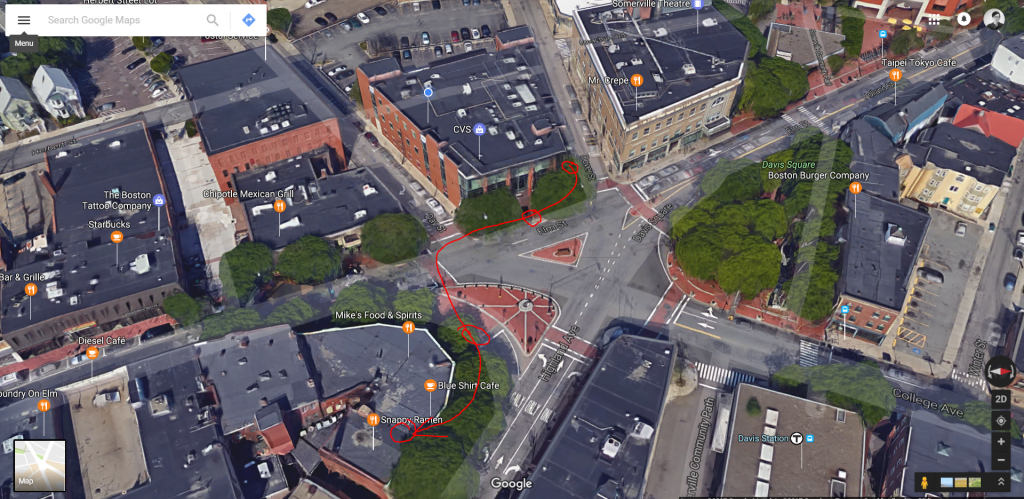
I decided to take a walk outside and shoot several shots around our office, including my favorite Ramen place in Davis Square.
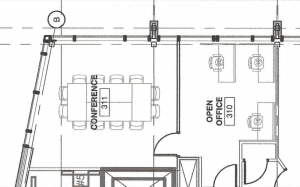
When all the shots were taken, I still needed to create a 3D environment of our office. I then took a Google Maps screenshot and the office floor plan from our lease agreement and inserted them into Rhino.
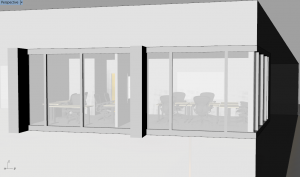
With some quick modeling based on the above two images, I created our office room #300 in Rhino.
I downloaded the chairs and tables from Herman Miller’s website. They have all of their furniture in different 3D formats.
With the model and panorama images ready, I then went to Modelo and uploaded everything. The new panorama upload is a bit different from uploading other things in Modelo, like assets or models. Below is a step-by-step tutorial.
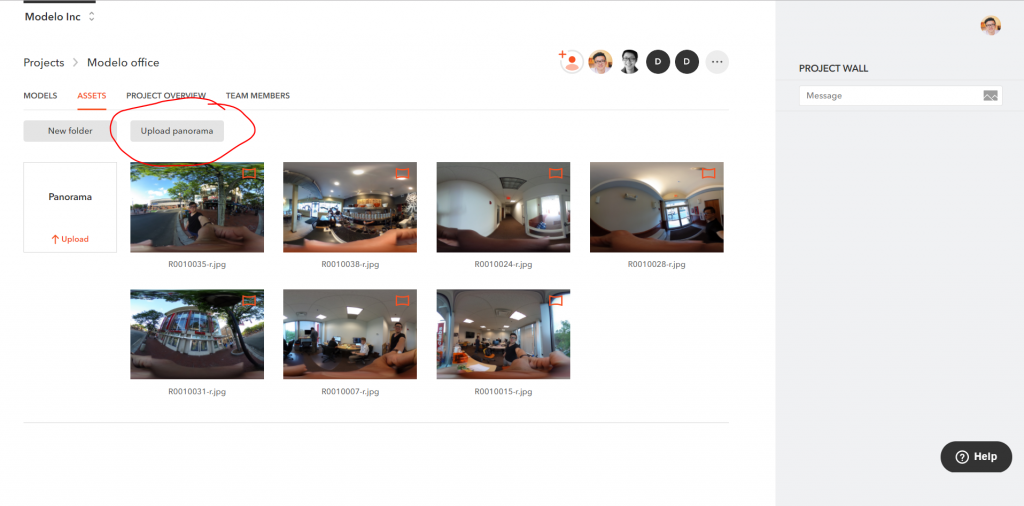
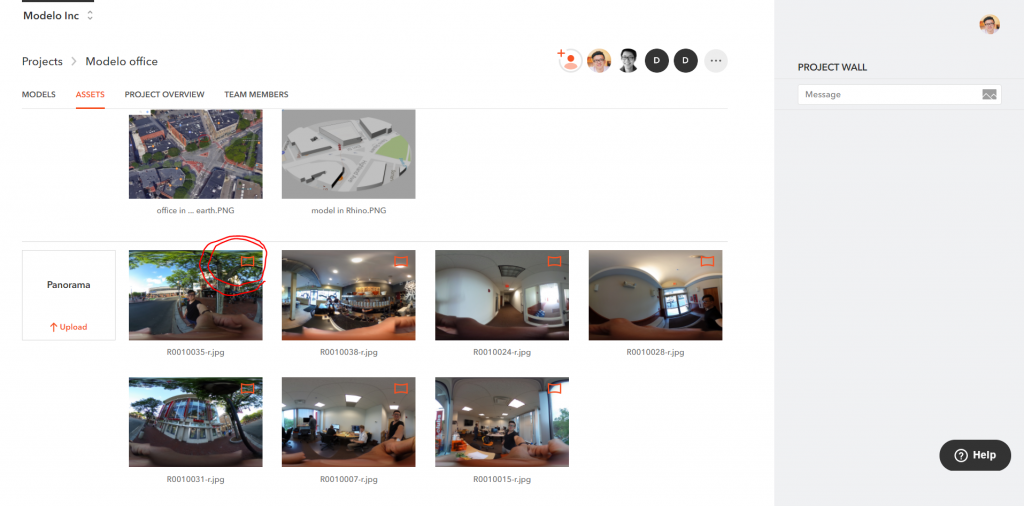
Step1 : go to your assets section and create a folder.
Step 2: click “Upload panorama” button
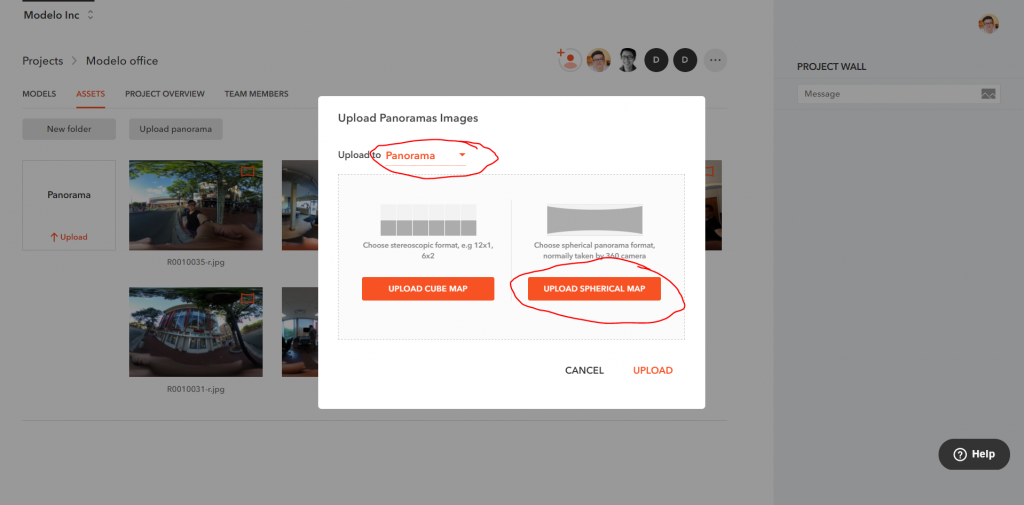
Step 3: choose “Upload spherical map” in this case and make sure you have the right folder selected.
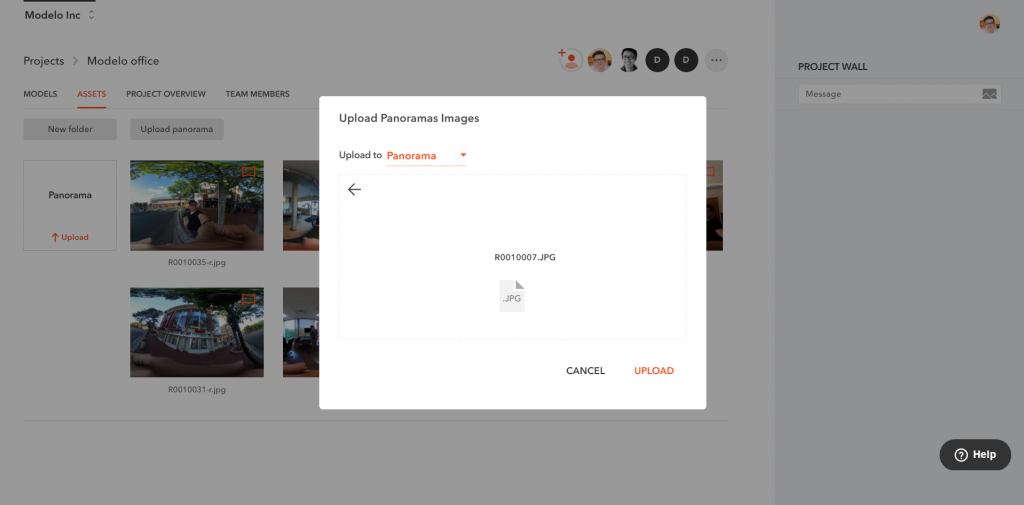
Step 4: select the file you want to upload and click Upload.
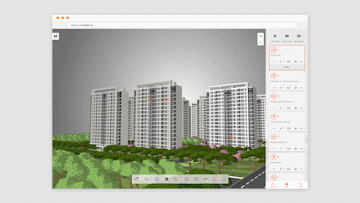
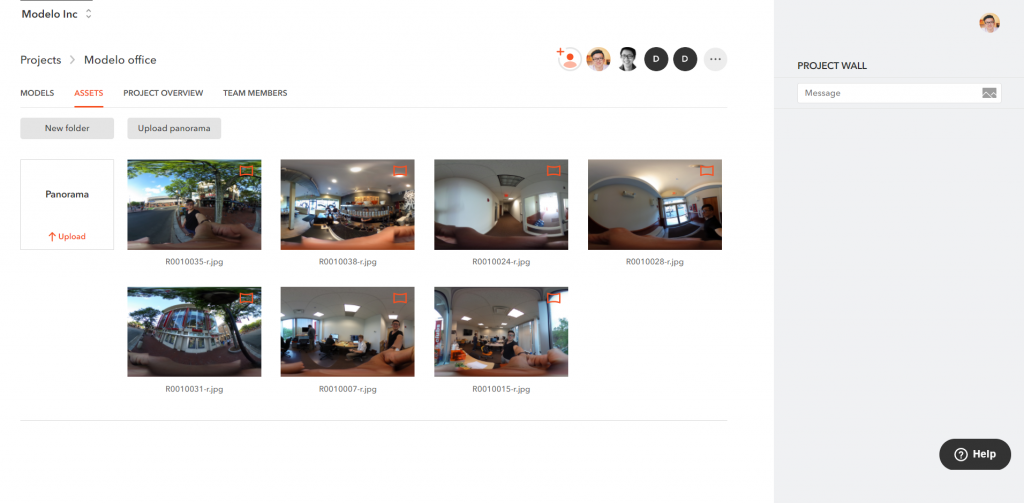
After successfully uploading these panorama images, you should be able to see them like the below screenshot. The thumbnails of panorama images have a special icon in the top right corner.
Now when you click on the panorama images, you can view them in full 360 degrees.
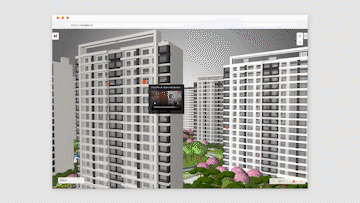
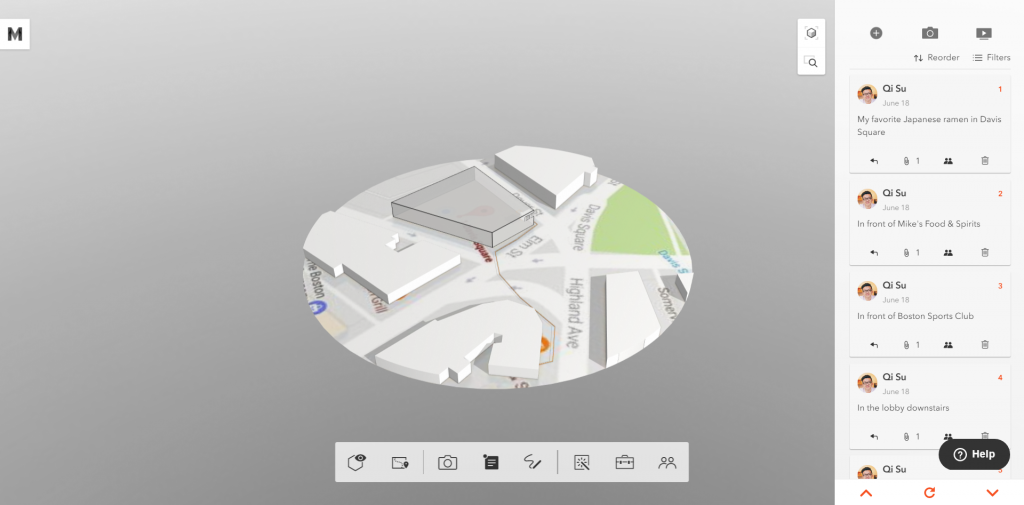
After I uploaded all of the images to Modelo, I went back to the 3D page and created 3D comment cards that reflect the locations of where I shot the panorama images.
The last step: attach panoramas to 3D comment cards.
All done! Below is the final result in 3D. Click on the comment button and then click on the attachment to view the panorama. You can turn on the present mode in the 3D page so that you can turn panorama on and off and jump from card to card more freely. Note, we will have the present mode ready for shareable links in our next release.
This concludes the brief tutorial of how to integrate panoramas into Modelo’s 3D presentation, feel free to try it yourself. In the next Modelo tutorial, we will show you how to render cubic maps and combine them into presentations.
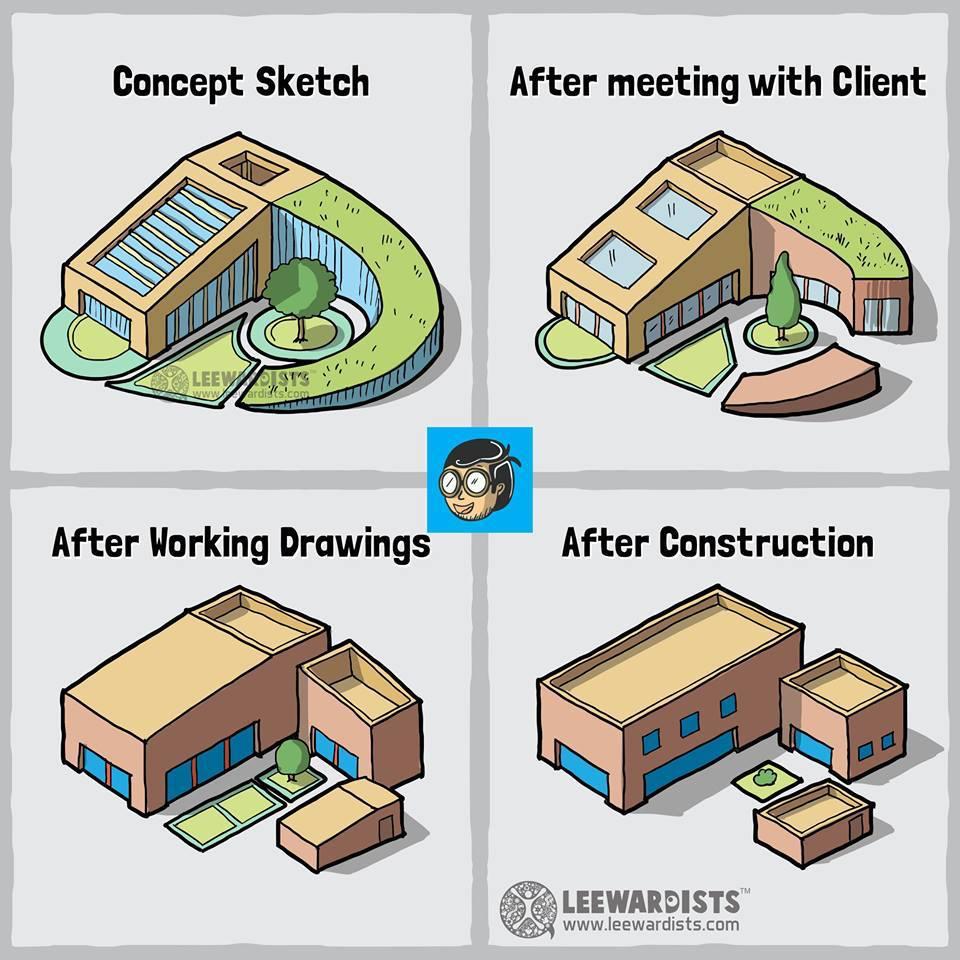
In this post, we’ll highlight the top 5 things that architects can improve on during client presentations. Client presentations are a huge part of our job as architects and communicating your vision to clients should be clear and engaging. Read on to learn how to create interactive 3D presentations and utilize Virtual Reality with clients.
A typical CAD interface
1. Directly showing clients a CAD modeling interface Let’s face it, people like to see stuff in 3D, but CAD modeling software like Rhino, SketchUp or Revit is too complicated and overwhelming for non-users to understand. Many cases have shown that clients love the interactiveness of presentations, like animations, VR etc.
Image courtesy of BIG
2. A lack of back-up options beside renderings Clients get hooked on with very minor things in one image and sometimes don’t let go. It’s always nicer to have more renderings and more design options to show, however with demanding deadlines, we never have enough time to make those happen. Nonetheless, it’s important to have multiple images to back up your renderings.
Miscommunication can lead to terrible results
3. Spending too much time and money on what the client doesn’t want Before the presentation, everything we do is based on our assumptions. We need to better communicate with our clients from the beginning. Other service-based industries like law or consulting firms all have a client-centric approach, which means more communication in order to understand what they really need.
Clients usually don’t understand or appreciate complicated drawings.
4. Presentation materials that are too theoretical or diagrammatical There is such thing as “too much architectural dialogue.” Most architects are trained to present designs in an abstract and philosophical way. In reality, people don’t think or understand in that way, especially if they are not in the industry.
Be like an architect
5. Lack of style Style is relative, but as architectural professionals, it’s always better to show your clients that you have something special. Styles could be the way you talk, present, dress and of course, your design.
At Modelo, we are building a platform that help architects to communicate the vision of their design to clients and other stakeholders. We believe with the right tools, architects and building professionals can save lots time and money on the non-design and building tasks. We already work with 3D software all the time, but we are not taking advantage of it, like making it intuitive and accessible for everyone so that we can focus on what we do best. Creating interactive 3D presentations and utilizing Virtual Reality is key for communicating your vision clearly to clients. Read this 5-step process to take the first to learn how to create an interactive 3D presentation in Modelo.
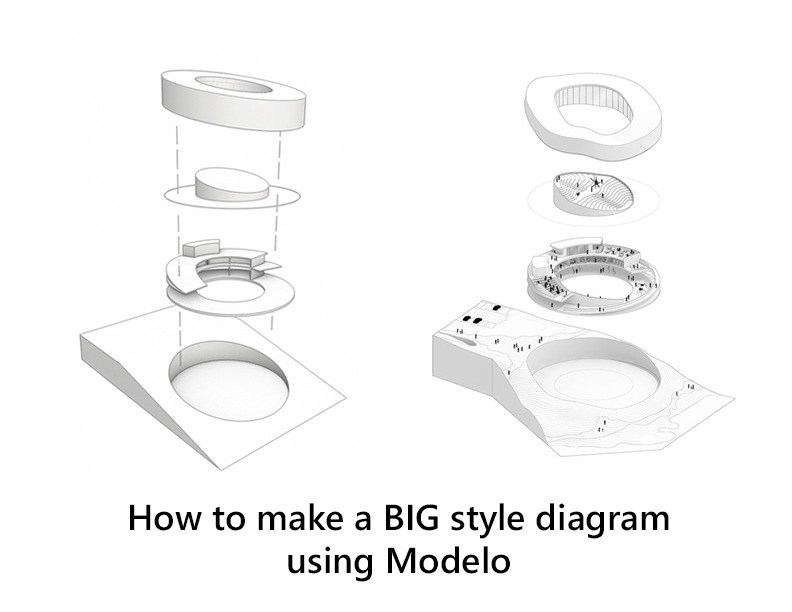
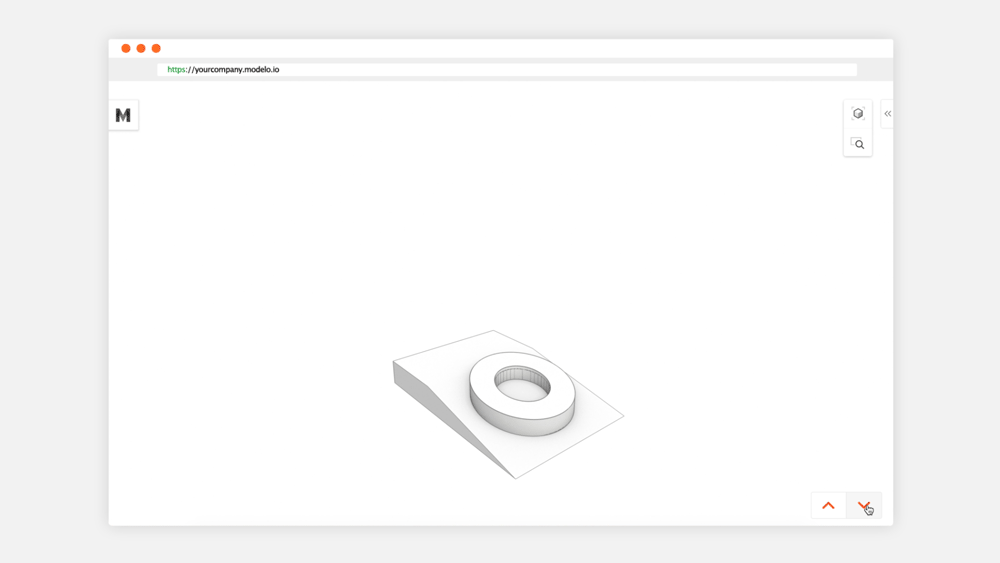
As a former architectural designer myself, it’s common to always get attracted to these “we-don’t-know-what-to-call-them” style diagrams. One of the firms that produces such drawings is BIG (Bjarke Ingels Group). Below is an example of how you can create BIG style drawings in Modelo:
Here is the diagram animated in Modelo
Part of the reason my Co-founder and I founded Modelo is that we wanted to save the time involved to generate these time-consuming renderings, drawings, and diagrams. I remember I used to spend hours back and forth between Rhino+Vray and Illustrator to achieve such visual effects. Thus, we started to rethink about what we can do to establish a standard visual style that’s appealing enough to be used in presentations and design reviews and easy enough so that we can focus on design, not overlay Make2D lines on top of a white Vray renderings in Illustrator. Introducing ArchitectEffect. (We’ve put together a Pinterest board for such drawings, if you are interested in contributing to this board, please contact us).
In this post, I will show you how to easily create BIG inspired diagrams in Modelo.
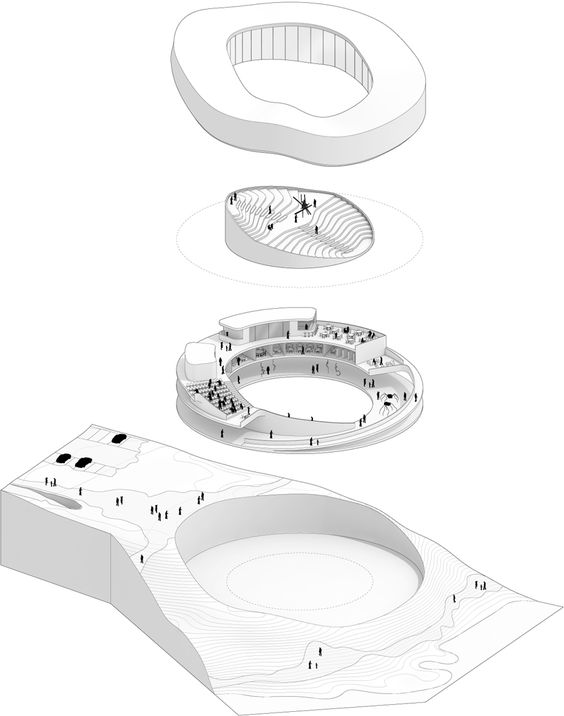
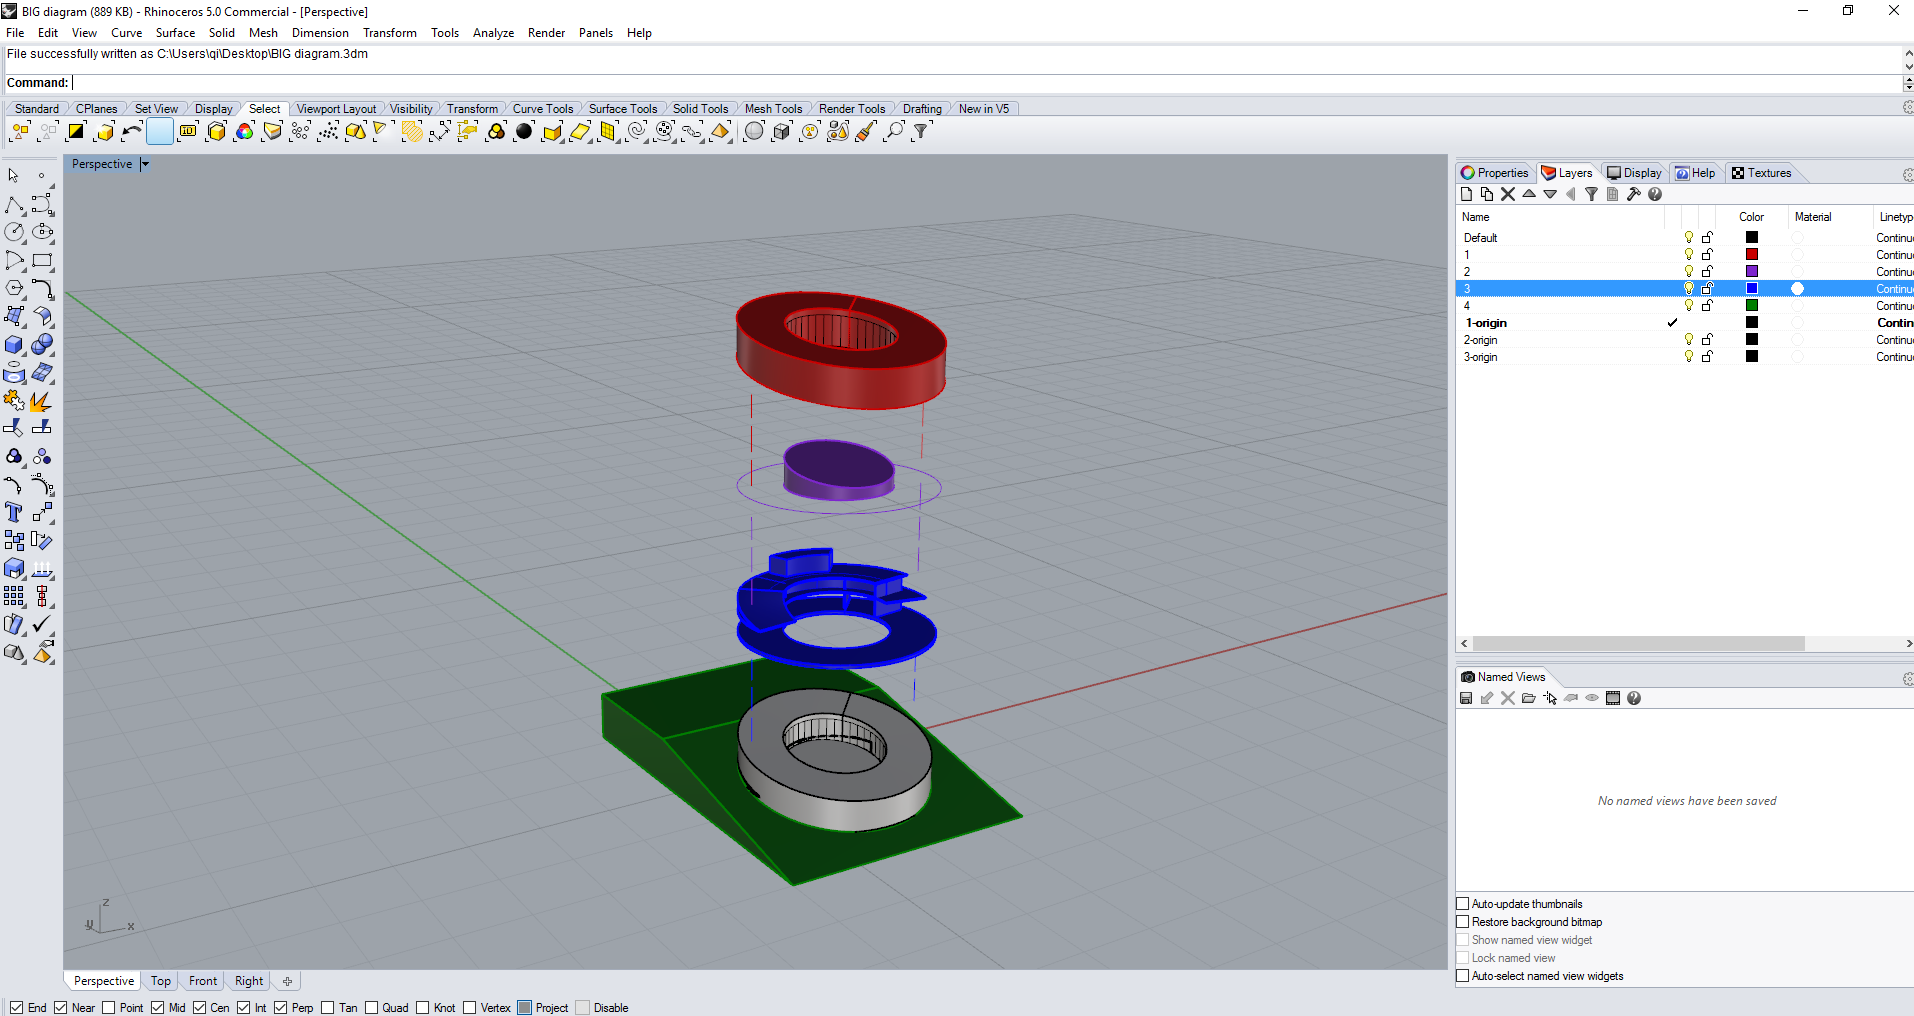
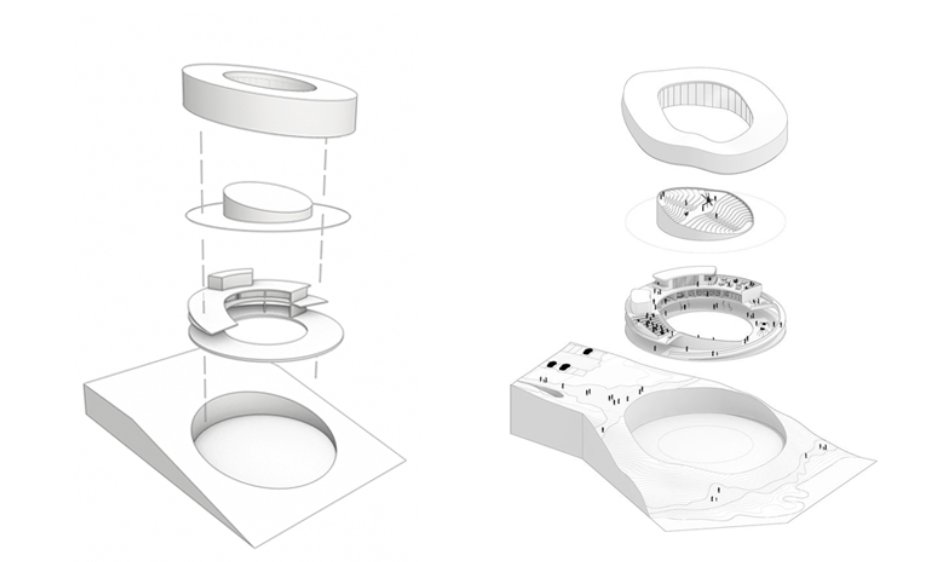
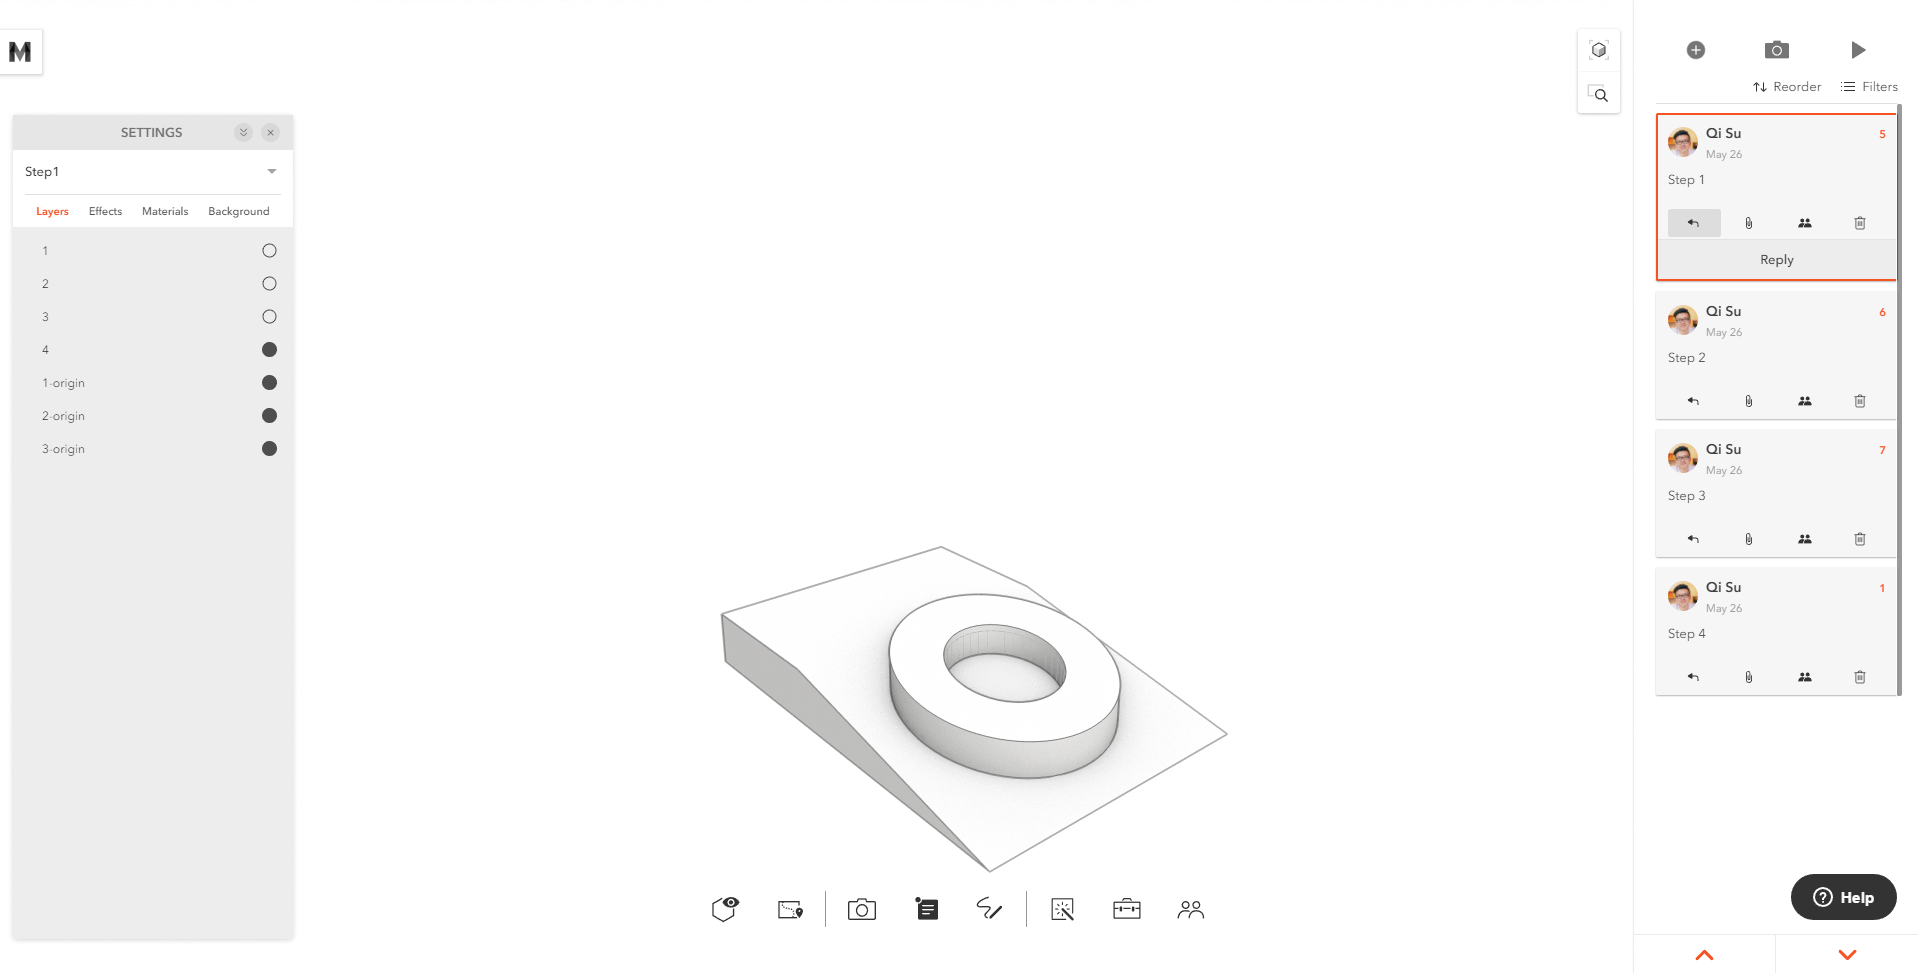
First, because I don’t have the model of this diagram, I created a simplified version of it. Below is how it looks in Rhino. I separated the four different components (site-4, building body-3, inner courtyard-2 and building envelope-1) and put each of them into a unique layer so that we can easily turn them on and off in Modelo.
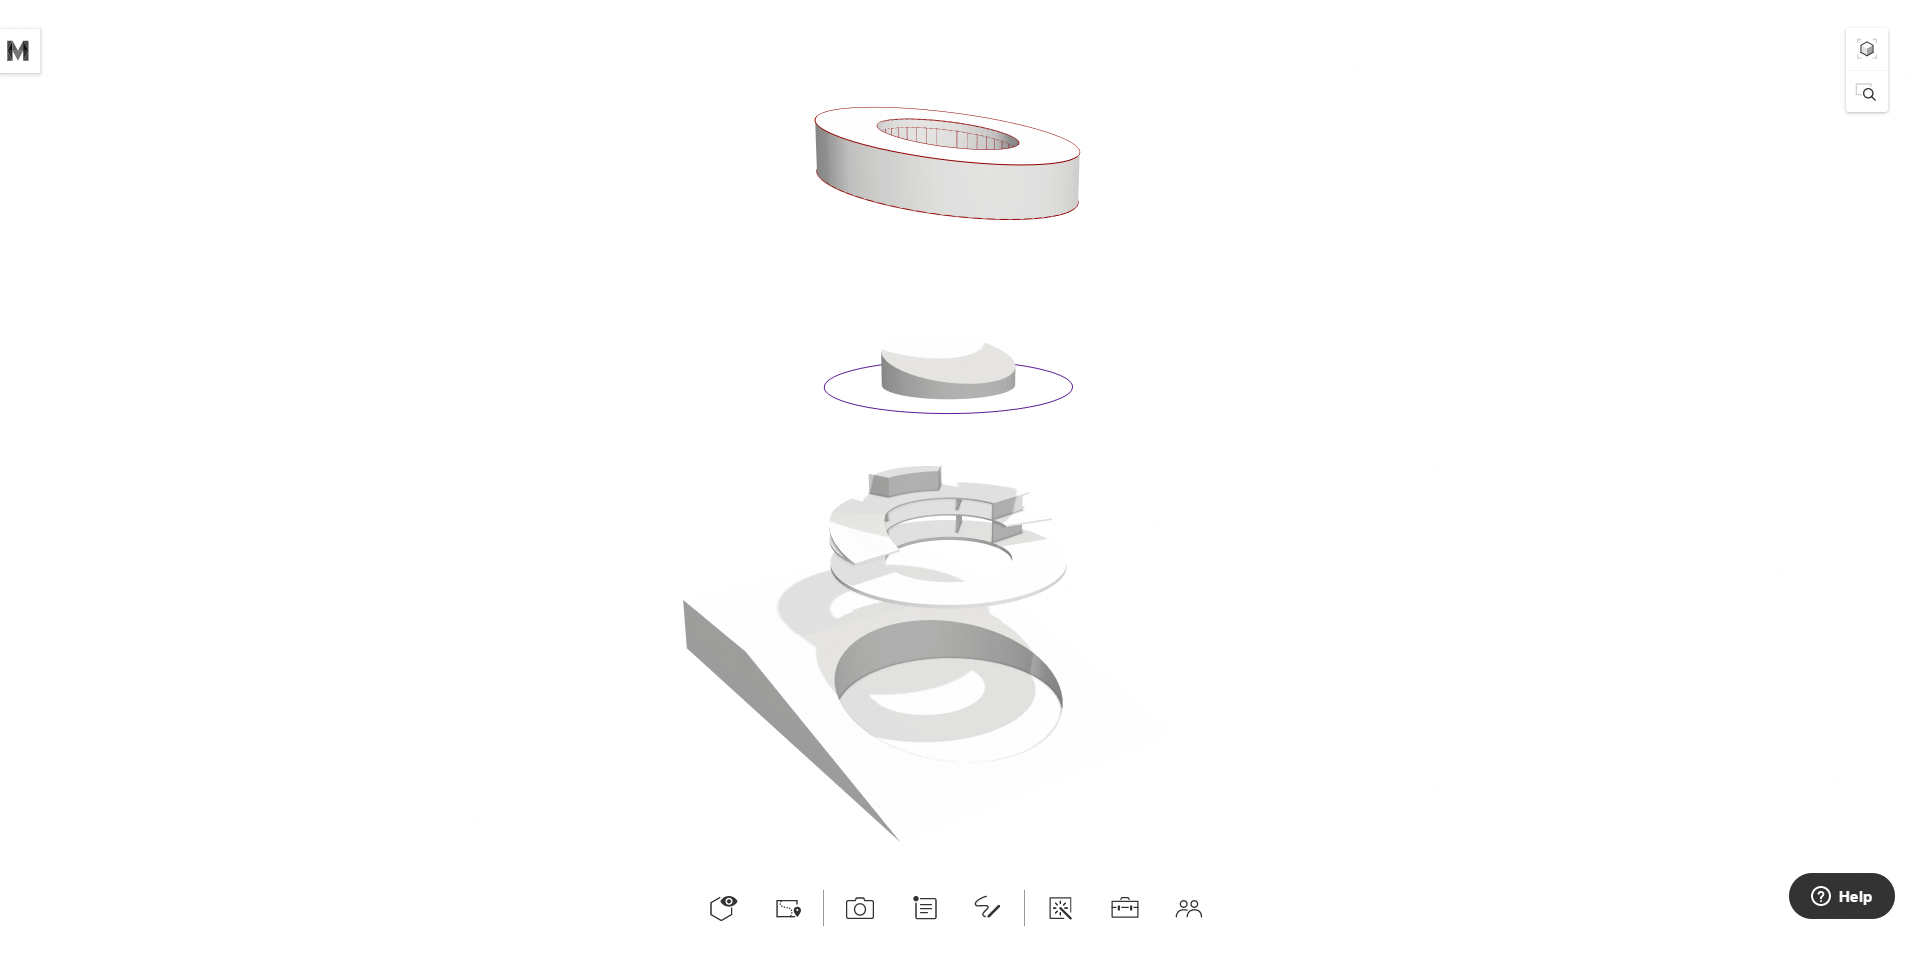
Now if we upload this BIG inspired model to Modelo, it looks like this:
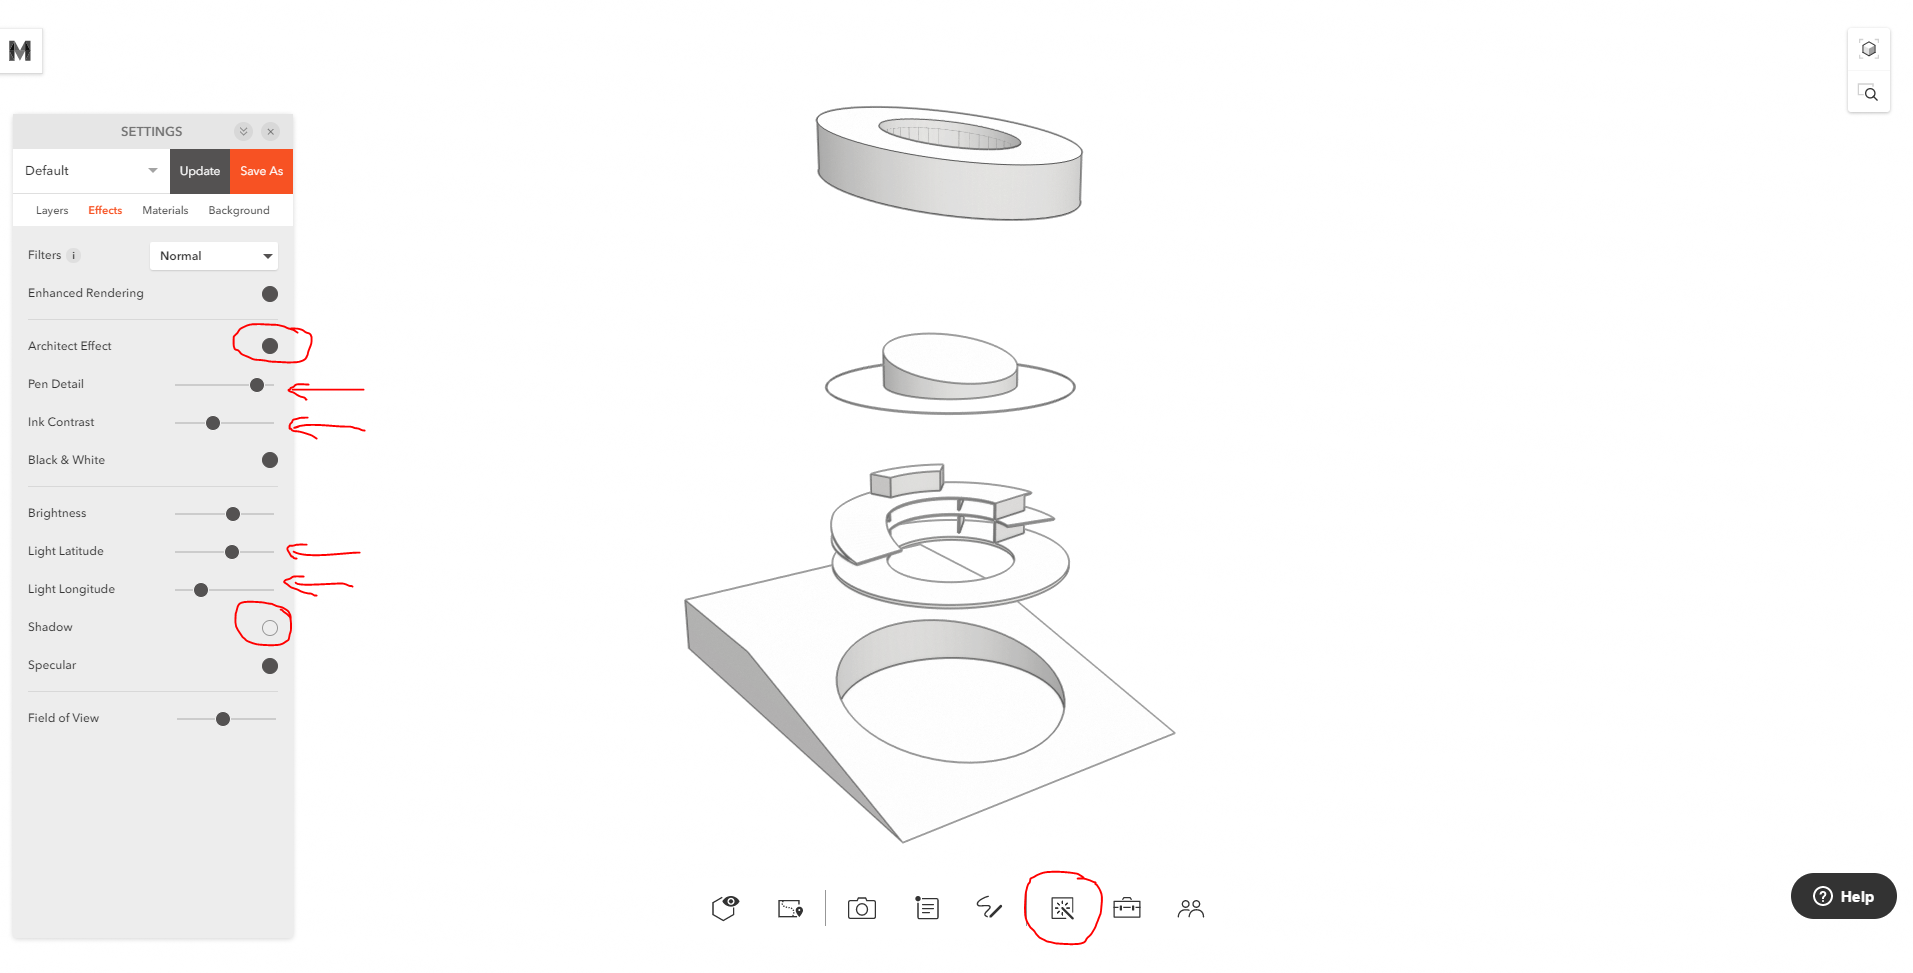
From here, you want to open up the setting panel, turn on the ArchitectEffect, adjust the Pen Detail which controls the amount of outline that gets rendered in the scene. Adjust the Ink Contrast so that all curves have a unified color. Then turn off the shadow (since there is no shadow in the example diagram, but you can keep them on depending upon your needs) and adjust the lighting direction. After all the adjustments, click Update to save this setting as the default.
Now if we take a look at this model, it gets the outlines and some ambient occlusion, but not as apparent as that in the example diagram.
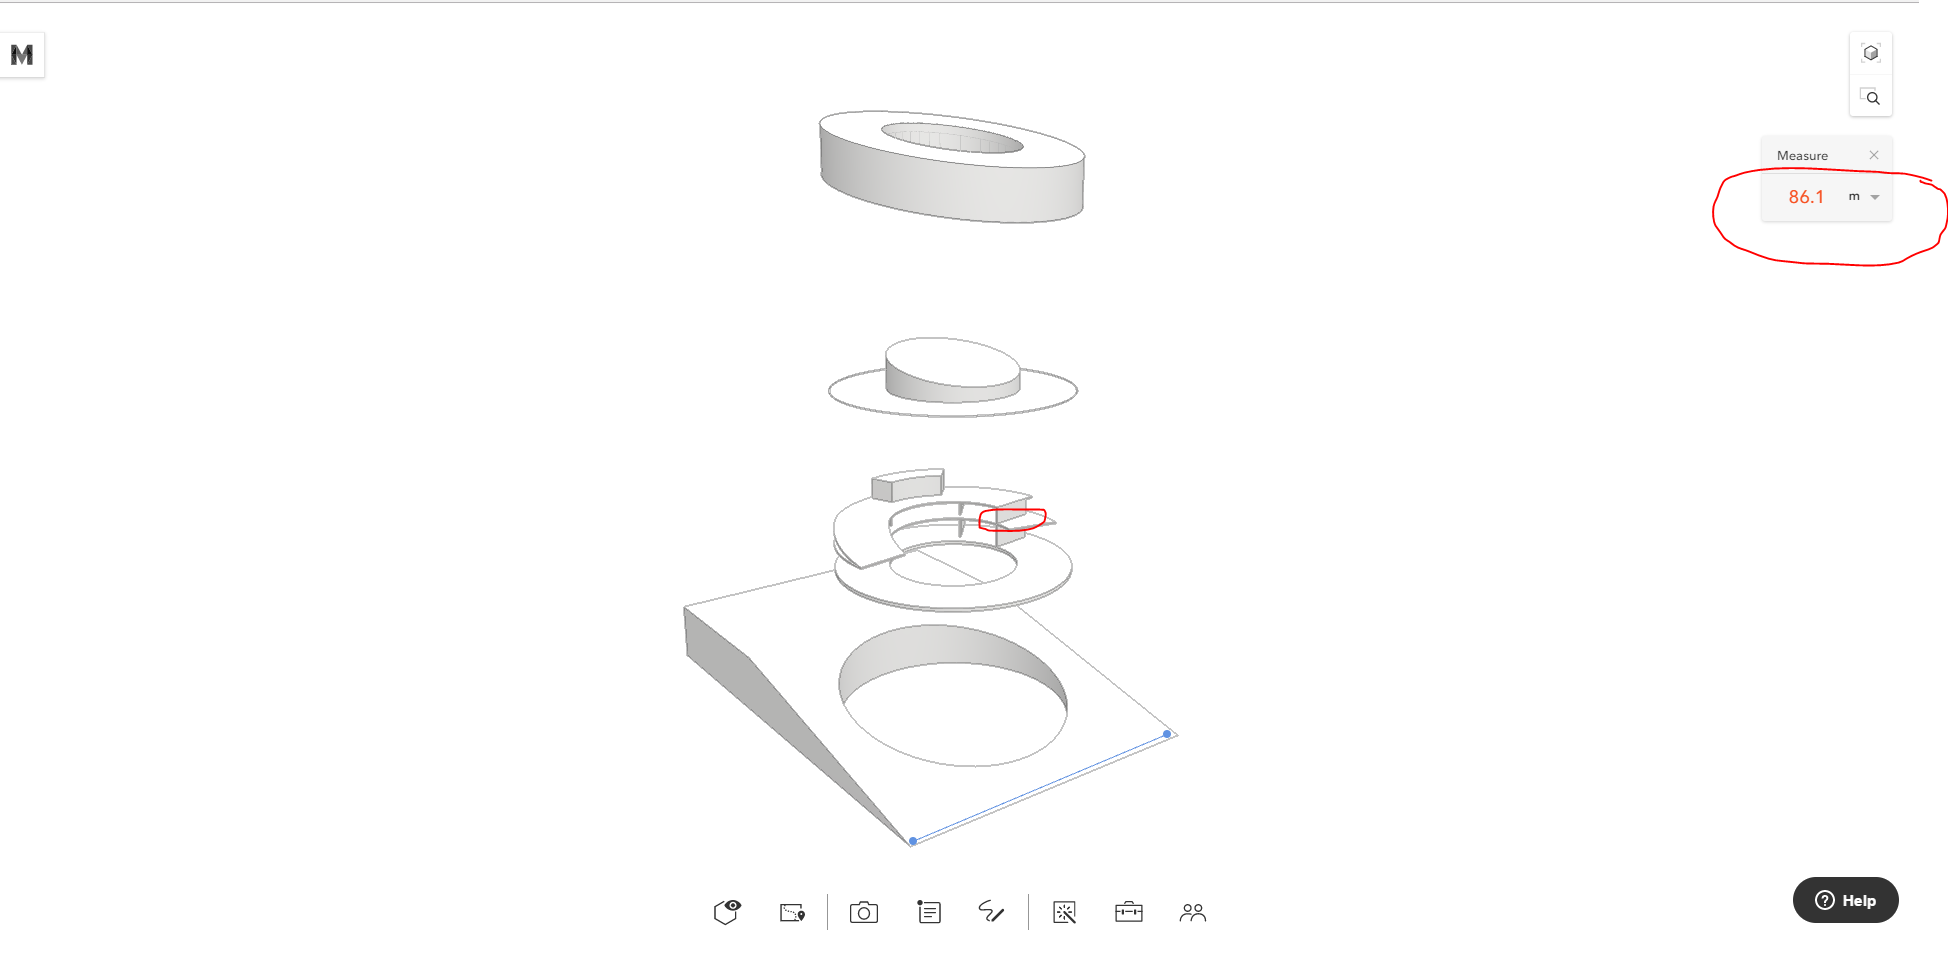
The issue is I made this model based on my assumption of the scale of a museum, as you can see from above, the sites’s width is around 90 meters. However, because the model is oversimplified, it doesn’t have the same level of geometrical complexity as BIG’s model does. And since our ambient occlusion is calculated based on real units, this model is basically too big for the AO to show up nicely. So I scaled the model down by 90%. Here is the result:
You can tell the areas around the intersection of geometries are darker, and it’s pretty close to what the BIG diagram looks like. Note, the AO will look even nicer with a more detailed model. Here is a side by side comparison with BIG’s diagram, not bad, huh?
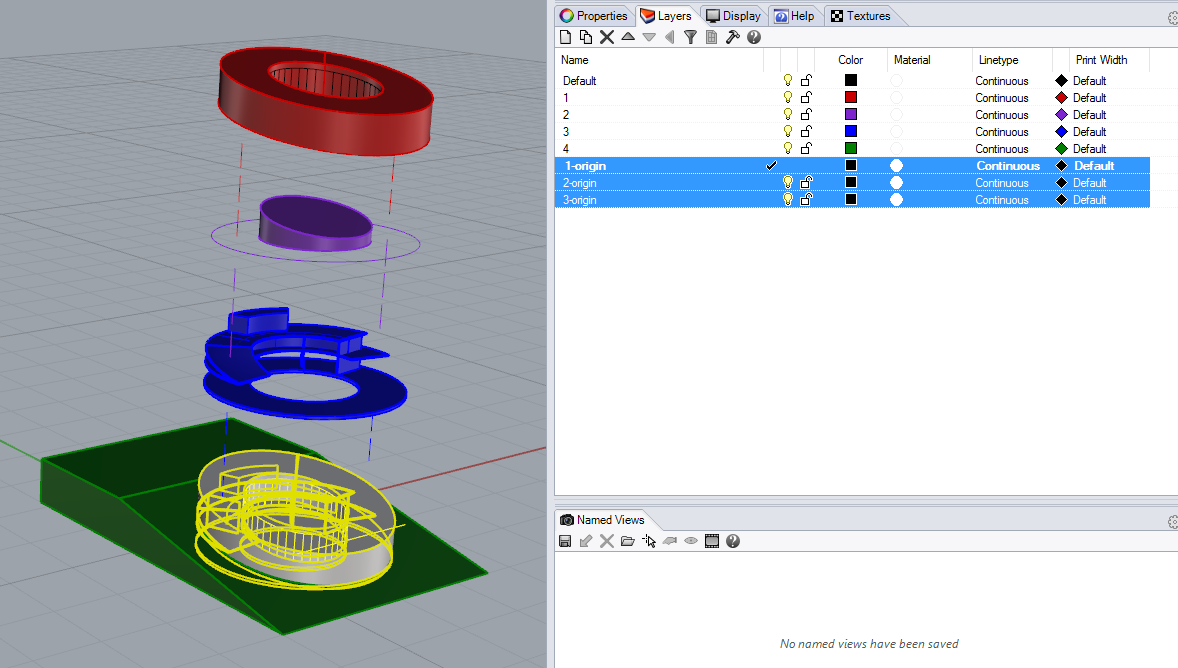
Now you know how to use Modelo’s ArchitectEffect to generate a BIG inspired diagram drawing. In addition, since everything in Modelo is interactive, we can explore further options. I went back to Rhino and created several more layers, like this:
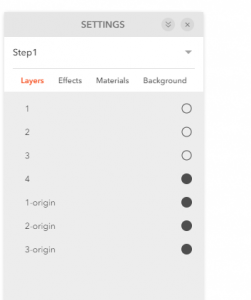
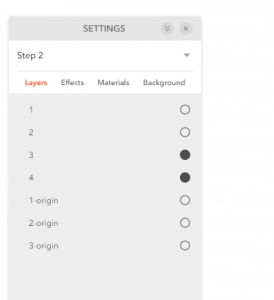
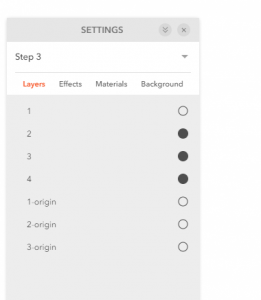
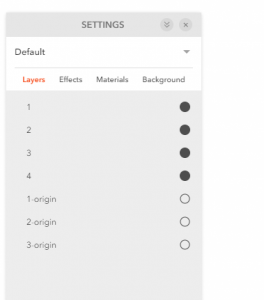
These new layers have the identical geometries from layer 1, 2 and 3. But are located where the building components are supposed to be. Now with this setup, after I upload the model to Modelo, I will have more layer configuration options. So I did a quick four-step setup in Modelo:
Then I selected a right camera view of my model and under each setting, I added a new 3D view:
With all these set up, I can then simply use the present option to achieve an animated diagram by circling through these four comment cards.
Below is how it looks in Modelo, try spinning the model around or zooming in.
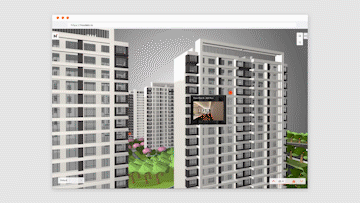
So you want to show off your 3D modeling skills… Well, we want to help you! Embedding your 3D Revit, Rhino, SketchUp, 3DS Max or Vectorworks model into your blog or portfolio website using a small piece of code we provide through Modelo. This small snippet of code creates what is called an “iframe” (an inline frame of html, embedded within a website). If the blogging tool you use supports iframes, then you should be in luck. Now onto the embedding!
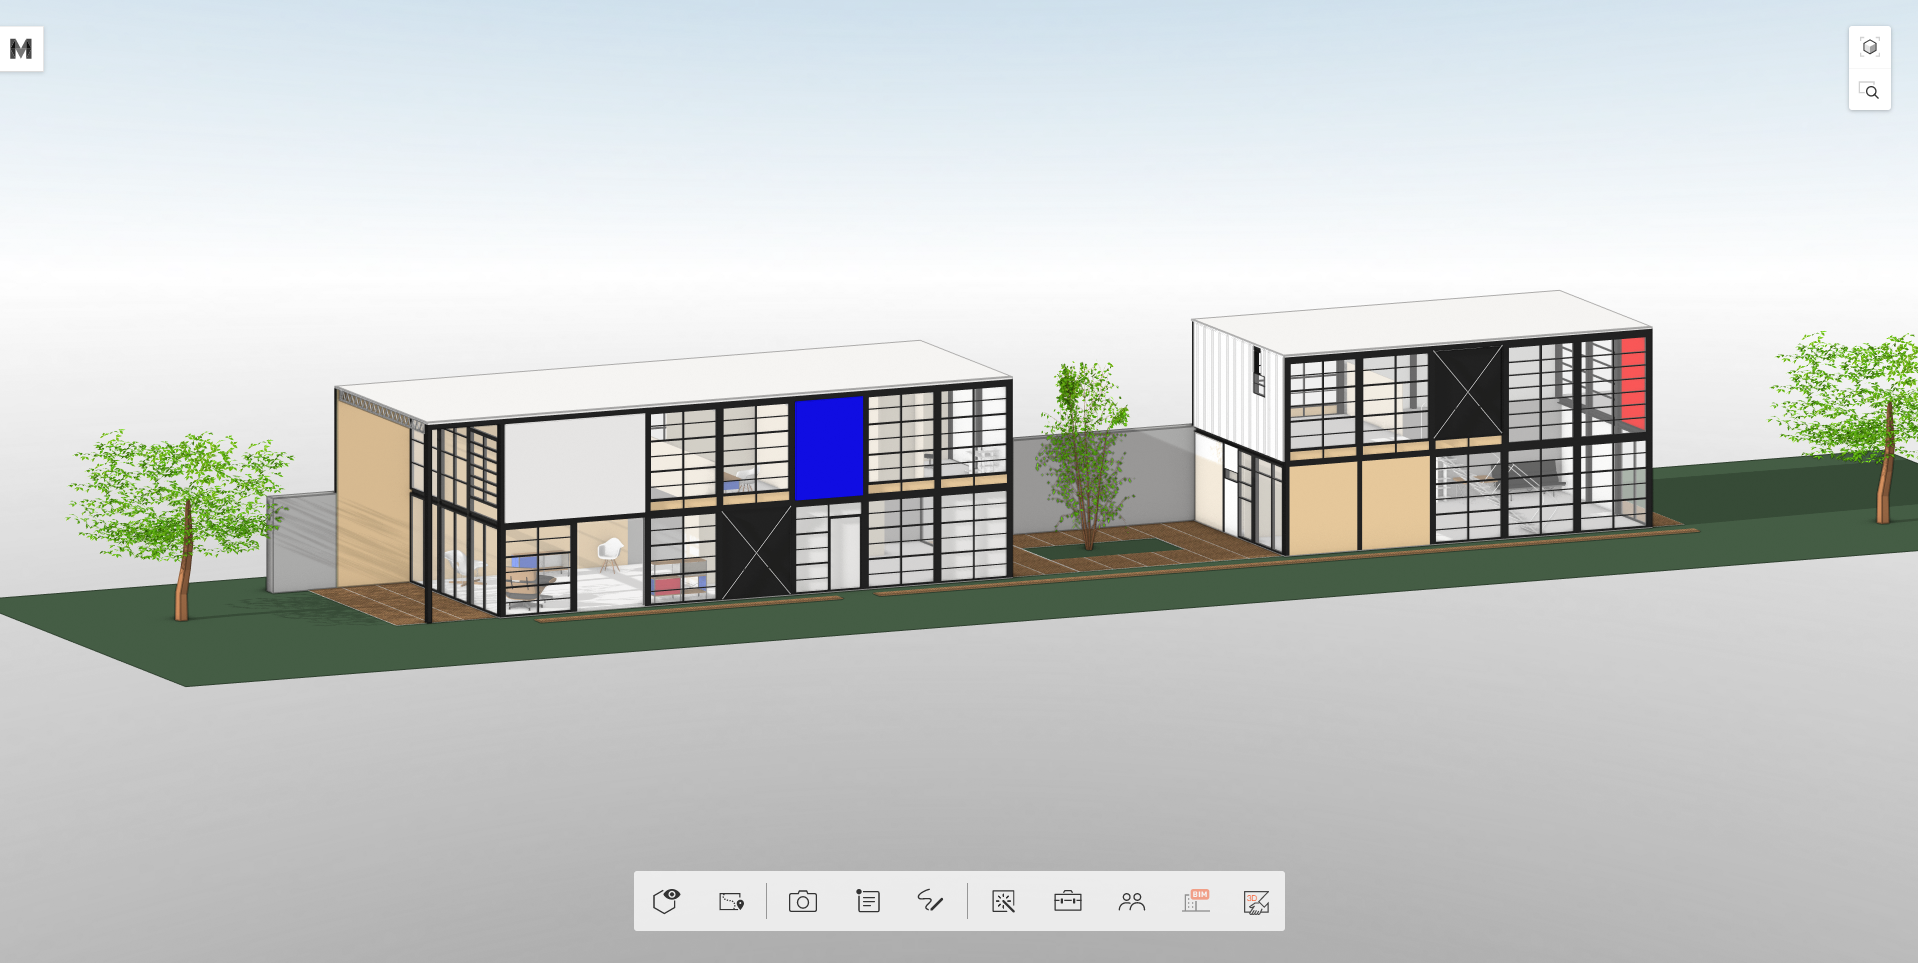
1. View your Model in the 3D viewer
Once you upload your model, navigate to the 3D view page, which looks like the screenshot above.
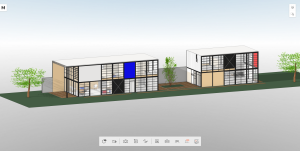
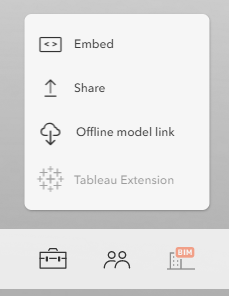
2. Click the Share icon and select “Embed”
From here it’s easy. Click the share icon at the far right of the toolbar and select the “Embed” option. This will open an Embed Options popup, which provides you with your html code for the iframe.
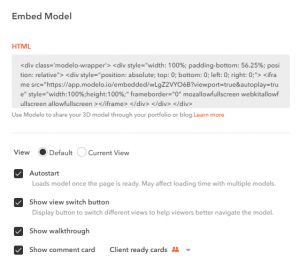
3. Choose your Embed options
Let’s look at each of the elements in the image above individually:
Embed code: This is the text you will copy and paste into your blog or website’s HTML. Click the text once to select it, copy it, then paste it into your site. (We’ve included some helpful links to iframe how-to for some of the most popular blogging sites below)
Size: This sets the size of the embedded model. The default is 640 x 360 – experiment with this to find the best fit for your purposes and the format of your website’s content. Pro-tip: you can adjust the width to 100% in order to have an adaptive window.
View: Default / Current View allows you to set the angle or perspective of the model when it loads on your site. Selecting Default will display the model in your embedded viewer as you see it when you first open it in Modelo. If you have a particular angle you want the model to be displayed at when it loads, cancel the Embed, rotate the model to your preferred position, and then select Embed and toggle to “Current View”
Autostart: Automatically loads the model on your site so that a user can immediately begin it. Keeping Autostart turned off will display a preview of your model with a Play button superimposed on top. If you are planning to embed a number of models on a single page, you should consider keeping Autostart turned off, otherwise, the load times could slow down significantly.
Autospin: The embedded model rotates slowly around the center when the model starts to display. If you drag to view the model, the autospin will pause a few seconds. Then it will continue when the users stop operating.
Show view switch button: In the top right corner, a small cube is displayed. Hovering over this cube pops out three different perspective views that allow your visitors to quickly change angles of view between: Top/Bottom, Front/Back, Left/Right and Default.
Hide Tools: When clicked this option, the toolbox will not show in the embedded models. Pro tips: if you don’t want customers to see the dimensions and the model inside. You prefer to check this box.
Show comment card: 3D comment card is another powerful feature of Modelo, you could use them to organize and showcase different design options, layer configurations, camera angles, as well as annotating in 3D. Check this tutorial out for more information:
Show walkthrough: You could easily create a walkthrough in Modelo interface, so when your website’s visitors see the model, they could simply click the play button to experience your 3D space like they are in it. The walkthrough option will only show when the ” Show comment card ” is clicked. Check this tutorial out for more information:
Show comment card: 3D comment card is another powerful feature of Modelo, you could use them to organize and showcase different design options, layer configurations, camera angles, as well as annotating in 3D. Check this tutorial out for more information:
4. Copy and Paste your Embed iframe html
With your Embed settings selected from Step 3 copy the iframe text (which will change slightly based on your preferred settings). Switch to the page in your blog or website in which you want to embed, select the embed option and paste!
Here’s what it would like in Squarespace (for example):
First add a block and select the “Embed” option outlined here in red, then paste your copied iframe html code into the box.
Keep in mind: You will probably need to play around with the settings a bit and explore the embed support options within your own publishing platform.
Here are some links to helpful support pages for a few different publication platforms:
WordPress – WordPress is a bit more complex, if you are familiar with working in html-mode adding the embeddable iframe should be easy. If not, you may need to do a bit more exploration. WordPress’s Embed Codex page might be a good place to start or the Embed Plugins page.
Next tip: learn how to customize your settings in Modelo before you share with clients or colleagues here.