Generate Shareable Links for 360º Images for Clients with Modelo

360º images are quickly becoming a go-to asset for presenting designs in an immersive way. With Modelo, sharing 360º images with clients has never been easier. Modelo allows your clients to easily access 360º images in a way that makes them feel as if they are standing in a design looking around at the real project site.

Panoramas can be shared individually or grouped together into a single shareable link, allowing clients to easily navigate through multiple panoramas. What’s more, your client doesn’t need to download any software, log into any applications, or have a special device to view the 360º images you share with them. In fact, all they need is an internet connection. In addition, when viewing 360º images on their phones, clients will quickly be able to jump into VR for an added wow factor.

Sending a 360º image or a series of 360º images to your clients can be done in seconds following these simple instructions:

Sharing a single panorama:
When in your Assets tab, you will have a view of all the panoramas you have uploaded into Modelo. Hover your mouse over the one you want to share and click on the share arrow.

This will generate a link for you to copy and share with clients. You can also preview the link to make sure everything looks great before sending.


Sharing multiple panoramas with one link:
To share multiple panoramas for your clients to navigate through in a single link, simply share the entire folder containing the images you want to share. First, in the Assets tab, make sure you have the panoramas you are sharing in the same folder. Then, hover over the folder with your mouse, click on the three dots in the top right corner, and click share.


Then a URL link will effortlessly be generated for you.

Next up, learn about 5 creative ways to use 360º panorama images in Modelo. Sign up today for FREE to start immersing clients in your panorama images today.

Creating Powerful Presentations with 360º Panorama Images

Architecture is about designing a space for people to connect with each other, create memories and come together. And realizing this noble pursuit is easily achieved when the building has been constructed. But, how do you communicate this sentiment with your client when you are still in the designing stage? Enter panorama images. Or, more specifically, presenting beautifully rendered, 360º panoramic images.

Presenting 360º images, particularly in Modelo, is a powerful and very easy way to immerse clients, contractors, and colleagues alike in your vision. To make your next presentation a success, try presenting panoramic images in context.

If you are familiar with Modelo (and if you aren’t, click here to set up a FREE FOREVER account), you will know that you can upload your model from almost any CAD software and use Modelo’s comment cards mark it up with new ideas, feedback, and comments anywhere on your model. When you are ready, these comment cards can be marked as being ‘Client Ready’ which means they are all set for your client to review. Now, here is the pro tip: attach panoramic images to your comment card using the paper clip icon.

Add comments to any area of your 3D model in Modelo for ultimate collaboration.

Imagine you have nailed your design brief and are showing your client all of your hard work. You’ve created an engaging 3D walkthrough of your design (which you can also create in Modelo) and it has whet their appetite. But, as you look across the table to your client, you notice that the client is struggling to imagine what their design will look like when construction is finished, a situation that I’m sure you are no doubt familiar with.

Upload 360 images to Modelo for an immersive design review process

Well, the answer is that you explore each aspect of your design, open the attached panorama image and wow your client with a high resolution, photo-realistic rendered panoramic view of that same area.

For an even more immersive experience, give your client a Google Cardboard and let them view a 360º panoramic image in virtual reality.

If you would like help from Modelo creating or attaching panoramic renderings, please contact hi@modelo.io or call your Success Specialist on +1 (617) 945-8692.

Make Design Decisions Faster by Using VR

Virtual reality visualizations allow AEC professionals to make informed design decisions on complex 3D designs quicker, allowing you and your firm to close more deals.

When you create VR tours of your 3D models, you essentially bring your design to life. No longer are you staring at a 2D drawing or even a 3D model on a computer screen. But you and your client are virtually walking through the front door, deciding which new kitchen counters to install, examining the specs of the bathroom, and truly immersing yourself in a realistic representation of the brand new charming house your client has dreamt of all her life. Plus, add a 360º image as the background of your 3D model and surround the house with the mountain flowers of Aspen, Colorado to give the full effect. After all, seeing is believing.

It’s not a mystery that designs go through many phases, and with those phases come lots of decisions. VR allows you and your client to come to design decisions quicker and it prevents misunderstandings or costly rework down the road. By using VR as a collaboration tool throughout the design review process, everyone can be on the same page, looking at the same model in VR. Modelo encourages thoughtful and beautiful design, but above all we encourage collaborative design.

When firms use Modelo’s VR tool, they upgrade their design capabilities and decision making to the next level. Learn how Modelo works perfectly with Google Cardboard, a less expensive but equally effective VR headset that’s easy to set-up. Further, pairing Modelo + Google Cardboard is especially easy for clients to use because there are no downloads required and it’s extremely intuitive for non-designers. When clients are immersed in the project along the way, they are more involved in the decision making, meaning that it’s easier to come to necessary conclusions. A client-centered approach means closing more deals and making your organization more money.

Use Modelo to view complex 3D designs in VR.

Besides client communication, VR is especially beneficial for internal collaboration. VR helps architects and designers understand their own designs better, thus allowing them to make design decisions quicker, be more productive and win more deals.

View complex 3D designs and make informed design decisions easier by using VR and Modelo throughout the design process. Sign up today for a free forever account.

Best Way to Communicate Design Options with Clients | Modelo

Here at Modelo, we focus on making life easier not only for designers but also for clients. Communication is a key aspect of the design process and using Modelo is the best way to communicate designs with clients.

Modelo equips clients with the right tools to track progress, give important feedback and make sure everything is aligned with their overall expectation. Plus, a client will never need to create an account, log in or download anything. Your client can have access to their project at all stages of the design process by simply clicking on a URL link. Below you will learn the best ways to communicate design options with clients.

Sharing 3D models with a unique URL is one of the easiest and best ways to communicate with your clients. You can share different design options, renderings, walkthroughs and much more by simply clicking on a URL from any device. This means the client doesn’t need a face-to-face presentation or need to be on a screen share to be updated on how things are going. As we know clients, just like designers, are very busy. Therefore, having the ability to collaborate with a URL allows clients to stay updated and communicate from any device, anywhere that works for them.

Most times when it comes to communicating with clients, it is done with 2D images. Clients receive an email with a long paragraph of explanations on what they are looking at and with photos attached. With Modelo, the best way to communicate images to clients is by taking a high definition screen capture in the platform. This then creates a comment card and from there you can make the comment card “client ready.” Then click the share button and send it directly to your client. The client will be able to view the photo by clicking on the URL in the email and will even be able to communicate feedback right on the comment card in real-time.

As you move into different stages of the design, it becomes more and more important to share different design assets with clients, such as floor plans, renderings or 360º images. The best way to communicate those design assets is to upload them into your assets folder and once again share them with a unique URL. From there the client can view, download and share those assets from any device. This saves a ton of time for the designers and the clients.

One of the biggest requests from clients in the design process is the ability to walk through a space to see how things are coming along and to quickly jump into VR to truly understand the space as it is being designed. The best way to communicate those walkthroughs and VR tours is by using Modelo. These can be easily created and viewed by clients. No fancy hardware needed and no need to be on a certain device to view anything. In seconds you can create a 3D walkthrough and share it directly with your clients or even create different comment cards in Modelo that will double as the scene in your VR experience.

Overall, it’s important to collaborate and communicate with clients during the design process. Sign up today for free and get started!

11 Ways to Be More Productive with Modelo

At times, the sheer number of software applications promising improved productivity can be overwhelming. Oftentimes, you may feel as though you spend more time evaluating software applications to improve productivity, rather than actually using them to be more productive. To avoid Modelo from falling into that trap, the team behind Modelo reached out to hundreds of Modelo users and asked them to help compile this guide. The final result is presented below for you to review and includes the top 11 ways that Modelo has been proven to deliver increased productivity.

To download this guide as a PDF eBook, click here.
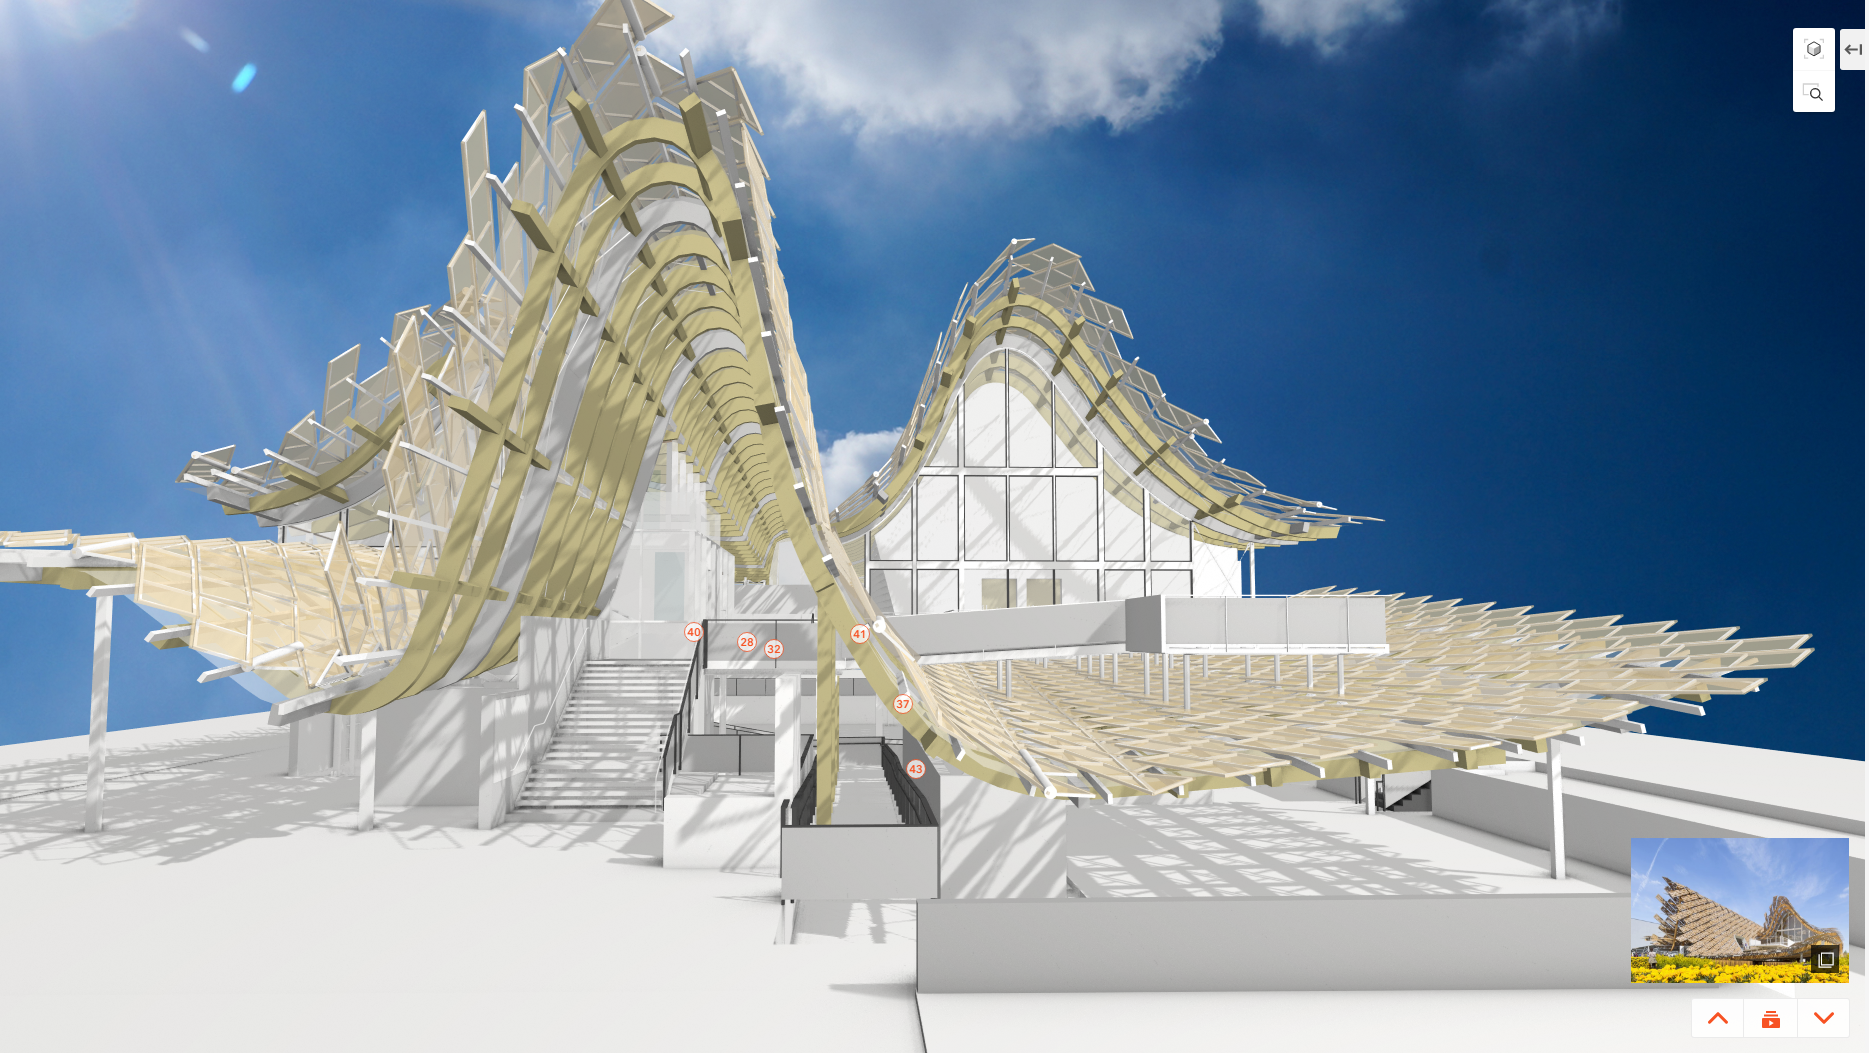
Learn Modelo's toolbar with functions like comment, share and walkthrough.

Learn the Toolbar

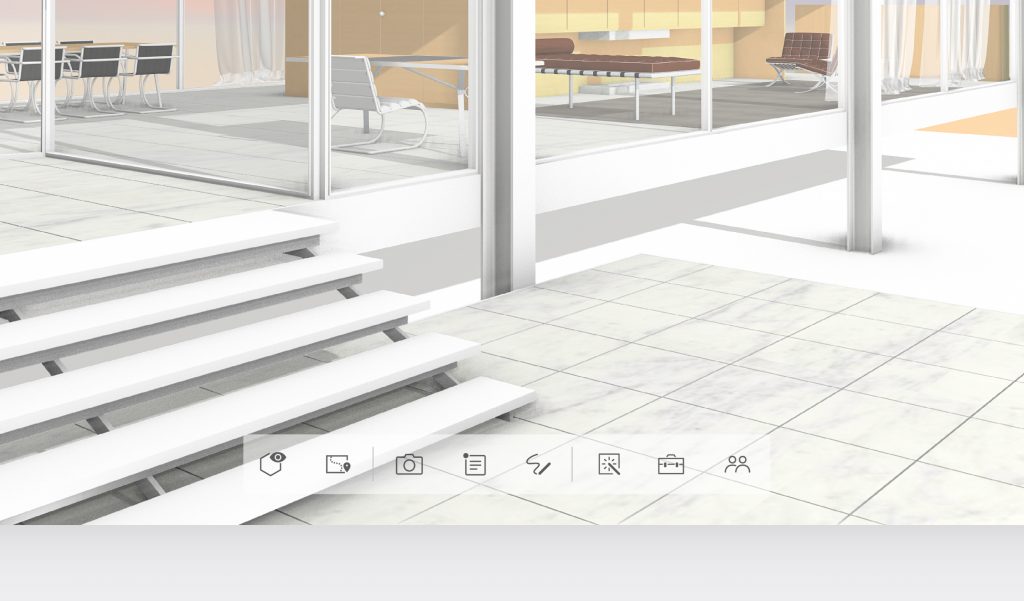
The toolbar in Modelo is the nerve center of your productivity. To make the most of Modelo, you are going to want to become familiar with, and ultimately master, the functionality it offers. As a brief summary, the icons from left to right are:

    1. Orbit View / First Person View: Toggle between viewing your designs in first person or orbital view.
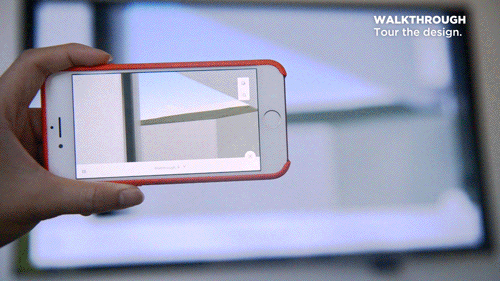
    1. Walkthrough: Create a walkthrough, or flythrough, of your design by dropping waypoints along your desired path. For a comprehensive explanation on how to create a walkthrough in Modelo, click here.
    1. Screenshot: Capture the current view of your screen in high or low resolution. Send it to a colleague or client or download it for later reference.
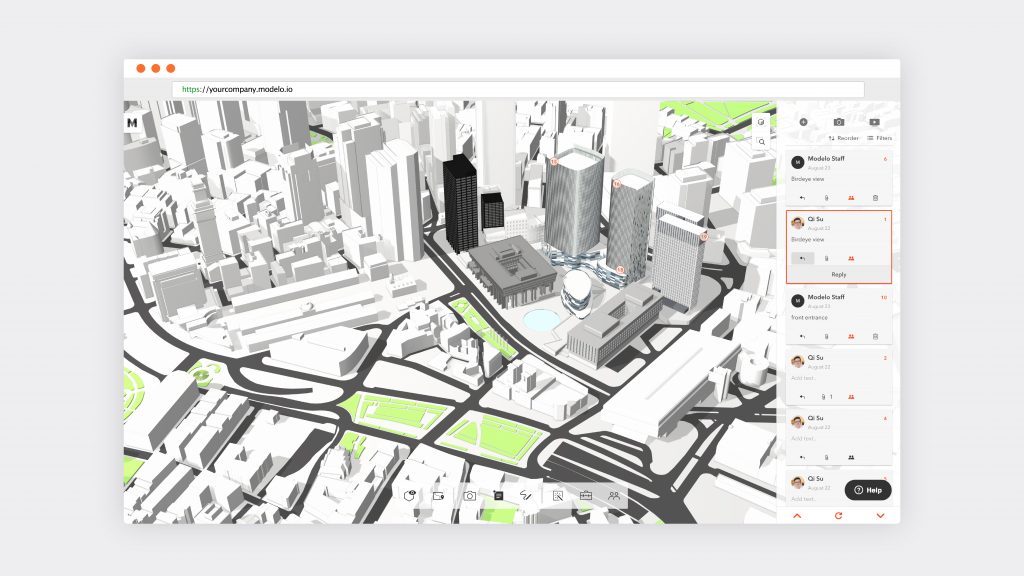
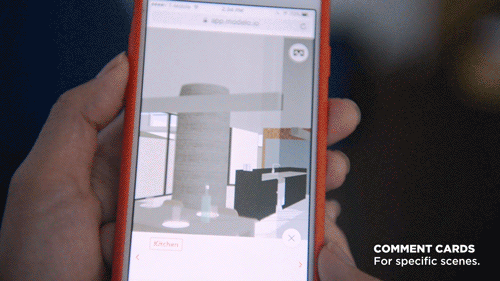
    1. Comment: Provide pinpoint feedback on your models by making a comment anywhere on your designs. Attach files to comment cards and use them to guide presentations. For a complete overview of how to best use comment cards in Modelo, read this guide.
    1. Sketch: Markup your designs in a variety of ways using Modelo’s sketch tools. A variety of colors, borders, line markings, pen weights, and other formatting tools are available to you.
    1. Settings: Adjust the settings that apply to your design. Select between a multitude of options under the Layers, Effects, Materials, and Background headings.
    1. Tools: Use Modelo to create section cuts, take measurements, zoom and pan, and see your design in full screen.
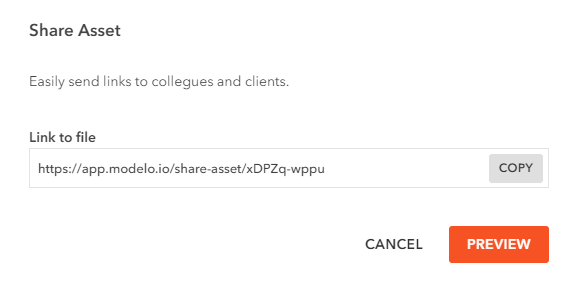
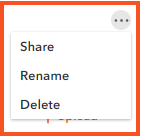
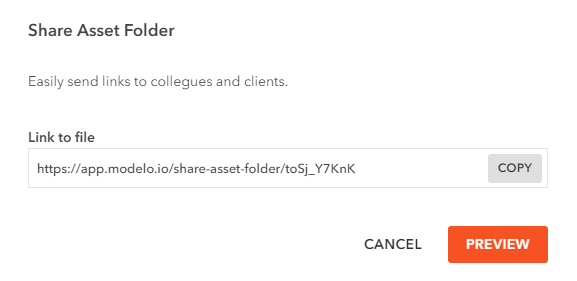
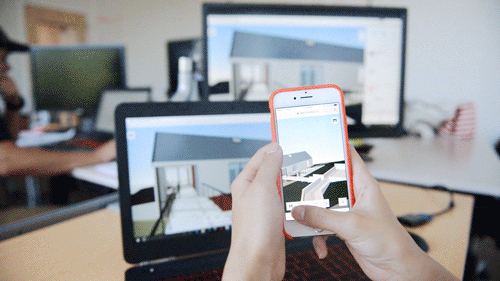
  1. Share: Sharing your design with clients and colleagues is one of Modelo’s most powerful features. You can generate HTML code to embed your design in a website, create a unique URL to share your designs, or save your design to view in an offline environment.

Create 3D views and scenes of any view of your design with Modelo.

Create scenes

Creating scenes of your designs isn’t a task that is exclusively reserved for your very expensive CAD software. Once your model is uploaded, you can create views and scenes of any view of your design. For instance, you can present different design options to your clients and have them provide feedback directly in Modelo. Of course, if you do create scenes in your CAD software, you can upload these to Modelo as well.

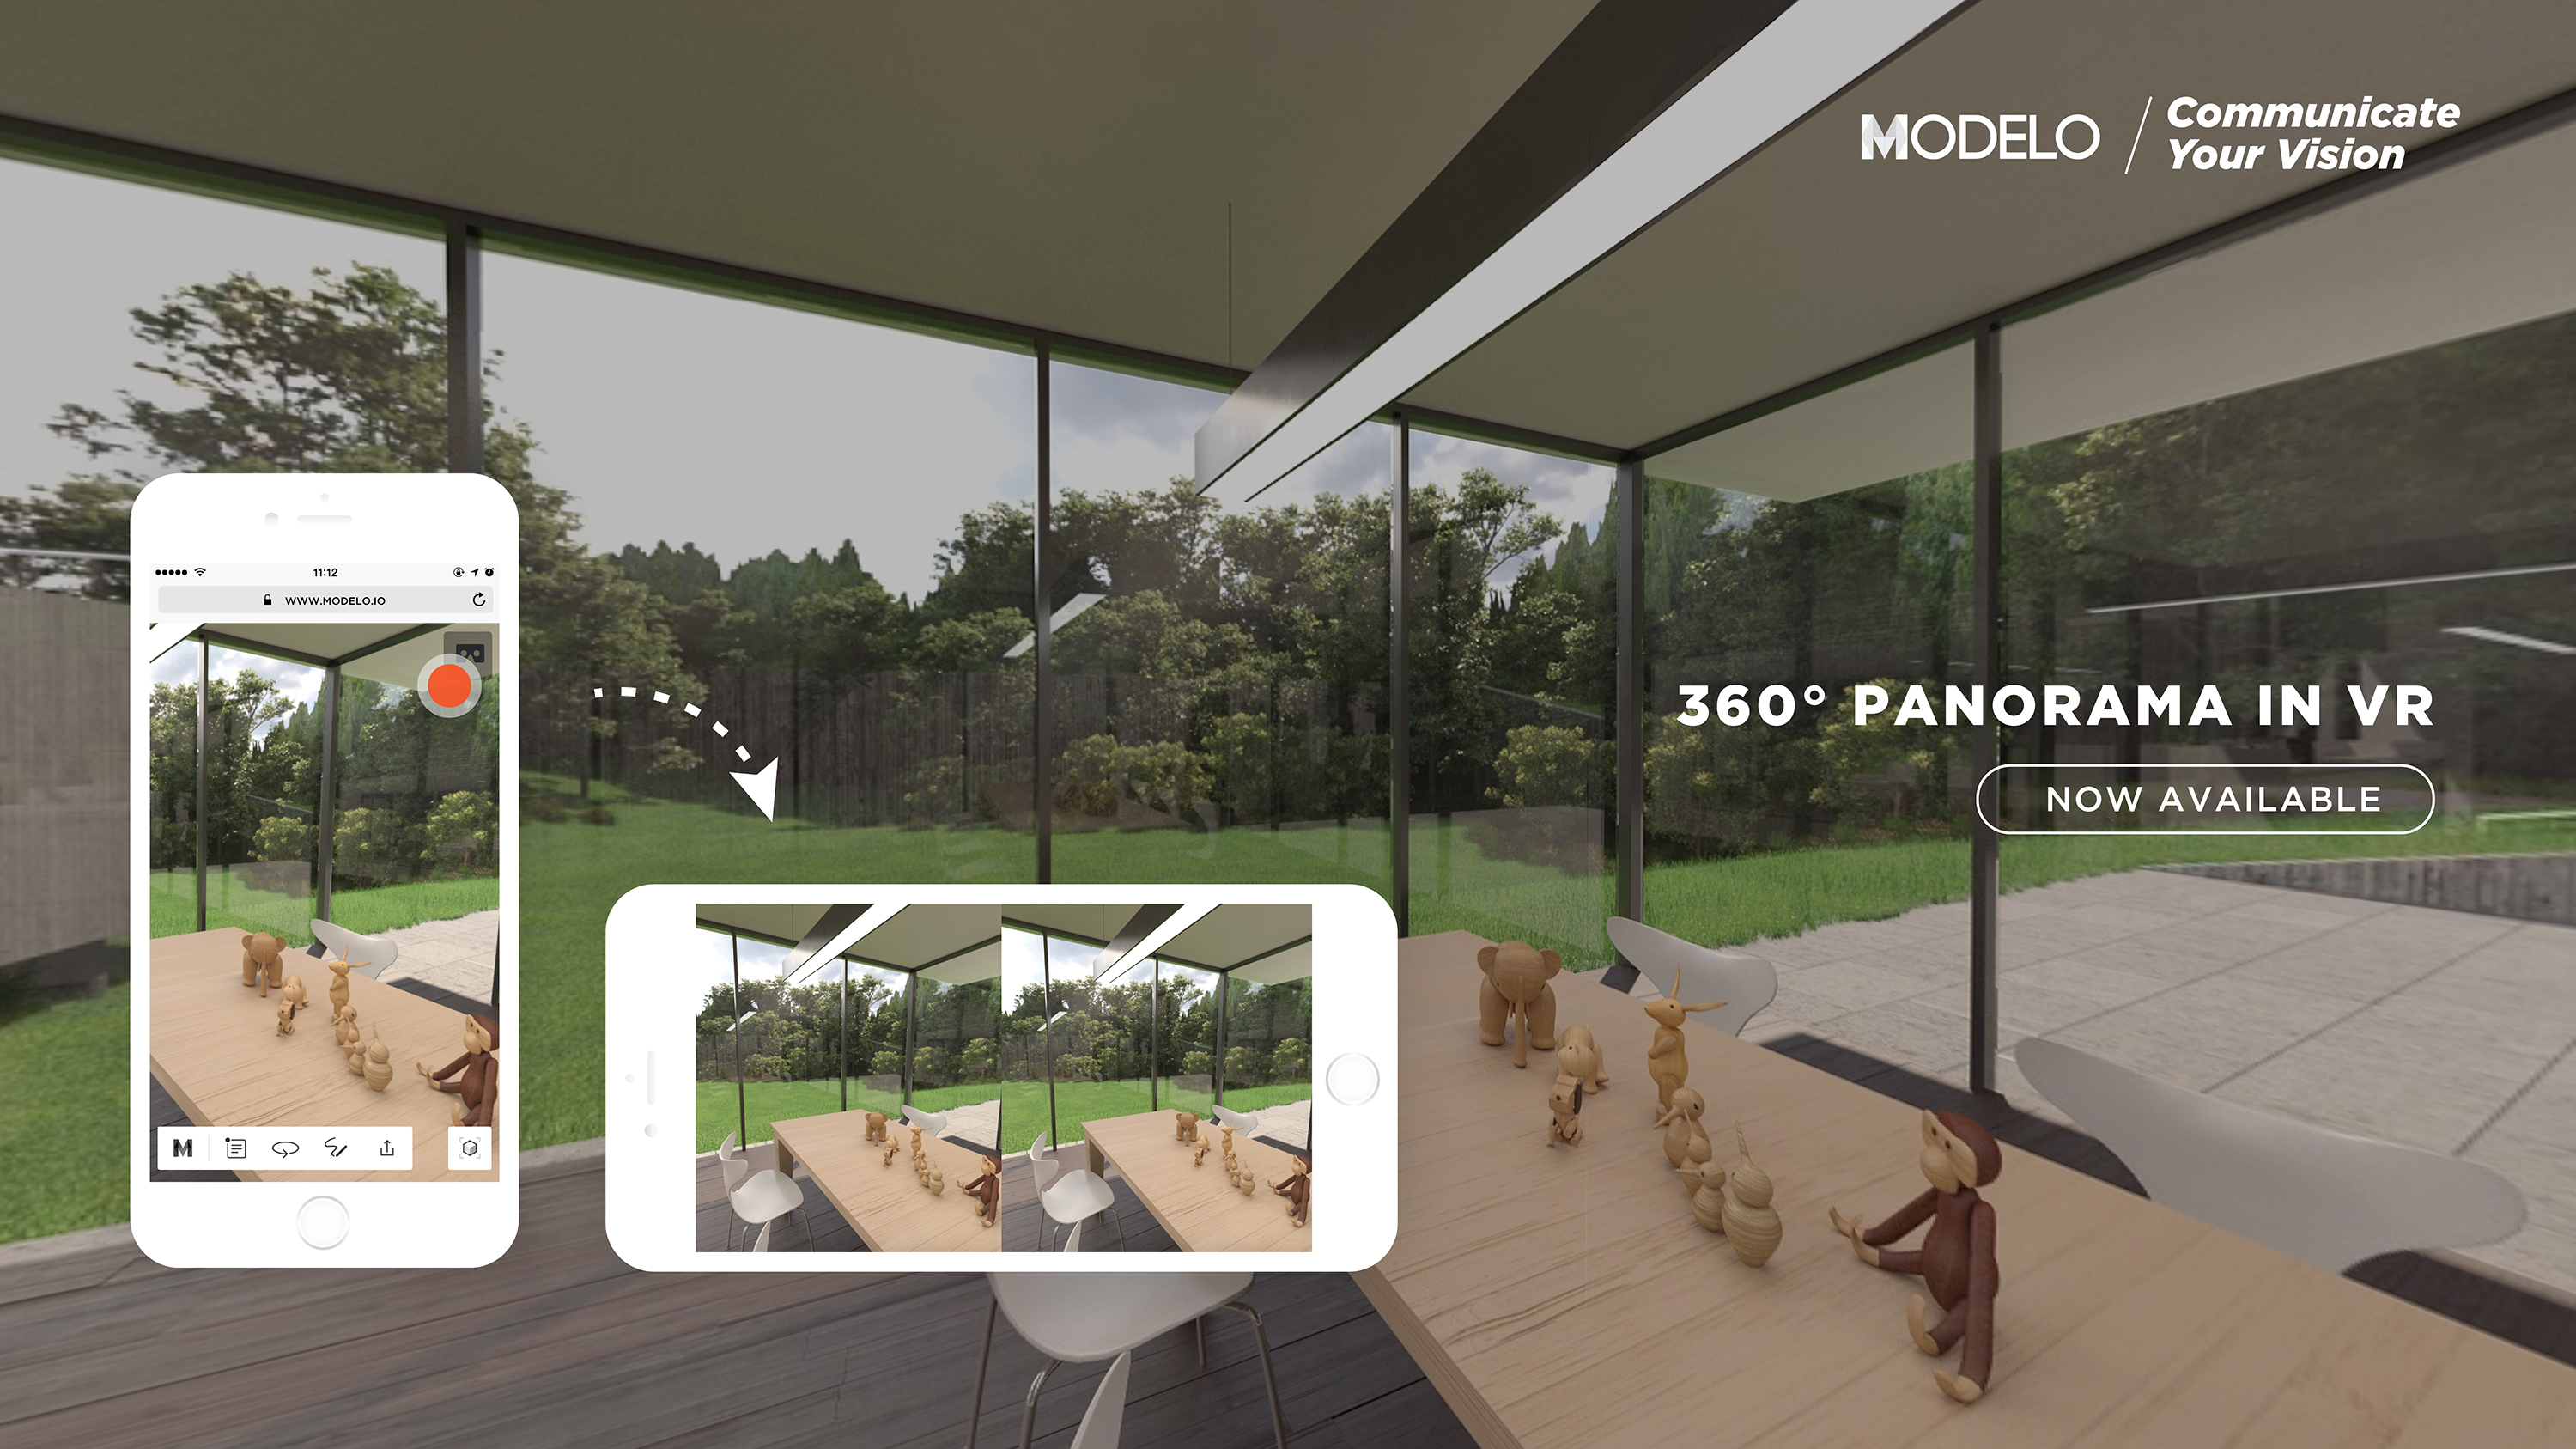
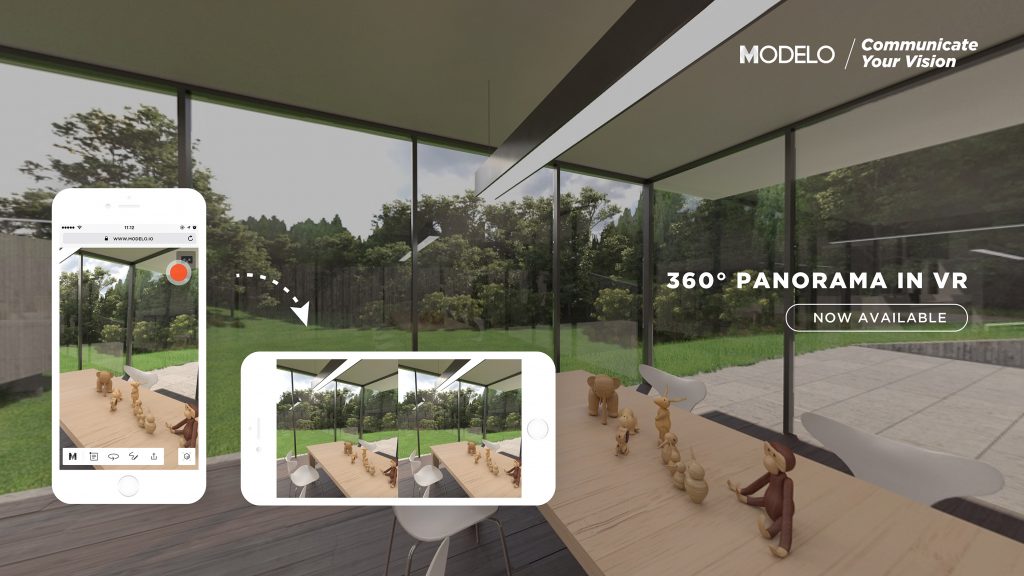
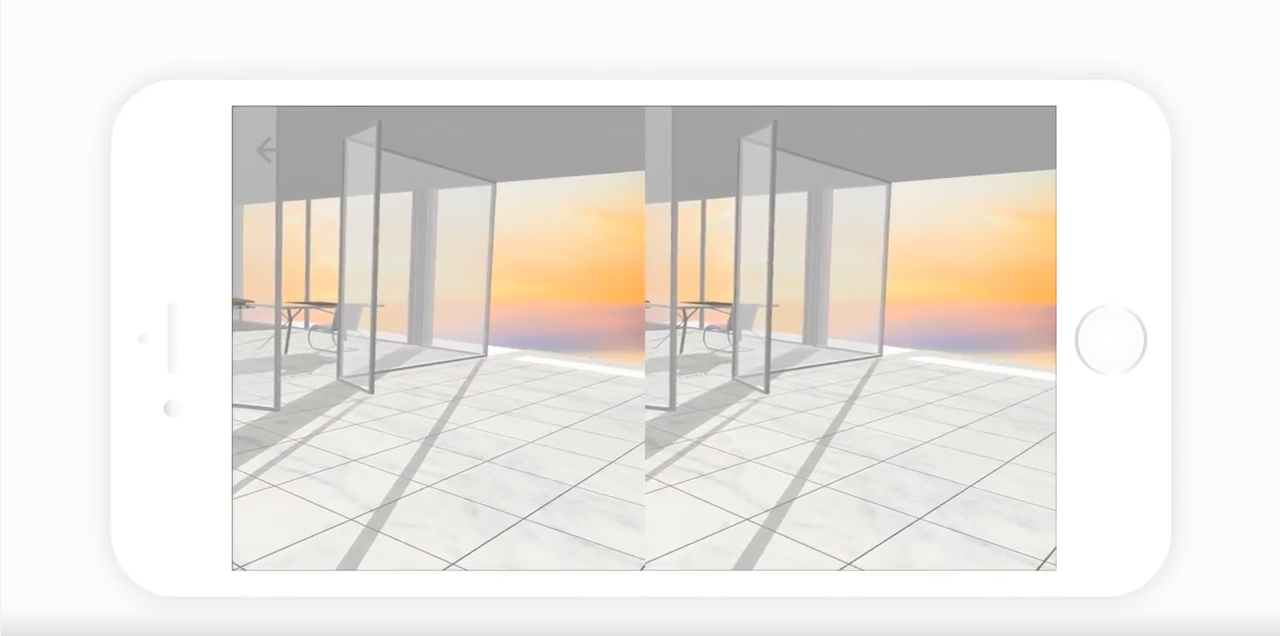
When you present your scenes in Modelo, you can elect to see these in virtual reality (VR), as a looping presentation that cycle automatically through your scenes, or create walkthroughs to really experience your design.
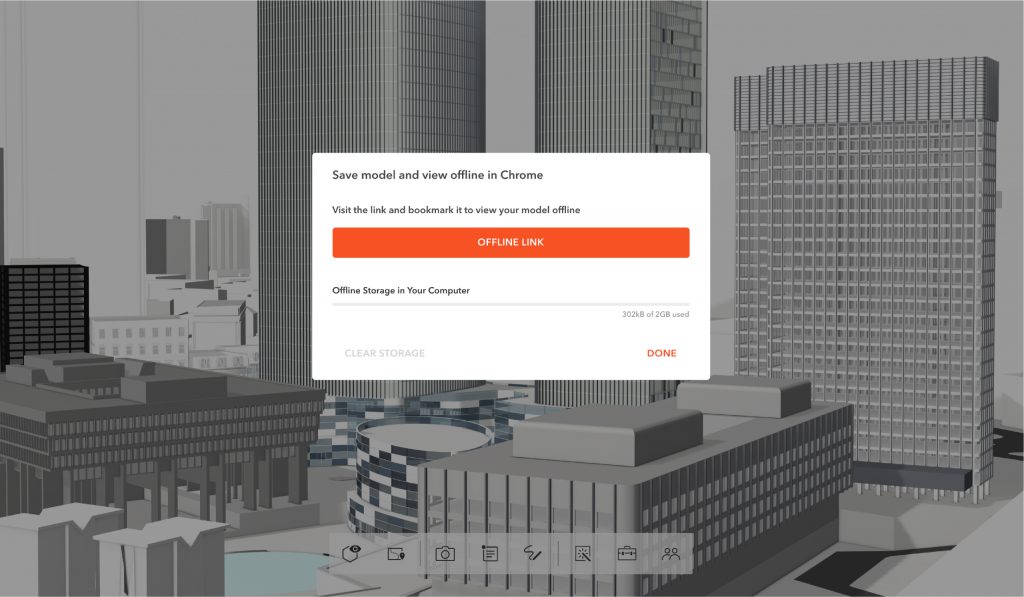
Download your designs and present them while you are offline with Modelo.

Save offline

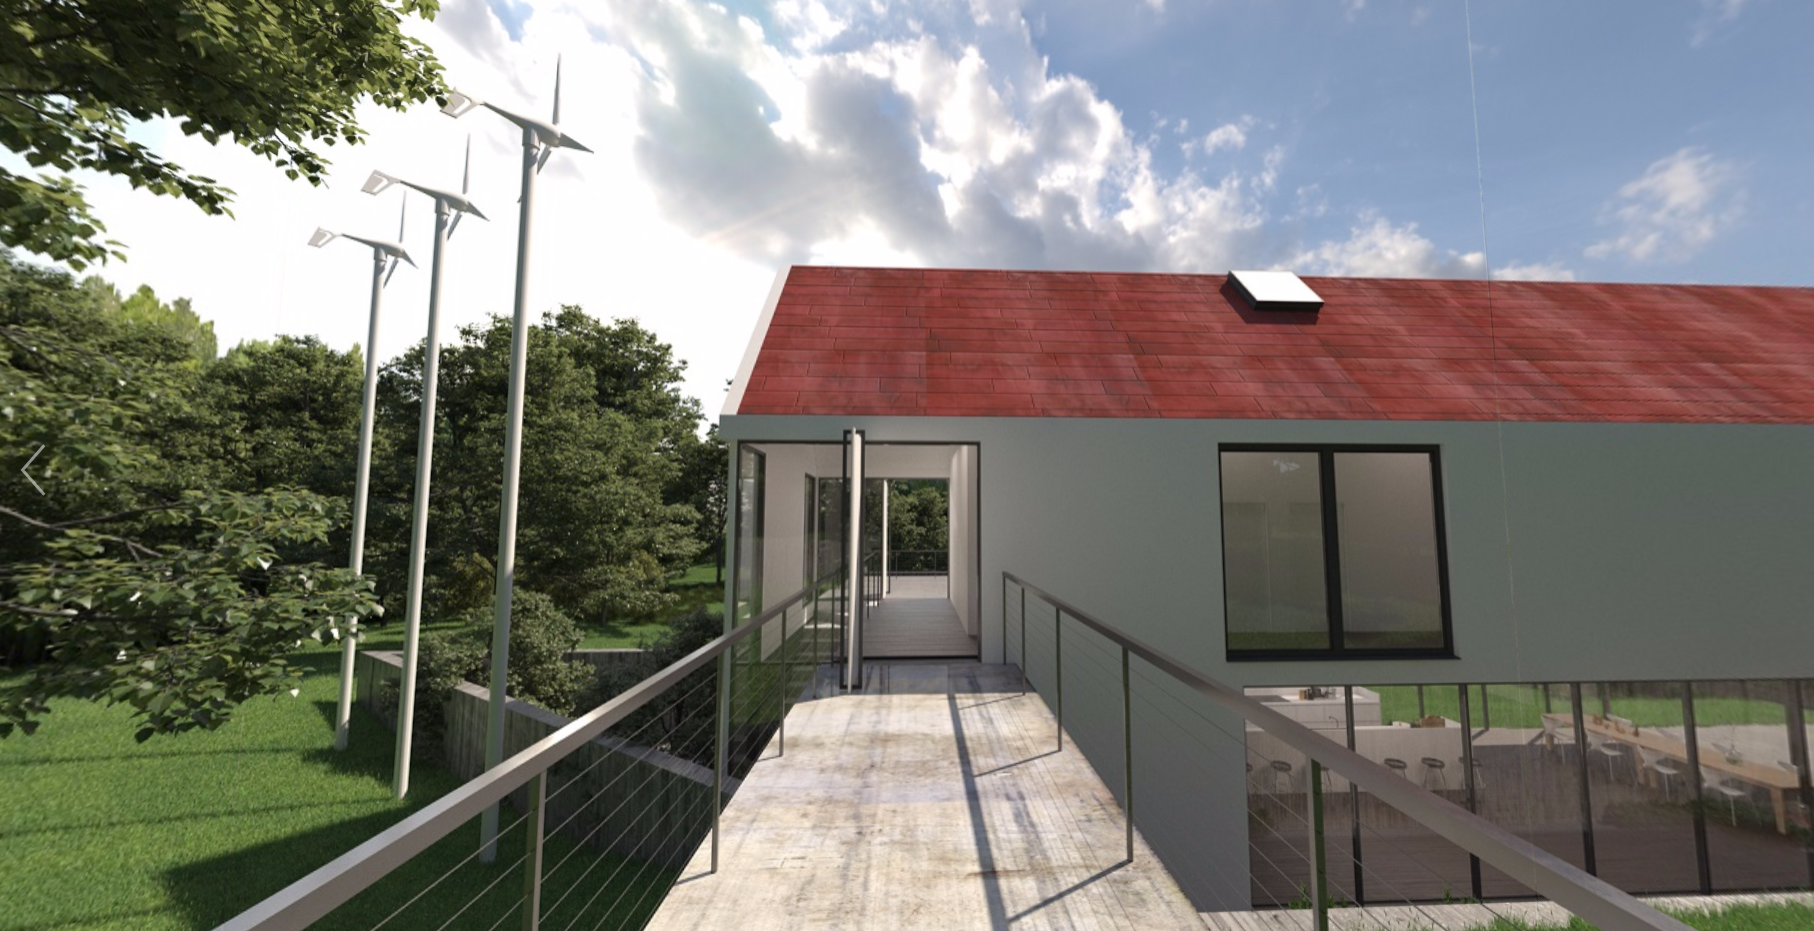
If you’re going to an area where the Internet is slow, mobile data is expensive or unreliable, or you can’t get online for any other reason, you can download your designs and present them while you are offline. All of the walkthroughs, comments, and markups you have created on your design will be saved so you don’t lose any presentation capabilities. You will still be able to present powerfully to your clients, explore your designs in detail, and communicate your vision with a highly rendered design even if you don’t have internet access.  

Customers who love this feature find it especially helpful when presenting in foreign countries or in an office where the Wi-Fi network cannot be accessed (such as many government institutions).

To save your designs for offline access, you are required to have a Modelo business account. Here is a step-by-step guide to saving your designs for offline access.

Modelo's Architect Effect lets you and your colleagues efficiently explore the design when you sit down for a design review.

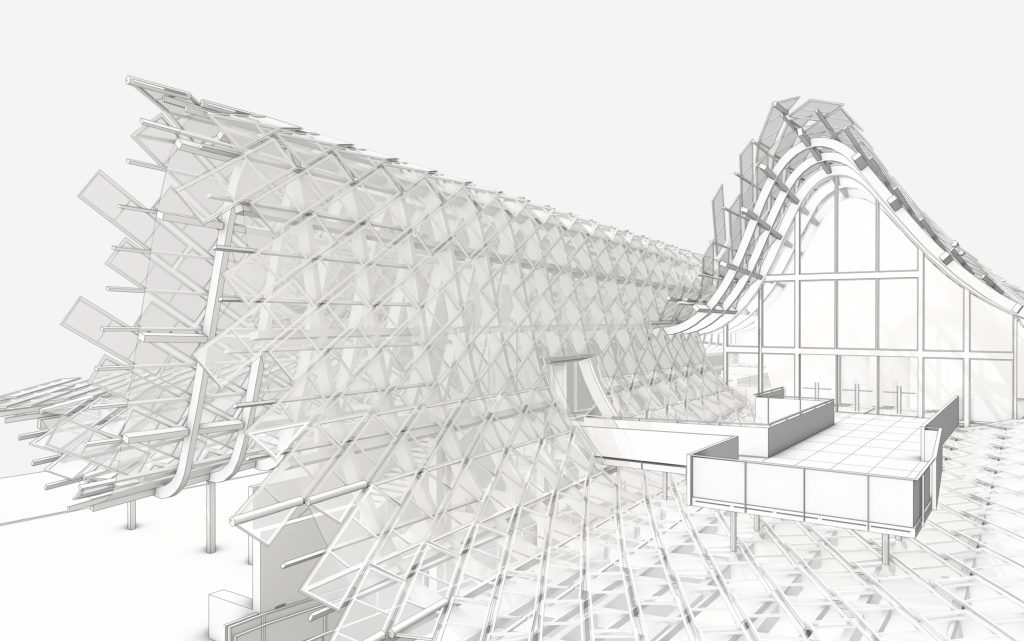
Architect Effect (and other design tools)

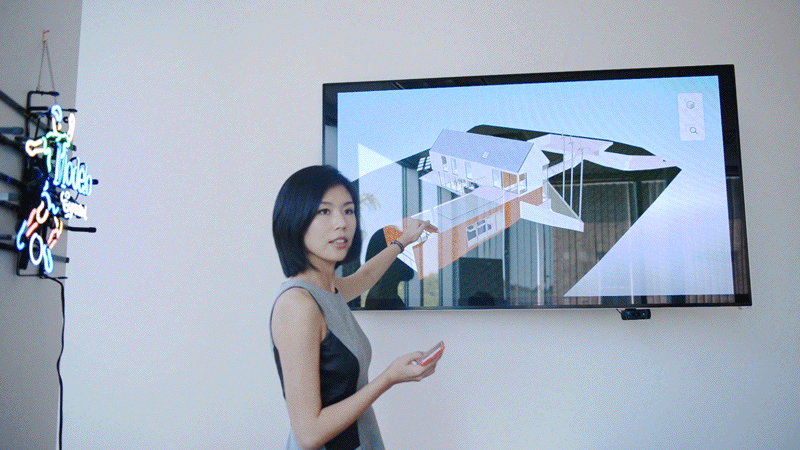
Clients love highly rendered, detail-rich designs to review. However, that doesn’t always make it easy to actually review your designs. To help with that, Modelo introduced an Architect Effect. This effect strips away all of the design elements to leave you a simple design of just your model that you and your colleagues can efficiently explore the design when you sit down for a design review.

To best suit your preferences, the Architect Effect can be displayed in a black and white, full color, or hand drawn effect.

Modelo's Architect Effect lets you and your colleagues efficiently explore the design when you sit down for a design review.

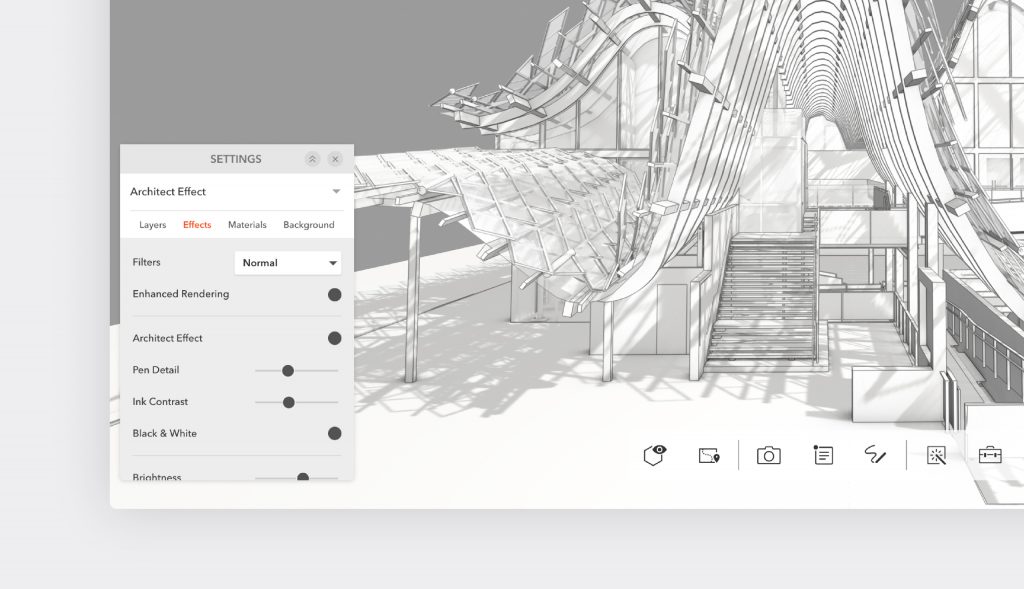
There are a host of other effects that you can apply to help further customize your design, depending on the client that you are working with, including:

    1. Filters: Apply different filters, such as blueprint, vintage paper, and dark sky over your design to create different looks.
    1. Enhanced Rendering: Add that little bit of extra polish to your design to create that ‘finished look’ before your client presentation by turning Enhanced Rendering on
  1. Brightness, light direction, and shadow: Adjust the brightness, latitude and longitude of your light direction, and your shadows to create a ‘time of day’ look to your presentations.
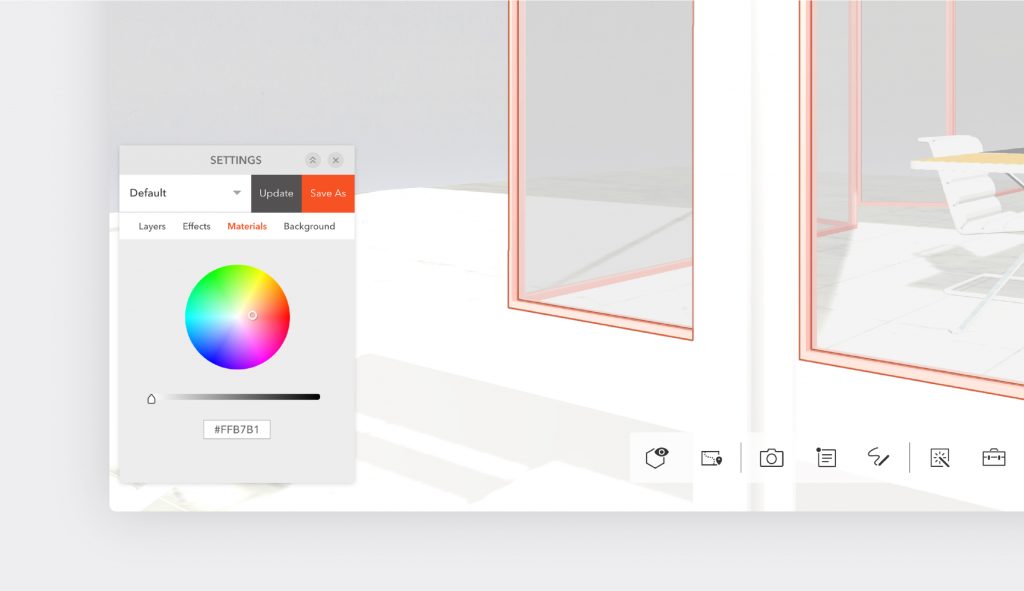
Use Modelo's Materials setting to call out a part of your design with a specific color.

Materials effect

Sometimes when you present to clients or colleagues you want to direct their attention to specific parts of the design. Use the Materials setting to call out a part of your design with a specific color.
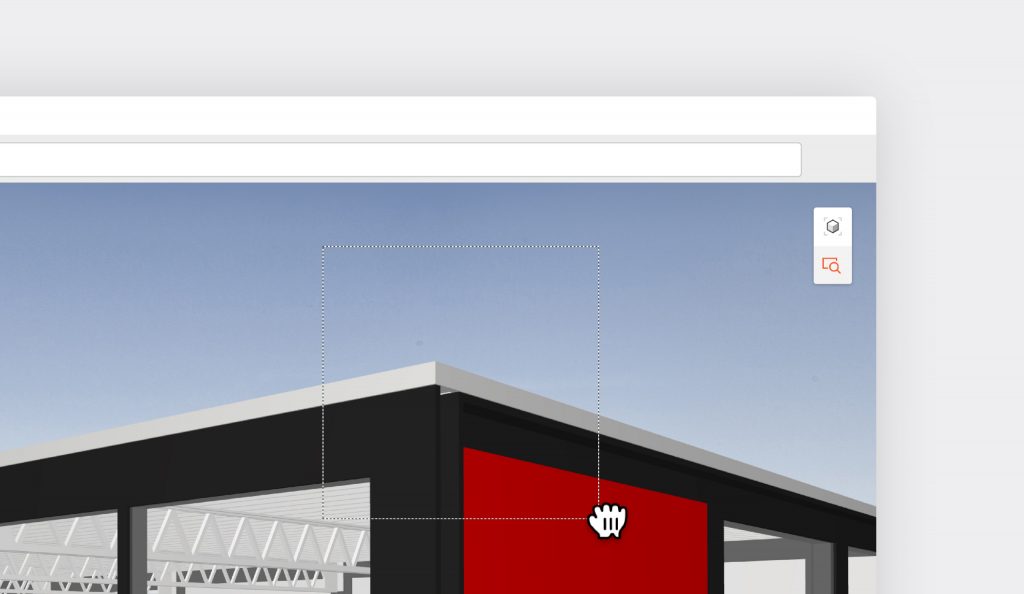
To quickly zoom into a part of your model you can click the magnifying glass icon and select the area you want to examine with Modelo.

Magnifying glass

To quickly zoom into a part of your model you can click the magnifying glass icon and select the area you want to examine. Conversely, if you want to zoom out of your model completely to see a particular perspective, click the directional cube directly above the magnifying glass icon and select either the top, front, or right perspective.
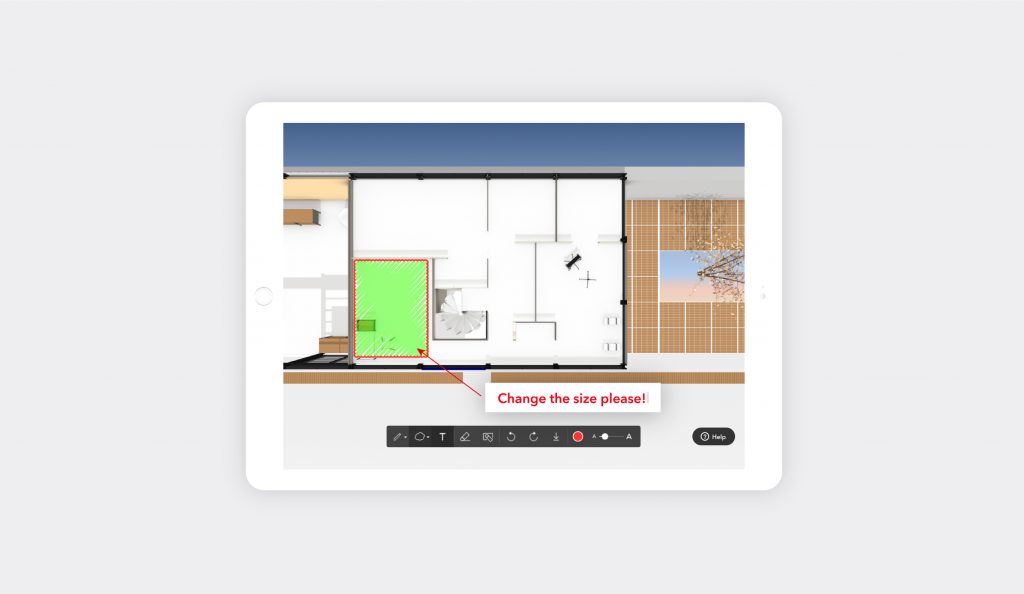
Modelo can satisfy all of your markup needs, and you can even choose your favorite hue.

Markup

Architects are all familiar with ‘Redlines,’ the ubiquitous way of marking-up corrections on a design. The good news is that Modelo can satisfy all of your markup needs, and you can even choose your favorite hue – you are not limited to just red!

After you navigate to the Sketch icon on your toolbar, you will notice that you have a multitude of markup options. They are all very self-explanatory, but the idea is that you can customize your feedback and make it appropriate for your audience. You can not only markup anywhere on your design, but you can also provide feedback on any files that you have uploaded to Modelo. Once you have completed providing your feedback, you can add any notes and share it with your colleagues.
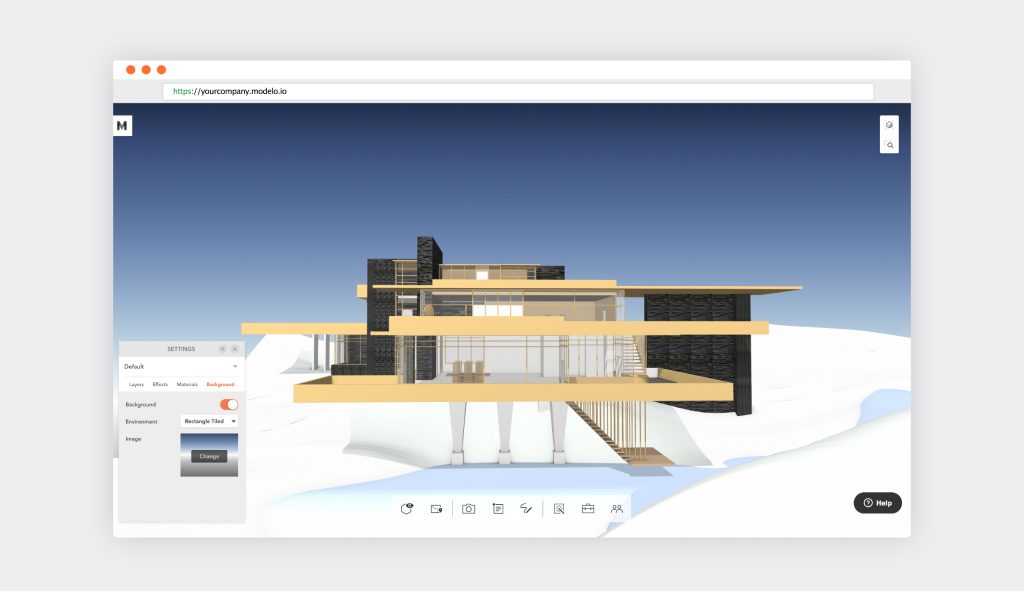
Extend your branding efforts or make your design really stand out with a customized background in Modelo.

Backgrounds

Extend your branding efforts or make your design really stand out with a customized background in Modelo. You can upload any image and then select how you would like it to be displayed (either as a rectangle, sphere, or tiled rectangle).

Use Modelo to explore your model in design reviews and present it to clients by toggling your layers on and off.

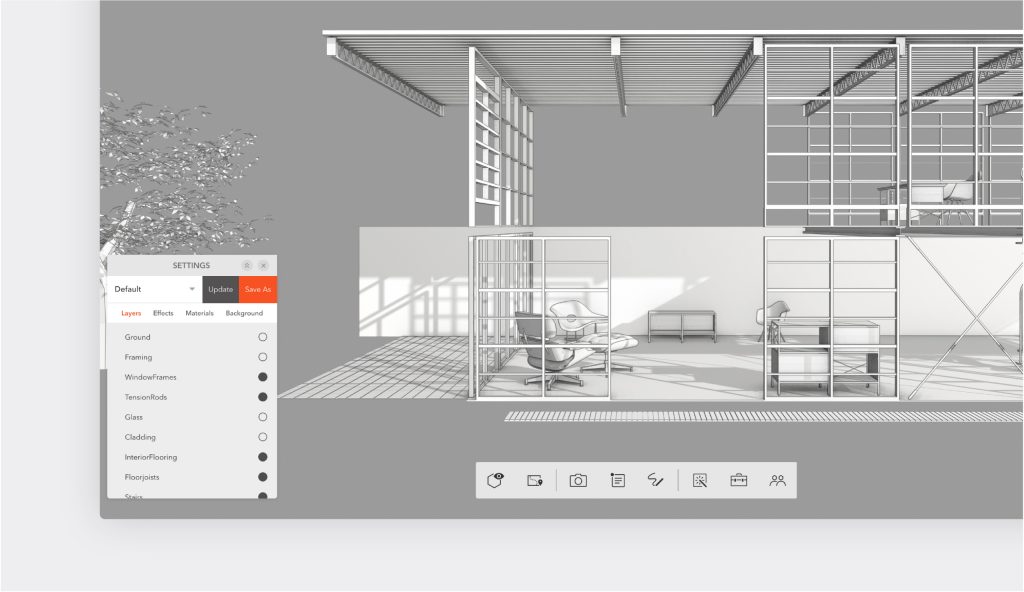
Toggle layers on and off

As you build your model in your preferred CAD software, you build it in layers. As you use Modelo to explore your model in design reviews and present it to clients, you can toggle your layers on and off.

Share the scenes of your design that you want clients to see with a unique URL.

Share designs

Almost everything you do in Modelo can be shared. Or, if you prefer, not shared. If some parts of your design aren’t ready for the client, don’t share those parts; only share the scenes of your design that you want them to see. Similarly, if you want them provide feedback on your design directly in Modelo, turn that functionality on. Walkthroughs can also be shared.

Your clients do not need a Modelo license to see what you share. All they need is a web-connected device (mobile phone, computer, tablet, etc). From there, all they have to do is click the unique URL that you generate and send to them directly from Modelo. There is no need to send them USBs or ask them to download anything from an FTP server or other file transfer service.

Share the scenes of your design that you want clients to see with a unique URL.

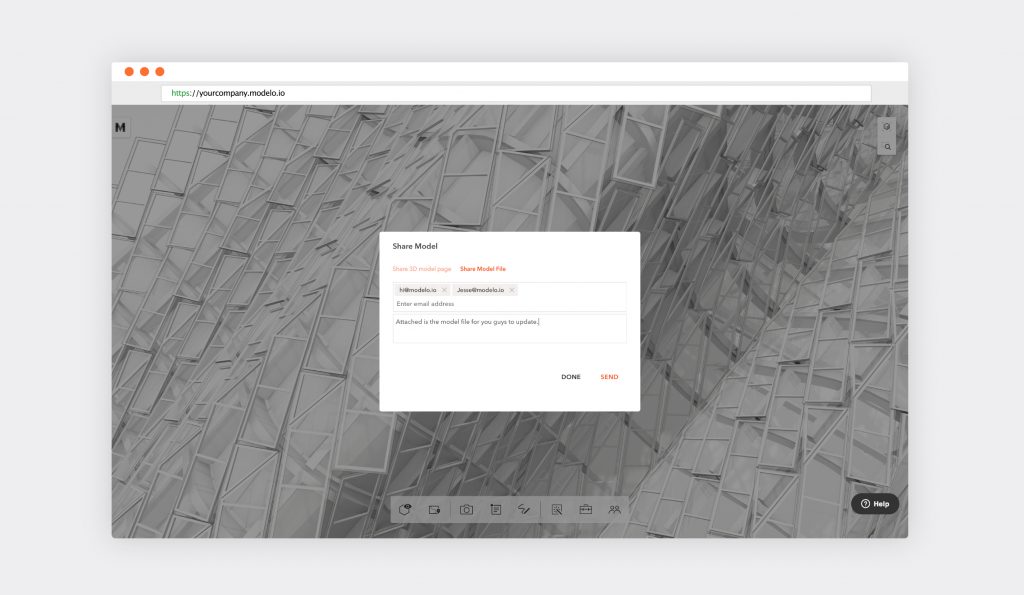
Clients told us that one major productivity gain they achieve by using the share link is by sharing their designs with clients ahead of their meeting and asking them to review it. Then, when they are in the meeting, they are using that time to dive into the client’s feedback to then translate that understanding into improving their design when they are back in the office.

Learn more about sharing designs using Modelo here.  
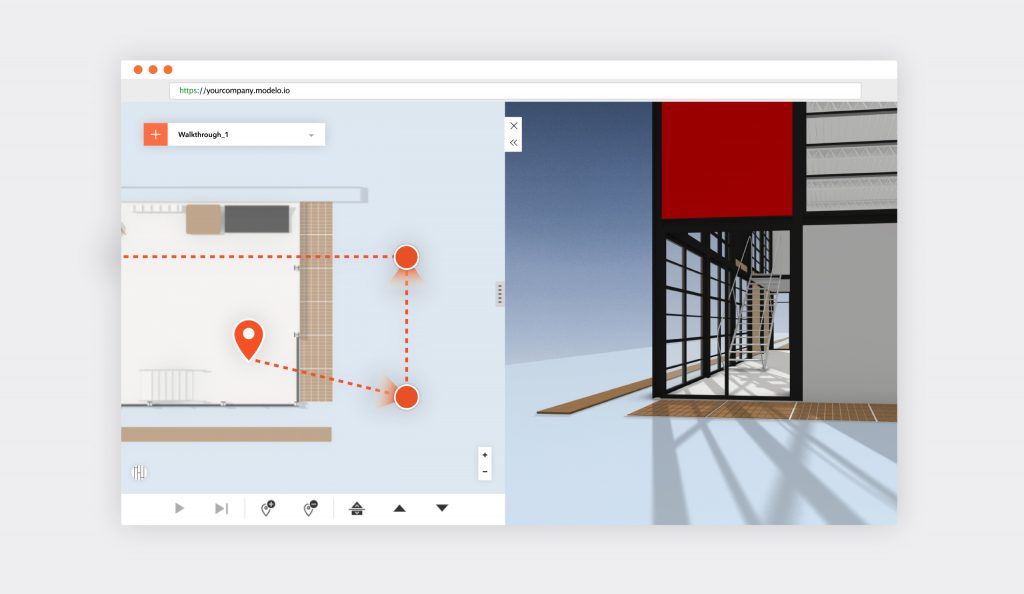
Create animated walkthroughs in minutes with Modelo.

Walkthrough

Creating animated walkthroughs of your designs can take hours. In fact, before architects started using Modelo, almost two-thirds of them spent at least one day creating each walkthrough. Now, they create animated flythroughs within minutes. Once they have uploaded their design, they simply select the walkthrough tool from the Modelo toolbar, drop their waypoints, and select the camera direction. What previously took hours, now only takes minutes. What’s more, you can share your walkthroughs with clients and colleagues alike.

Read a comprehensive summary of creating walkthroughs in Modelo.

Summary

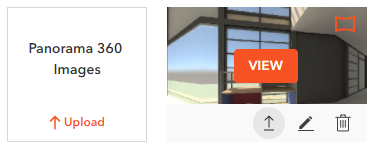
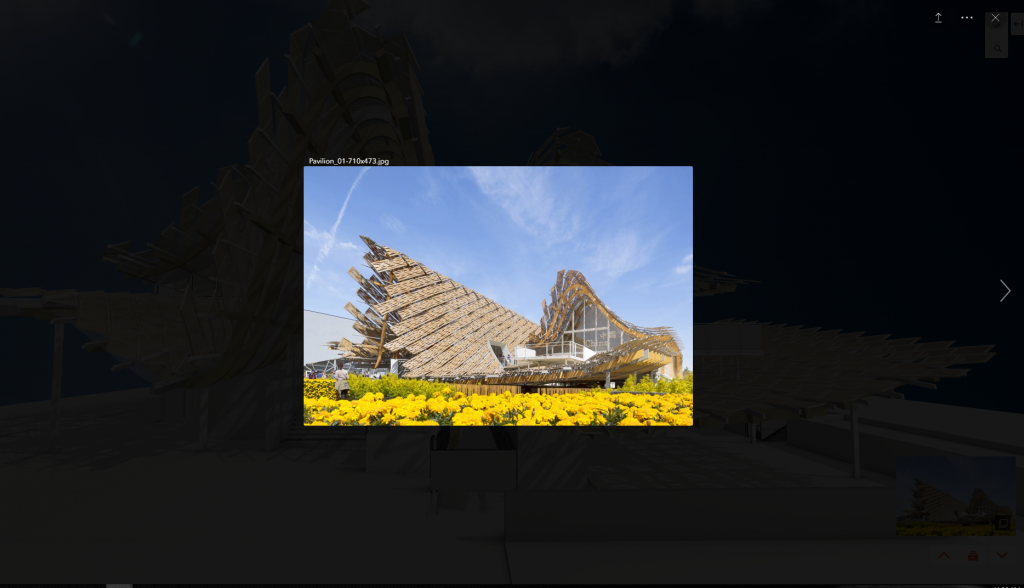
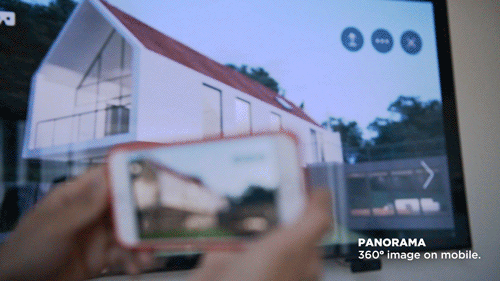
The 11 tips listed above have been proven to increase productivity for architects and industrial designers alike, particularly when they are working with their colleagues and presenting to clients. It is not an exhaustive list and there is certainly a lot more value still to be explored with Modelo, like embedding your design on your website, exploring your design in virtual reality, or uploading panorama images.

If you are not already a Modelo user, set up a FREE forever account today in 90 seconds. Then, upload your own model and see how much more productive Modelo can make you.

Use Architect Effect to views designs in black and white and impress clients with Modelo.

About Modelo

Modelo is a cloud-based software application used extensively throughout the architecture and industrial design, retail space planning, construction, and real estate industries. Created by a Harvard-educated architect and Rhode Island School of Design industrial designer, every aspect of Modelo has been designed to help professionals in these industries better communicate their vision. There are obvious applications for Modelo when presenting to clients, but internal communication with colleagues and partners can also be expertly facilitated through Modelo.

Attaching 2D Images to 3D Views in Modelo

In Modelo, 2D attachments can be connected to 3D views as a way to enhance presentations. This feature allows for high quality renderings, 360º panorama images, drawings, floor plans, images and more to be included with your model as part of a 3D slideshow. This is done by attaching items from your Assets to the Comment Cards you’ve created for the model. The best part is, it’s super easy to do, here’s how:

First, when in your Project Page, click on the “Assets” tab. From there, you can create folders to categorize the different 2D assets you are uploading. Once a folder has been created, you will be able to start uploading your 2D assets. And once the items are in your assets folder, they can be attached to your 3D Comment Cards.

For an overview of how to create Comment Card in Modelo, check out this video.

You will notice at the bottom of each Comment Card, there is a paperclip icon used to make attachments. Click on that and you will be prompted to upload your file from your assets. Once the attachment is made, you are able to click on the comment card and pull up the image.

When viewing in Present mode, you will be able to cycle through the comment cards on full screen and the attachments to each comment card will be previewed on the bottom right of the screen, where you will be able to pull them up during your presentation. In this way, Modelo allows you to integrate 2D assets into your 3D presentation.

Here is a complete overview of how to create interactive presentations in Modelo:

Next up, learn how to integrate 360º panorama images into interactive presentations for an overall more immersive experience for project stakeholders. Start creating all-inclusive, amazing presentations today with Modelo for FREE.

Create Quick CAD Presentations with Your Phone

As designers, we always want to share our ideas with the people we work with, take in valuable feedback, and inspire others so we can work as a team and make contributions to the project.

By using Modelo, you can simply present your ideas instantly using only your phone. By using Airplay, your phone and a TV screen to display, you can give easily a presentation to everyone in the room.

Modelo is an online platform that allows you to upload your 3D/CAD models and access your model in the cloud, across different devices. Beyond that, people can collaborate with you on the same 3D model you’ve uploaded, by only using the web browser they have on their device.

That means, your clients (or virtually any project stakeholder), with or without the professional knowledge of CAD modeling, are able to access to the model and navigate through them on their own. It’s easy to navigate the Modelo platform and it’s an intuitive place for anyone to participate in 3D/CAD design.

Further, you or anyone on your team, can access to the CAD model anytime and anywhere. Simply open your 3D model and mirror it on a bigger screen to share your thoughts and collaborate instantly throughout the entire design process. With Modelo’s advanced technology, you can not only give the presentation, but also impress everyone with this revolutionary method!

  1. Comment cards

Present comment cards on the spot that you want to talk about and whenever you tap on that comment card, the system will bring you back to that exact location you have set. You can share those comment cards with everyone on your team. The best part is that you get to decide which comment cards you want to share and with whom by using the “client-ready” option.

  1. Walkthrough

Modelo automatically generates a floor plan of the 3D model, prompting you to drop waypoints on the floor plan. Modelo then connects the dots to create a path that allows you to tour the design instantly, at your desired speed and you can stop or restart whenever you want. This is the simplest and best walkthrough tool you can get on the market. Coupled with the great instant rendering style, your walkthrough can look like a v-ray animation and you don’t even need to render it. Simply DROP dots and instantly PLAY the animation.  

3. Panorama

It’s now possible for you to upload and view a 360° Panorama image and access it across all devices, as well as view it in VR mode with one click using Modelo. It’s an all-inclusive platform for panorama and VR. By using Google Cardboards and Modelo, you can hand-deliver a great panorama VR experience for your teammates or clients. It’s convenient, fast and overall a more immersive way to learn more about the design you are working on.

You can watch the full video here. Try Modelo today to start presenting CAD files instantly and collaborating in 3D with your team. 

View Rhino Files in VR with Modelo

Experiencing your Rhino models in VR has never been easier with Modelo. The first step is uploading your Rhino model into Modelo. We’ve created a guide for how to do that here:

Once your Rhino model has been converted to Modelo, you can create customized VR experiences for your team to use when evaluating design options and for your clients to engage with and understand your design vision throughout the process.  

Our unique comment card feature allows for custom VR experiences for Rhino models. Views and design options created in Rhino are imported to Modelo as comment cards and new views can be created and saved as comment cards within Modelo. These 3D views are very easy to create and are a powerful tool for VR.

When viewing your Rhino models in VR, these 3D views can be cycled through using the clicker on your google cardboard. This allows Rhino VR to be applied easily throughout the design process for team collaboration and client communication. Your team will be able to use Modelo to instantaneously visualize different design options, allowing more informed decision making and better design work. For client communication purposes, the 3D views can be arranged to create a VR walkthrough tour of your Rhino model. Learn how to create VR tours in Modelo here.

The beauty of using Modelo for your Rhino files in VR for client communication is how easily it can fit into your workflow. Your Rhino VR experiences can be shared with clients instantaneously with a URL link. Your client doesn’t need to download any application or software, nor do you need to implement a complicated VR setup.  

All clients need to experience your vision in VR is a mobile device, an internet connection, and a Google Cardboard. Bring some branded Google Cardboards to your onsite presentation for an added layer of engagement, or send them over to your client in advance so they can view your model in VR and provide educated feedback throughout the design process. Implementing VR into your worklfow and using it to deliver on client expectations has never been easier than it is with Modelo.

Learn about our VR requirements and our compatibility with Google Cardboard. Sign up to Modelo for FREE today to start viewing Rhino files in VR!

5 Creative Ways to Use 360º Panorama Images

360º panorama images elevate your collaboration processes and design presentations to the next level. Not sure how to integrate them into your workflow? We’ve outlined 5 creative ways to use 360º panorama images with Modelo.

Bring 360º panorama images into VR with the click of a button for an immersive experience

  1. For your client to better understand your vision for the project, it helps for them to understand the space the structure will occupy. Immersing them in the environment, especially if it is a nice area, provides a better user experience that will surely impress your client throughout the design process.
  2. Tracking your progress and understanding your design better is crucial. Further, adding a comment card with a new 360º panorama image every week of the same view of your project allows you and your client to understand the progress of the project without ever having to step foot in the design.
  3. When giving a presentation about an actual place, like Davis Square in Cambridge, MA as our CEO, Qi Su did, panoramas are complementary. While designs are great, an immersive 360º panorama gives better context of the designs for the viewer. Check out how easy it was for him by clicking here!
  4. Sometimes your design is not exactly where you want it to be yet and you need some inspiration for your design. By attaching a 360º panorama of an additional image in a comment, you can better communicate your vision with inspirational images to project stakeholders. 
  5. Last but certainly not least, now you can view 360º panorama images in virtual reality with the click of a button to truly create an immersive, realistic experience. Learn how to best utilize Google Cardboards to upgrade your design process.

Want to learn more about using panorama images to enhance your design process? Check out Modelo’s introduction to panorama and how to embed panorama images on your website.

Convert 3ds Max Files to VR fastier and easier with Modelo

Converting your 3ds Max files to VR has never been easier. By using Modelo’s 3ds Max plugin you can effortlessly drag, drop, and upload your 3D model from 3ds Max to create 3ds Max VR presentations faster and easier than anything available on the market by following these simple steps:

  1. Within your Modelo account, you can download and install the 3ds Max exporter. Once installed simply open your 3D design in 3ds Max, click the Modelo tab within 3ds Max and select the “Export Scene to Modelo” option. From there 3ds Max will prompt you to input an “upload token” which is found in the Modelo browser.
  2. On the projects page simply click the “Upload Token,” go to the folders tab and select “3ds Max to VR in Modelo” which will give you your “Upload Token” to copy. Go back to 3ds Max, and paste the token into the “Export to Modelo” window, hit upload, and start to upload the model to Modelo. Refresh the Modelo screen and you will see that in seconds your model will be uploaded onto the Modelo projects page. Now you are ready to view in VR.
  3. To prepare your mobile device to view in VR make sure your turn on the “Do not disturb” option so that when you are in VR, you won’t be interrupted by notifications from your other apps. Also, turn off the “Orientation Lock.”On any mobile device, you are able to open your Modelo browser and find the 3ds Max model you uploaded. Open the project and click “View 3D.” Find the VR icon in the bottom right hand corner of your phone, click on this VR icon and then rotate your phone 90 degrees, slide it into a Google Cardboard, and view your 3ds Max files in Virtual Reality.

For a guided step-by-step tutorial of how to convert 3ds Max files to VR, watch the video above. Next up, learn how to create VR tours of your 3D models and sign up for a FREE account with Modelo.